The certificate-based authentication for Azure IoT works like this:
- There will be a root certificate signed by a certificate authority.
- The root certificate will be uploaded to the Azure IoT Hub.
- For each IoT device we want to authenticate, we will create a separate client certificate, signed by the same certificate authority.
- At the time of the authentication, our IoT device will present the client certificate as the proof of identity.
- Azure IoT Hub will verify the identity based on the root certificate and the device name.
This document details how to create a certificate authority, a root certificate, and the client certificate(s).
As a first step, we need to generate the certificate hierarchy.
Create the following folder structure on your local drive to hold the various certificates in the hierarchy that we will be generating:
iotcerts/
├── ca/
└── certs/
    ├── device/
These are the steps that need to be completed for the certificate hierarchy:
Create Root Certificate
Generate a private key file (ca.key) for the Root CA using the command below. You may choose to enter a passphrase to be associated with the ca.key file as well.
openssl genrsa -des3 -out ca/ca.key 4096
Generate a self-signed certificate (ca.crt) for the Root CA using the command below. This command generates a new self-signed X.509 certificate named "ca.crt" valid for 3650 days (10 years) using the RSA private key "ca.key". You will be required to enter the pass phrase associated with the private key file "ca.key".
openssl req -new -x509 -key ca/ca.key -days 3650 -out ca/ca.crt
|
There are a number of fields associated with the creation of the certificate. Fill them out with your relevant details.
Example CA Creation
$ openssl req -new -x509 -key ca/ca.key -days 3650 -out ca/ca.crt
Enter pass phrase for ca/ca.key:
You are about to be asked to enter information that will be incorporated
into your certificate request.
What you are about to enter is what is called a Distinguished Name or a DN.
There are quite a few fields but you can leave some blank
For some fields there will be a default value,
If you enter '.', the field will be left blank.
-----
Country Name (2 letter code) [AU]:US
State or Province Name (full name) [Some-State]:KS
Locality Name (eg, city) []:Stilwell
Organization Name (eg, company) [Internet Widgits Pty Ltd]:Cirrus Link Solutions
Organizational Unit Name (eg, section) []:Support
Common Name (e.g. server FQDN or YOUR name) []:CLS Example Root CA
Email Address []:
$
|
You should have the following files created:
chariotcerts/
├── ca/
   ├── ca.crt
   ├── ca.key
Depending on the version of openSSL that you are using, you may see additional .srl files created which contain the signed certificate's unique serial number. These files are not used directly by the modules and not included in the certificate hierachy displayed above.
Create Client (Device) Certificate
Import Server Configuration to IoT Hub
On the IoT Hub resource Overview page, click “Certificates” menu on the left blade, and click the “Add” button.
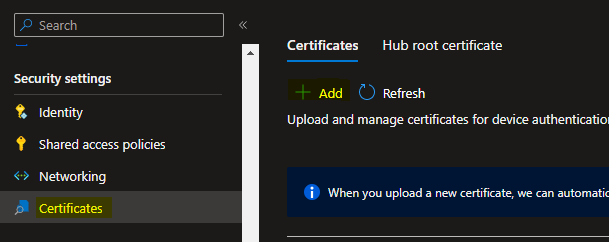
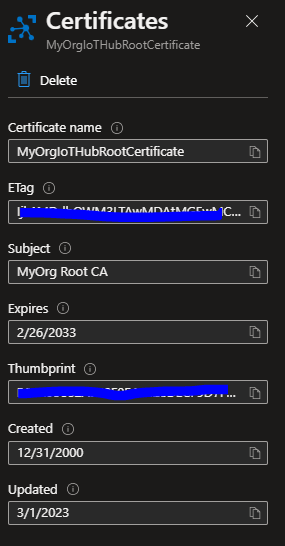
In the “Certificates” blade that appears, give a certficate name (eg. MyOrgIoTHubRootCertificate).
Browse to the IotCerts/rootca folder on your computer and import the rootca.pem. Check the “Set certificate status to verified on upload” checkbox.
Click Save.
Create Logical Device myiotdevice1
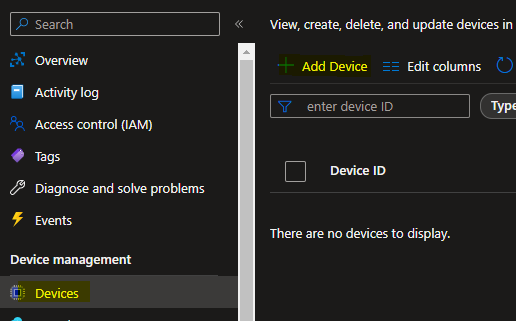
On the resource Overview page, click “Devices” menu on the left blade, and click “Add Device” button.
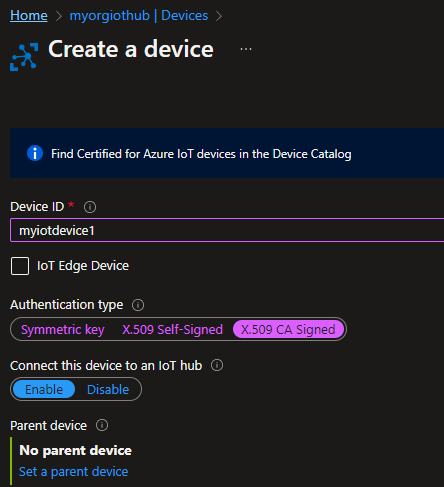
In the “Create a device” page that appears, give myiotdevice1 as the Device Id.
Select Authentication type X.509 CA Signed. Keep “Connect this device to an IoT Hub” as Enabled.
 it
it
Click Save.