The Azure Injector module provides the ability to push Tag data to an Azure IoT Hub or Azure Event Hub. The settings configuration for this module are located under the Configure tab of the Ignition Gateway web UI in the left hand navigation pane under 'Azure Injector Settings'. Once in the configuration section there are five tabs: General, Azure IoT Hubs, Azure Event Hubs, Sets, and Tag Agents. Each of these tabs is described in detail in the following sections.
General
The first tab contains the general settings for the Azure Injector module.
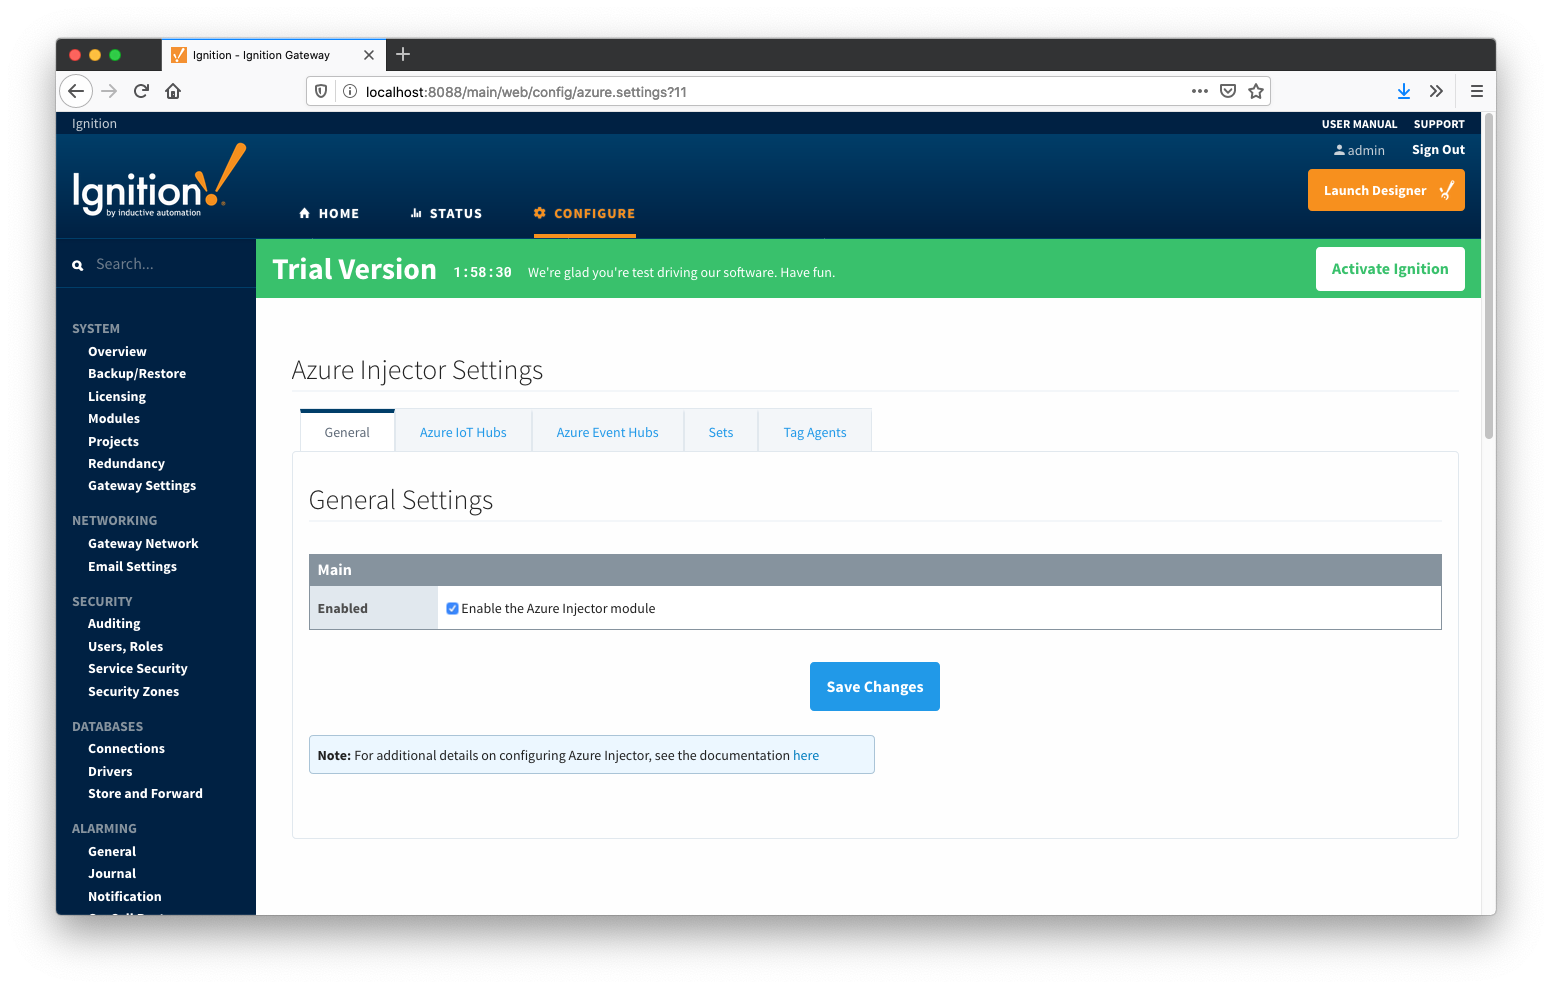
The general configurations options available on this tab are listed below:
Main
- Enabled
- Sets whether the module is enabled or disabled. If disabled, the Tag Agents will not run and now data will be pushed to any configured endpoints.
Azure IoT Hubs
The next tab is the list of Azure IoT Hub endpoints that the module should connect to to push tag data.
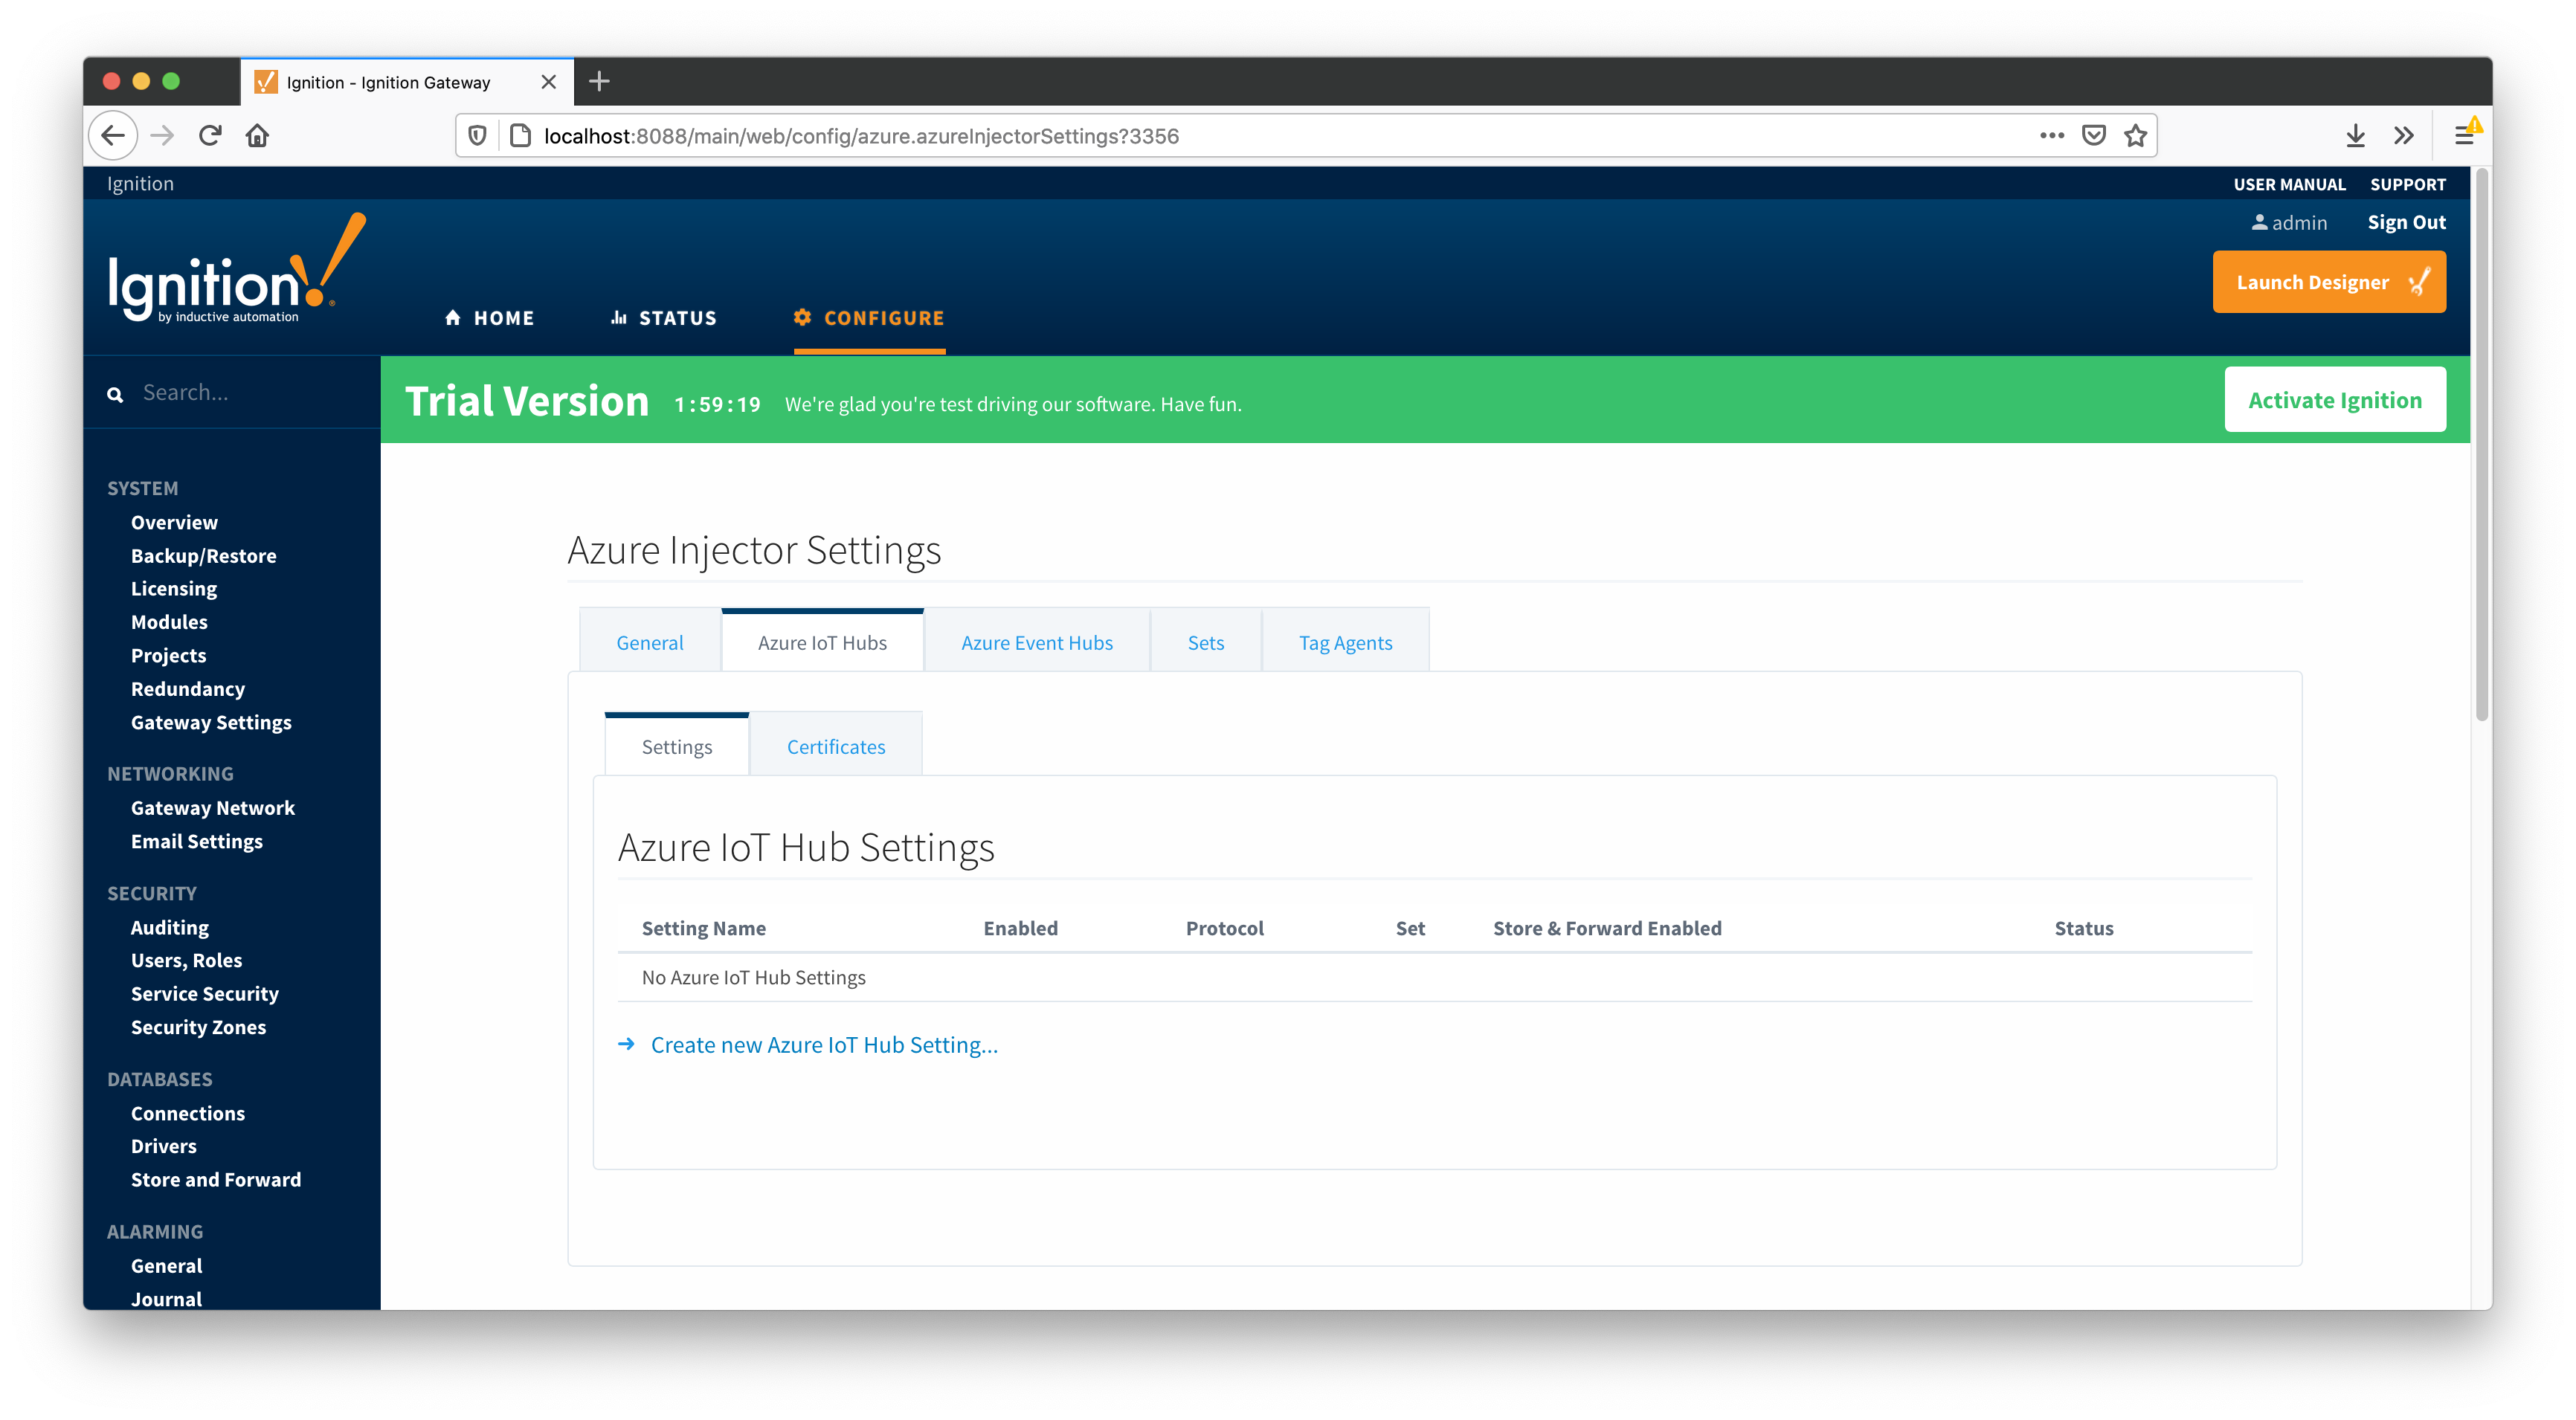
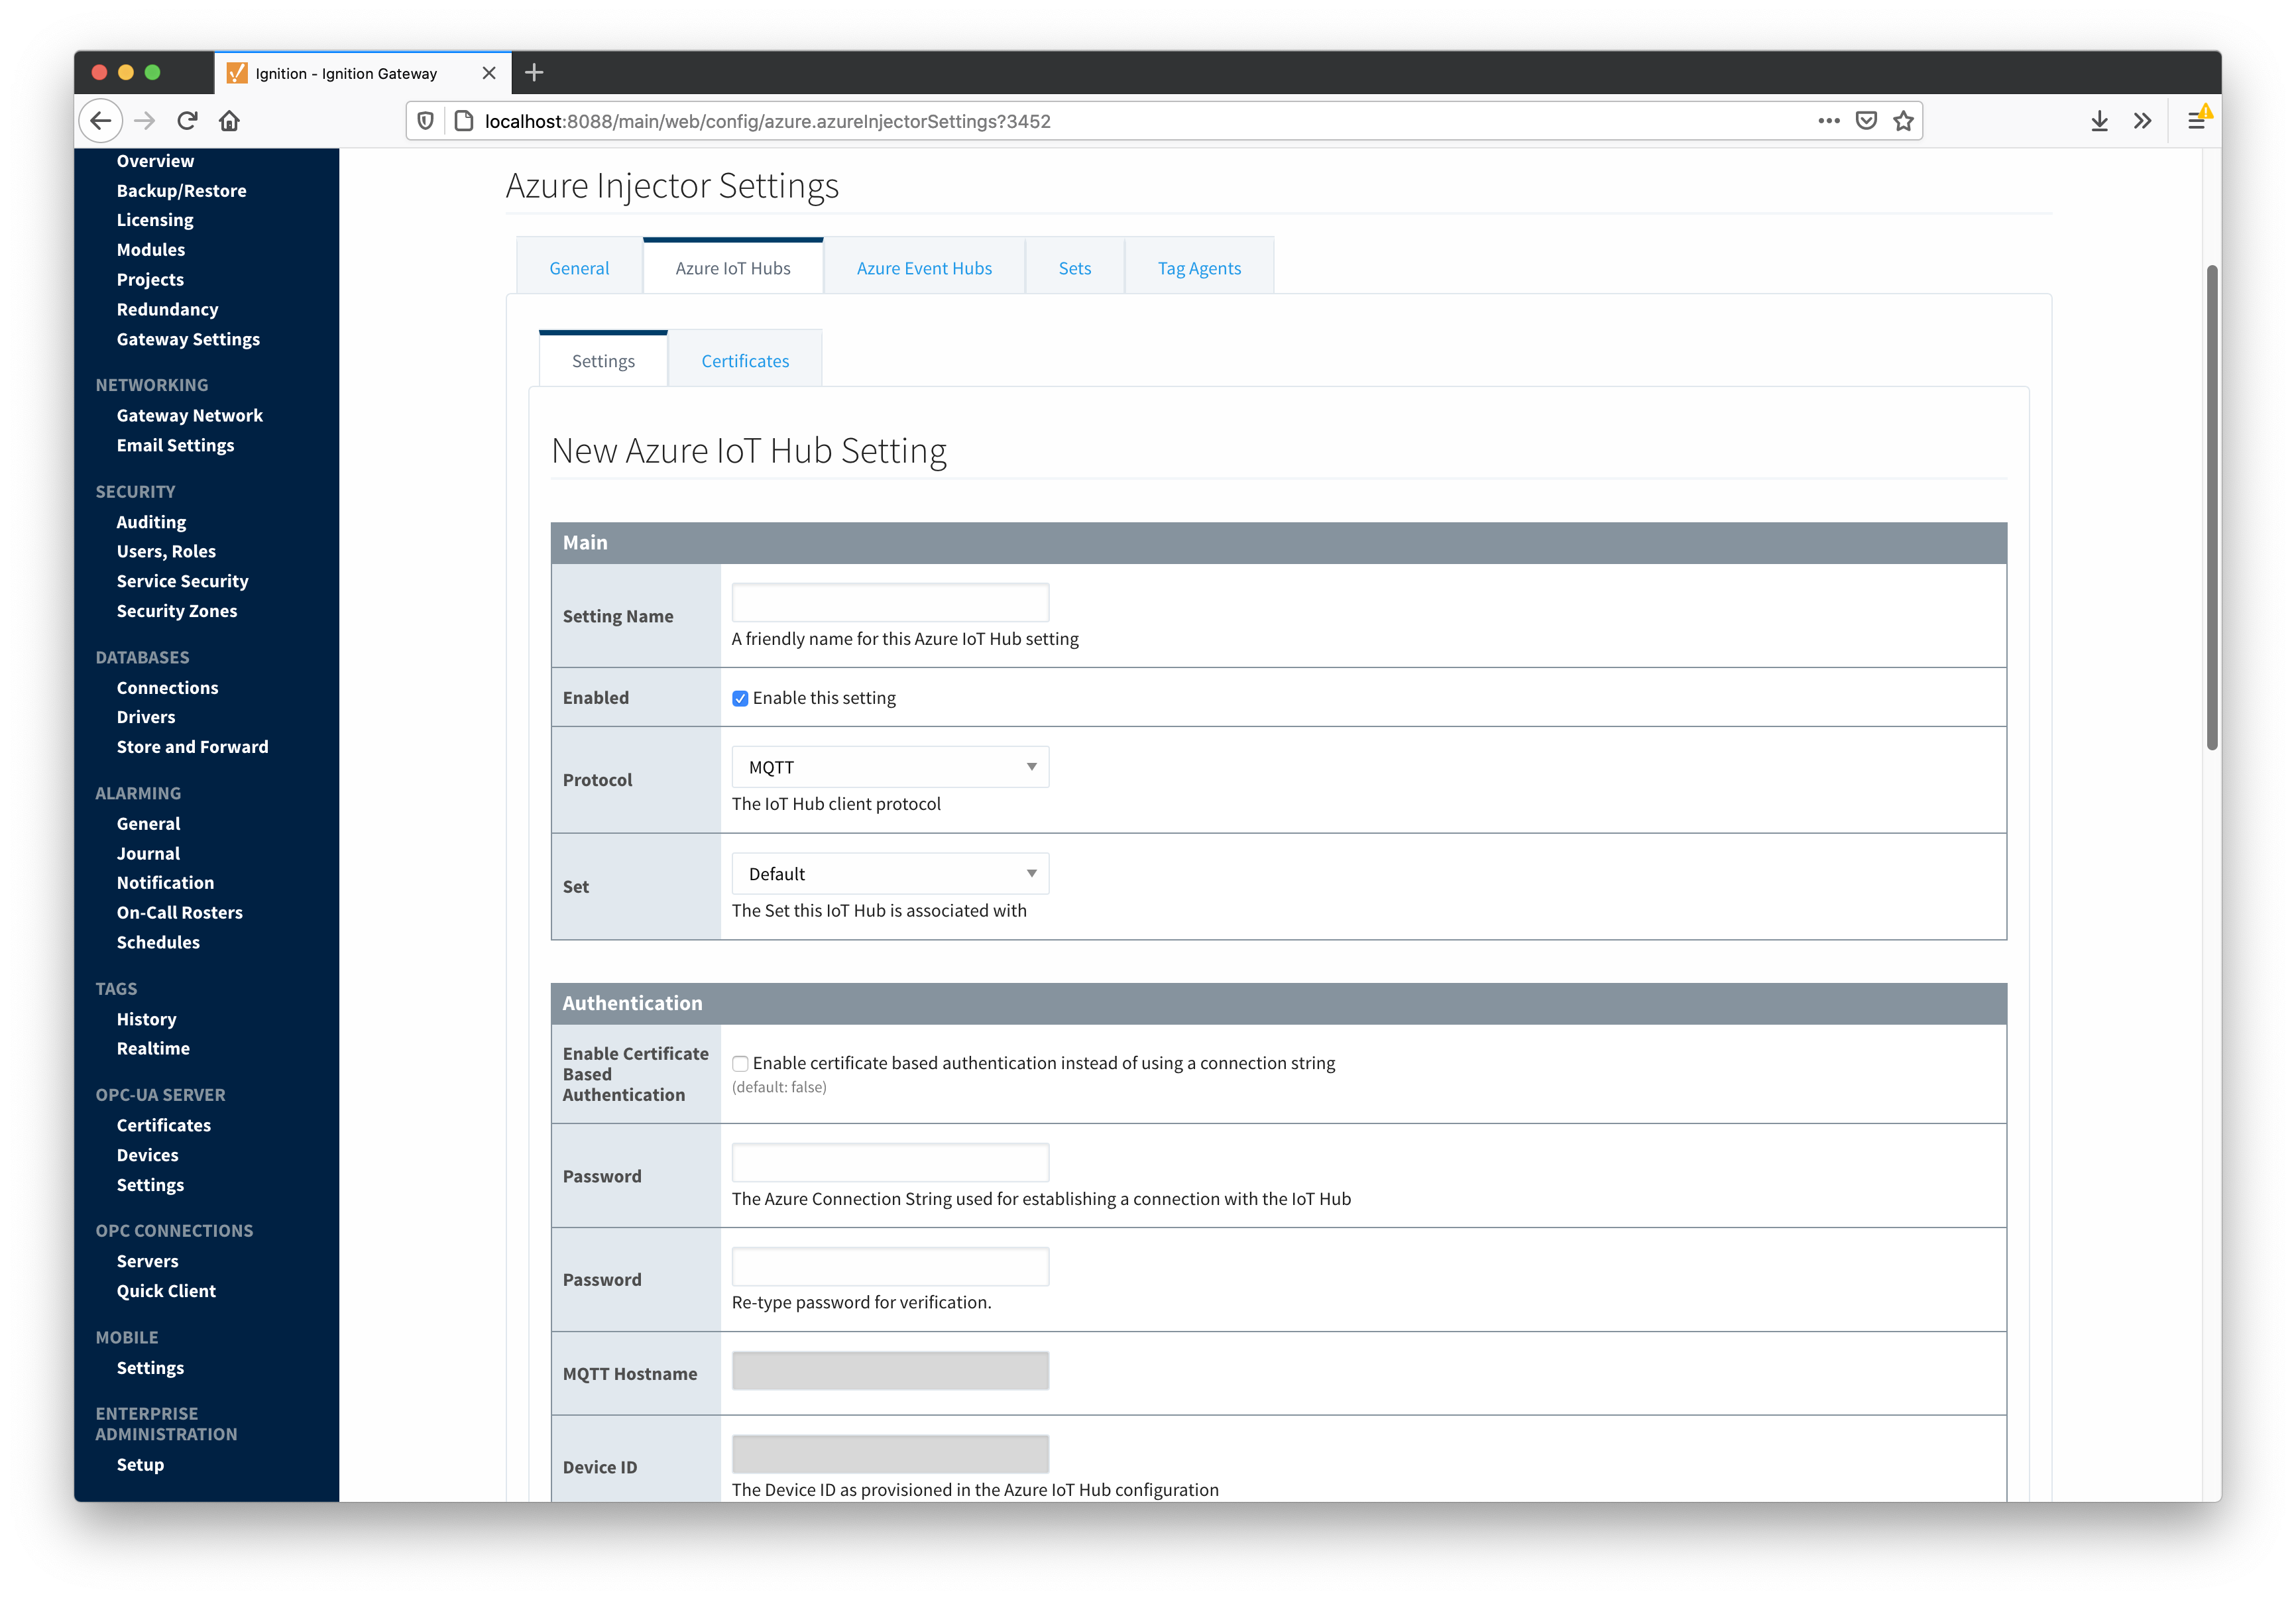
One or more Azure IoT Hub endpoints can be configured on this tab. The configuration options for an Azure IoT Hub connection are listed below.
Main
- Setting Name
- This is a friendly name of the Azure IoT Hub used to easily identify it. This must also be unique.
- Enabled
- Whether or not this connection is enabled.
- Protocol
- The protocol to use when connecting to the Azure IoT Hub. It can be one of the following:
- MQTT
- Note: If using MQTT as the protocol, the connection string must be a 'device' connection string when not using certificate based authentication.
- Set
- The Set to associate this Azure IoT Hub connection with.
Authentication
- Enable Certificate Based Authentication
- Whether or not to use certificate based authentication. If not using certificate based authentication, the 'Password/Connection String' field must be used. If certificate based authentication is used, the other Authentications fields must be used.
- Password/Connection String (required if not using certificate based authentication)
- This is the Azure IoT Hub connection string used to connect. This string can be one of the following:
- An IoT Hub connection string with the following format:
- HostName=<Host Name>;SharedAccessKeyName=<Key Name>;SharedAccessKey=<SAS Key>
- An IoT Hub's Event Hub-compatible connection string with the following format:
- Endpoint=<ENDPOINT>;SharedAccessKeyName=<Key Name>;SharedAccessKey=<KEYVALUE>
- An IoT Hub device connection string with the following format:
- HostName=<Host Name>;DeviceId=<Device Name>;SharedAccessKey=<Device Key>
- Note: If using MQTT as the protocol, this is the connection string format that must be used.
- MQTT Hostname (required if using certificate based authentication)
- This is the DNS endpoint name of your IoT Hub
- Device ID (required if using certificate based authentication)
- The Device ID as provisioned in the IoT Hub to connect as
- CA Certificate File
- The CA certificate file of your IoT Hub. See this document for more information.
- The drop down is populated from a list of files that have been uploaded to the IoT Hub/Certificates tab.
- Client Certificate File (required if using certificate based authentication)
- The client certificate file as provisioned for this device.
- The drop down is populated from a list of files that have been uploaded to the IoT Hub/Certificates tab.
- Client Private Key File (required if using certificate based authentication)
- The client private key file that was used in generating the certificate for this device
- The drop down is populated from a list of files that have been uploaded to the IoT Hub/Certificates tab.
- Password/Private key password
- The password used for the private key if one was specified for the key
Store & Forward
- Store & Forward Enabled
- Whether to enable Store & Forward capabilities for this endpoint
- Store & Forward Type
- The type of the Store & Forward mechanism
- Message Capacity
- The Maximum number of messages to store before dropping the oldest historical messages
- Flush Period
- The period of time to wait (in milliseconds) between sending when flushing messages
Advanced
- Keep Alive
- The MQTT keep alive timeout in seconds
- Max Message Size
- The maximum message size in bytes that any message can be when pushing to IoT Hub.
- Session Expiration
- How long in seconds to specify for session token timeouts when not using certificate based authentication
- Content Type
- Content Encoding
- The content encoding to include in the topic to Azure IoT Hub
- NONE (default) - No content encoding header will be included with the message
- UTF_8 - The 'utf-8' header will be included with the message and make the body of the message available for routing if the content type is also set to APPLICATION_JSON
- UTF_16 - The 'utf-16' header will be included with the message and make the body of the message available for routing if the content type is also set to APPLICATION_JSON
- UTF_32 - The 'utf-32' header will be included with the message and make the body of the message available for routing if the content type is also set to APPLICATION_JSON
- See this tutorial for more details
- Azure Date/Time Format
- The date/time format to use when pushing messages to IoT Hub
- LONG_MS_SINCE_EPOCH (default) - The timestamp values will all be as numbers in milliseconds since epoch (Jan 1, 1970) in UTC
- STRING_AZURE_COMPAT - The timestamp will be pushed as described here. This is useful when wanting to use 'edge' timestamps in Azure Time Series insights.
- See this tutorial for more details
Clicking on the "Create new Azure IoT Hub Setting..." link will bring up the following form for adding a new Azure IoT Hub endpoint.
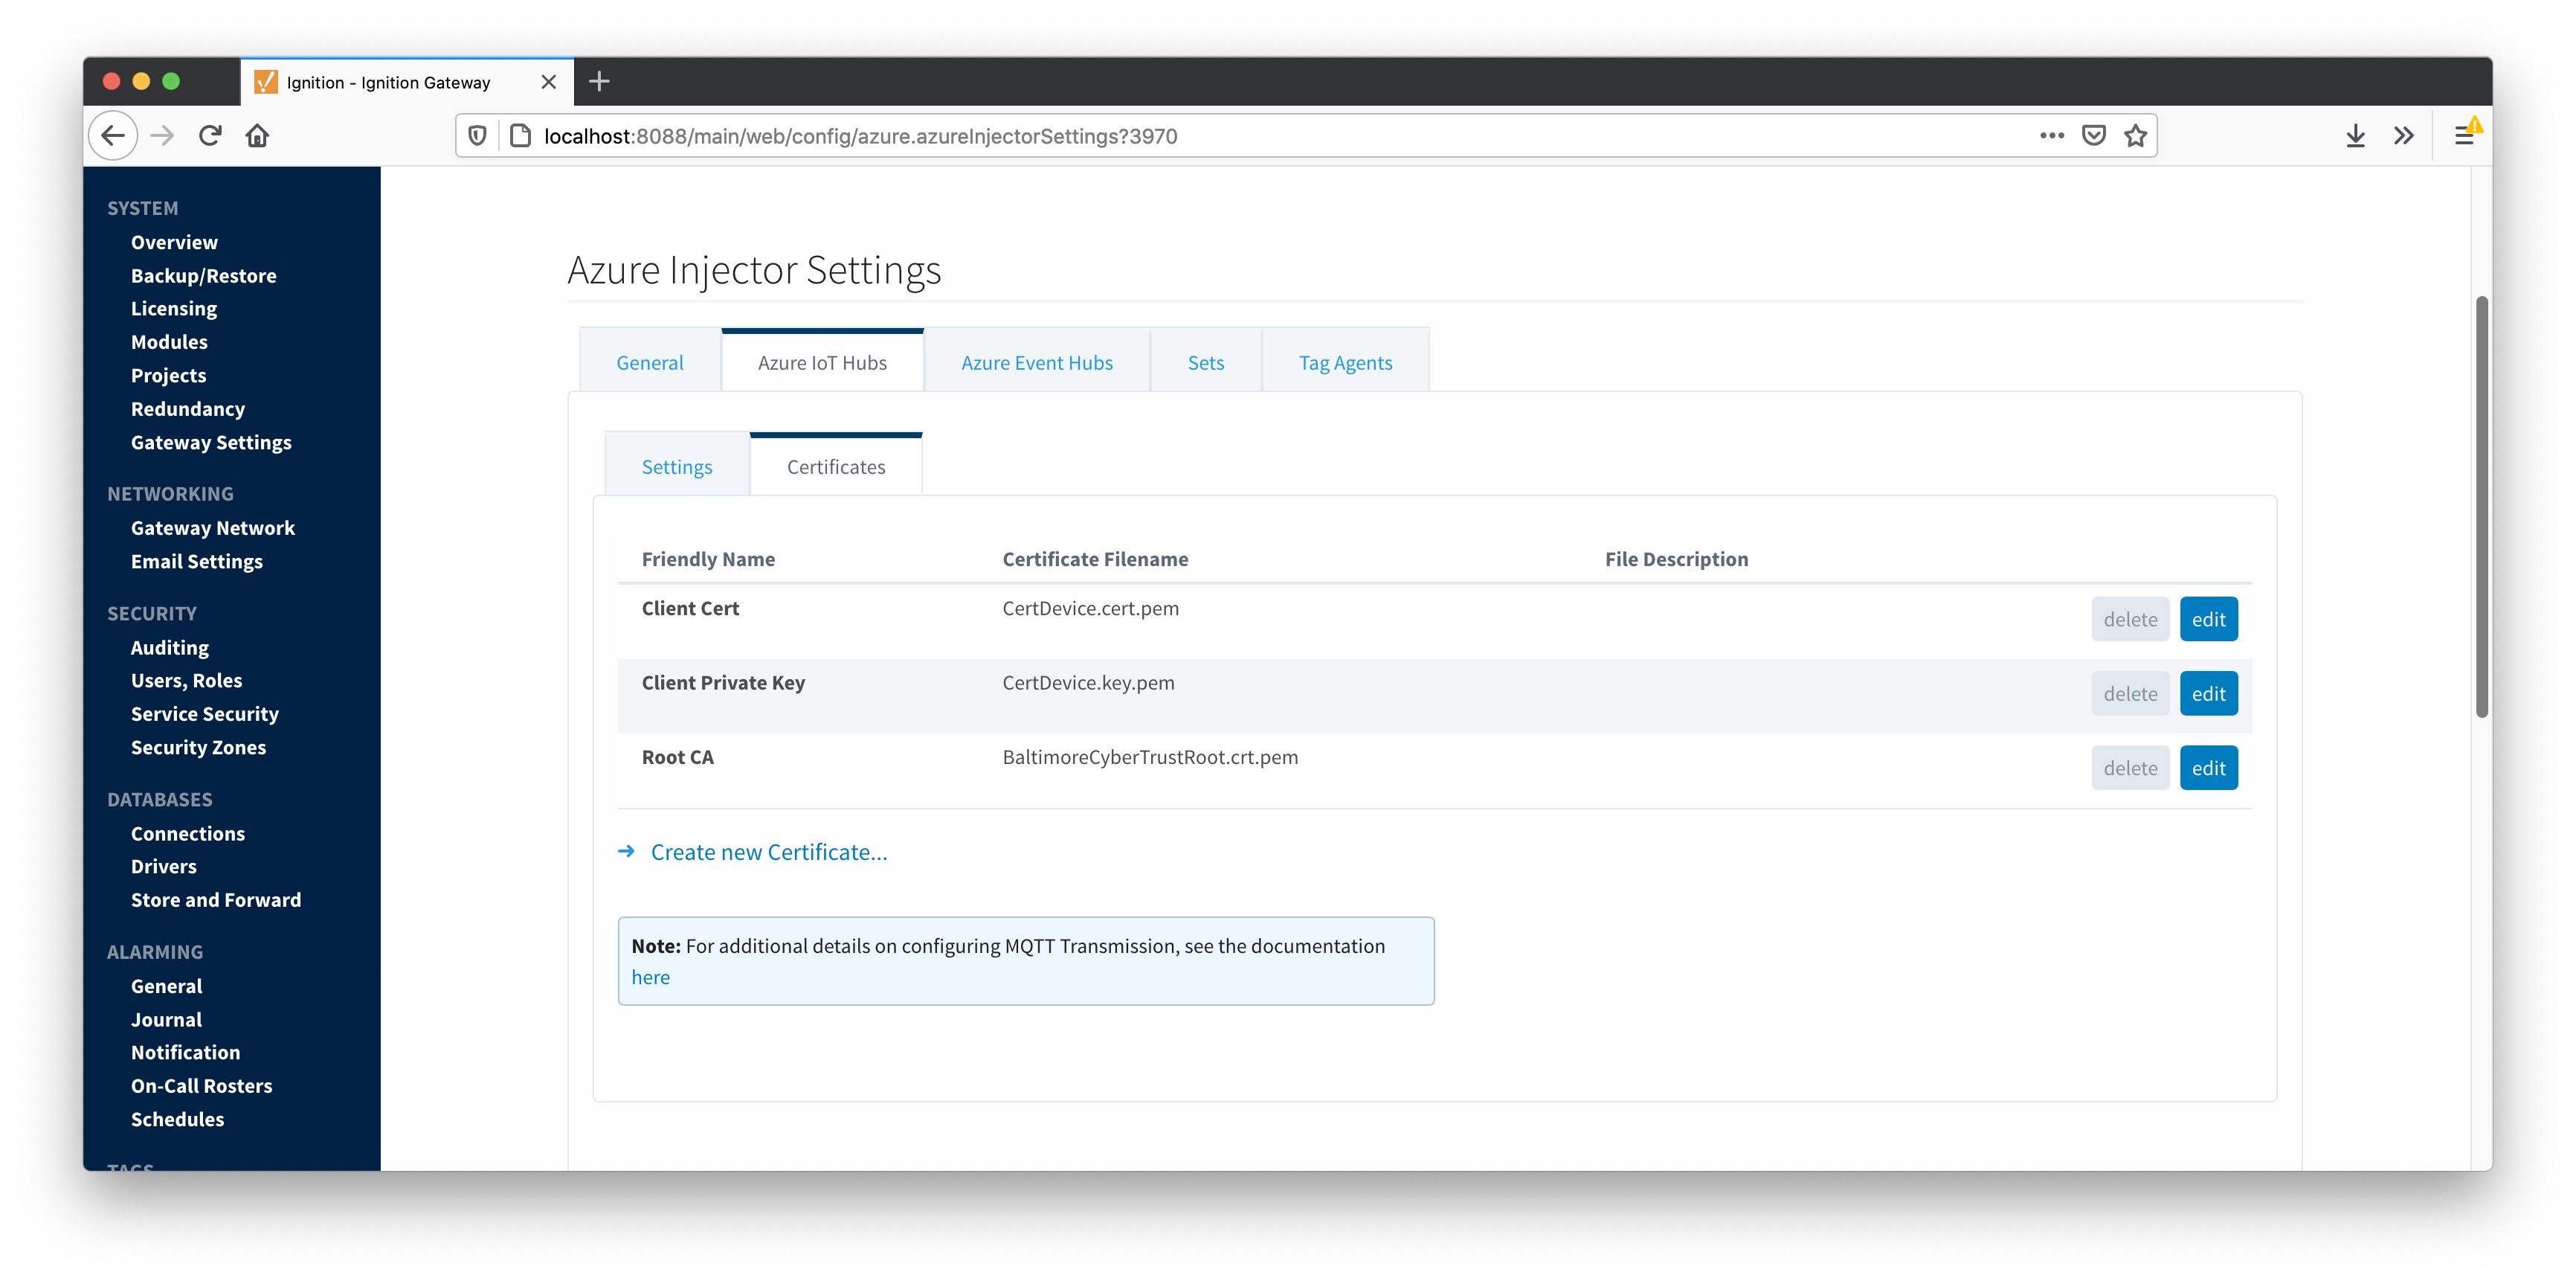
The following shows the page where certificate files are uploaded and can then be selected in the Main IoT Hub Settings page when using certificate based authentication. This should generally include the root CA for your IoT Hub, the client certificate file, and the client private key file.
Azure Event Hubs
The next tab is the list of Azure Event Hub endpoints that the module should connect to to push tag data.
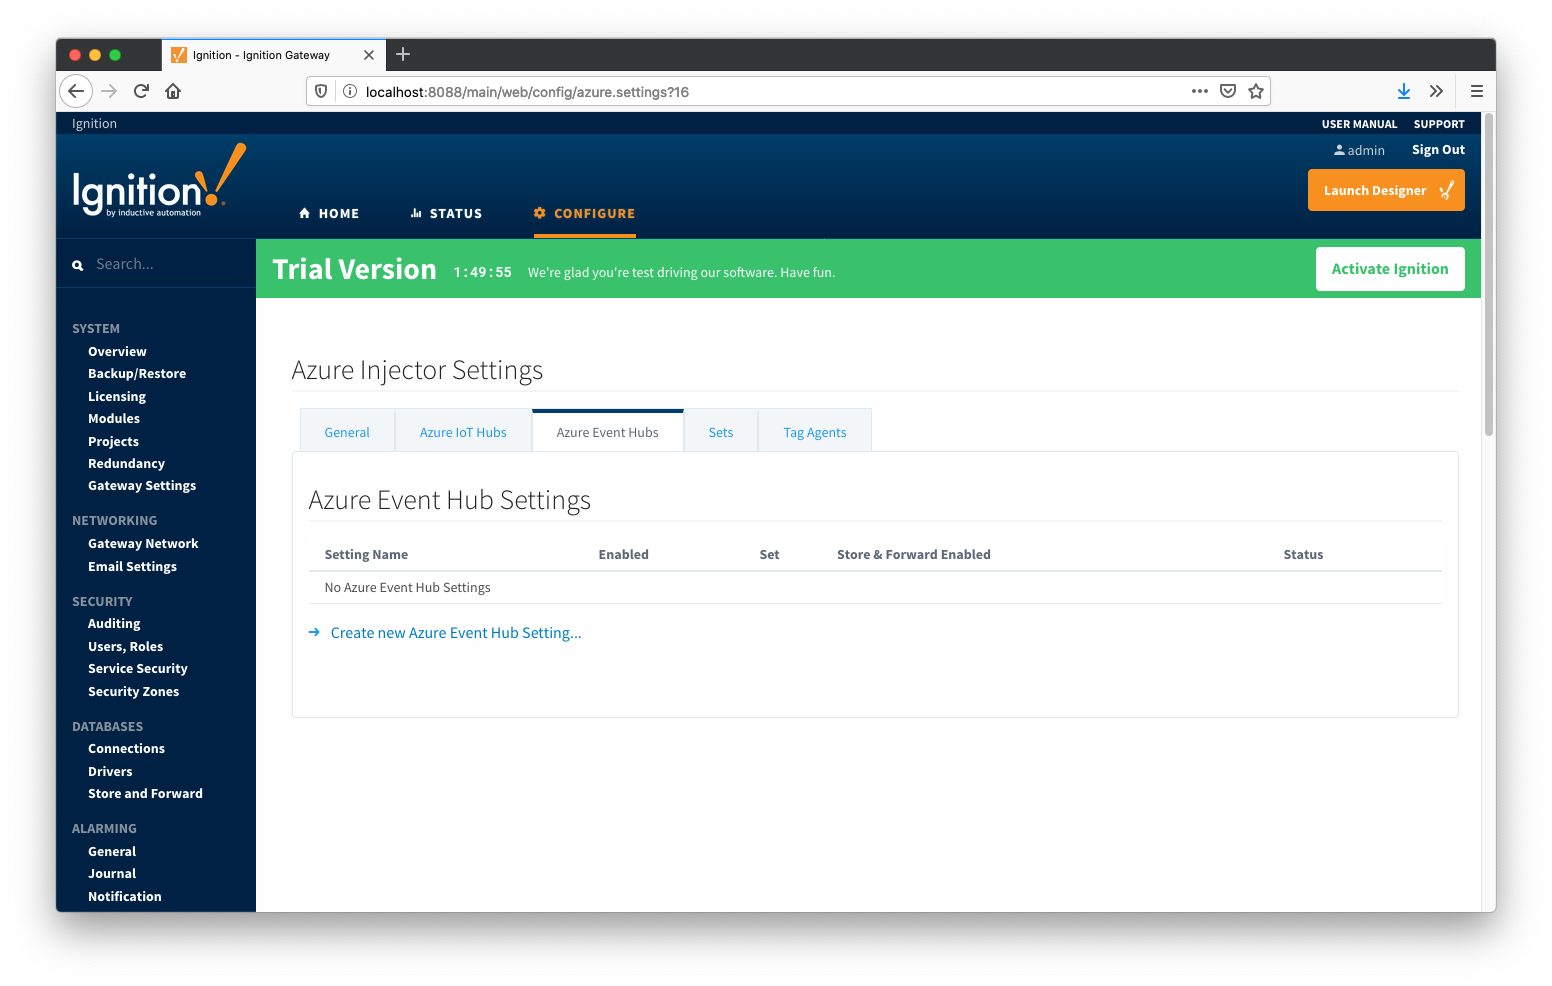
One or more Azure Event Hub endpoints can be configured on this tab.
Notes
- Ports 5671 and 5672 need to be opened for outbound traffic so the EventHubClient can establish an AMQP connection to the EventHub.
The configuration options for an Azure Event Hub connection are listed below.
Main
- Setting Name
- This is a friendly name of the Azure Event Hub used to easily identify it. This must also be unique.
- Enabled
- Whether or not pushing to this Event Hub is enabled or not.
- Password/Connection String
- Set
- The Set to associate this Azure IoT Hub connection with.
Store & Forward
- Store & Forward Enabled
- Whether to enable Store & Forward capbilities for this endpoint
- Store & Forward Type
- The type of the Store & Forward mechanism
- Message Capacity
- The Maximum number of messages to store before dropping the oldest historical messages
- Flush Period
- The period of time to wait (in milliseconds) between sending when flushing messages
Advanced
- Max Message Size
- The maximum message size before outbound messages will be divided into chunks smaller than the max message size
- Azure Date/Time Format
- The date/time format to use when pushing messages to IoT Hub
- LONG_MS_SINCE_EPOCH (default) - The timestamp values will all be as numbers in milliseconds since epoch (Jan 1, 1970) in UTC
- STRING_AZURE_COMPAT - The timestamp will be pushed as described here. This is useful when wanting to use 'edge' timestamps in Azure Time Series insights.
- See this tutorial for more details
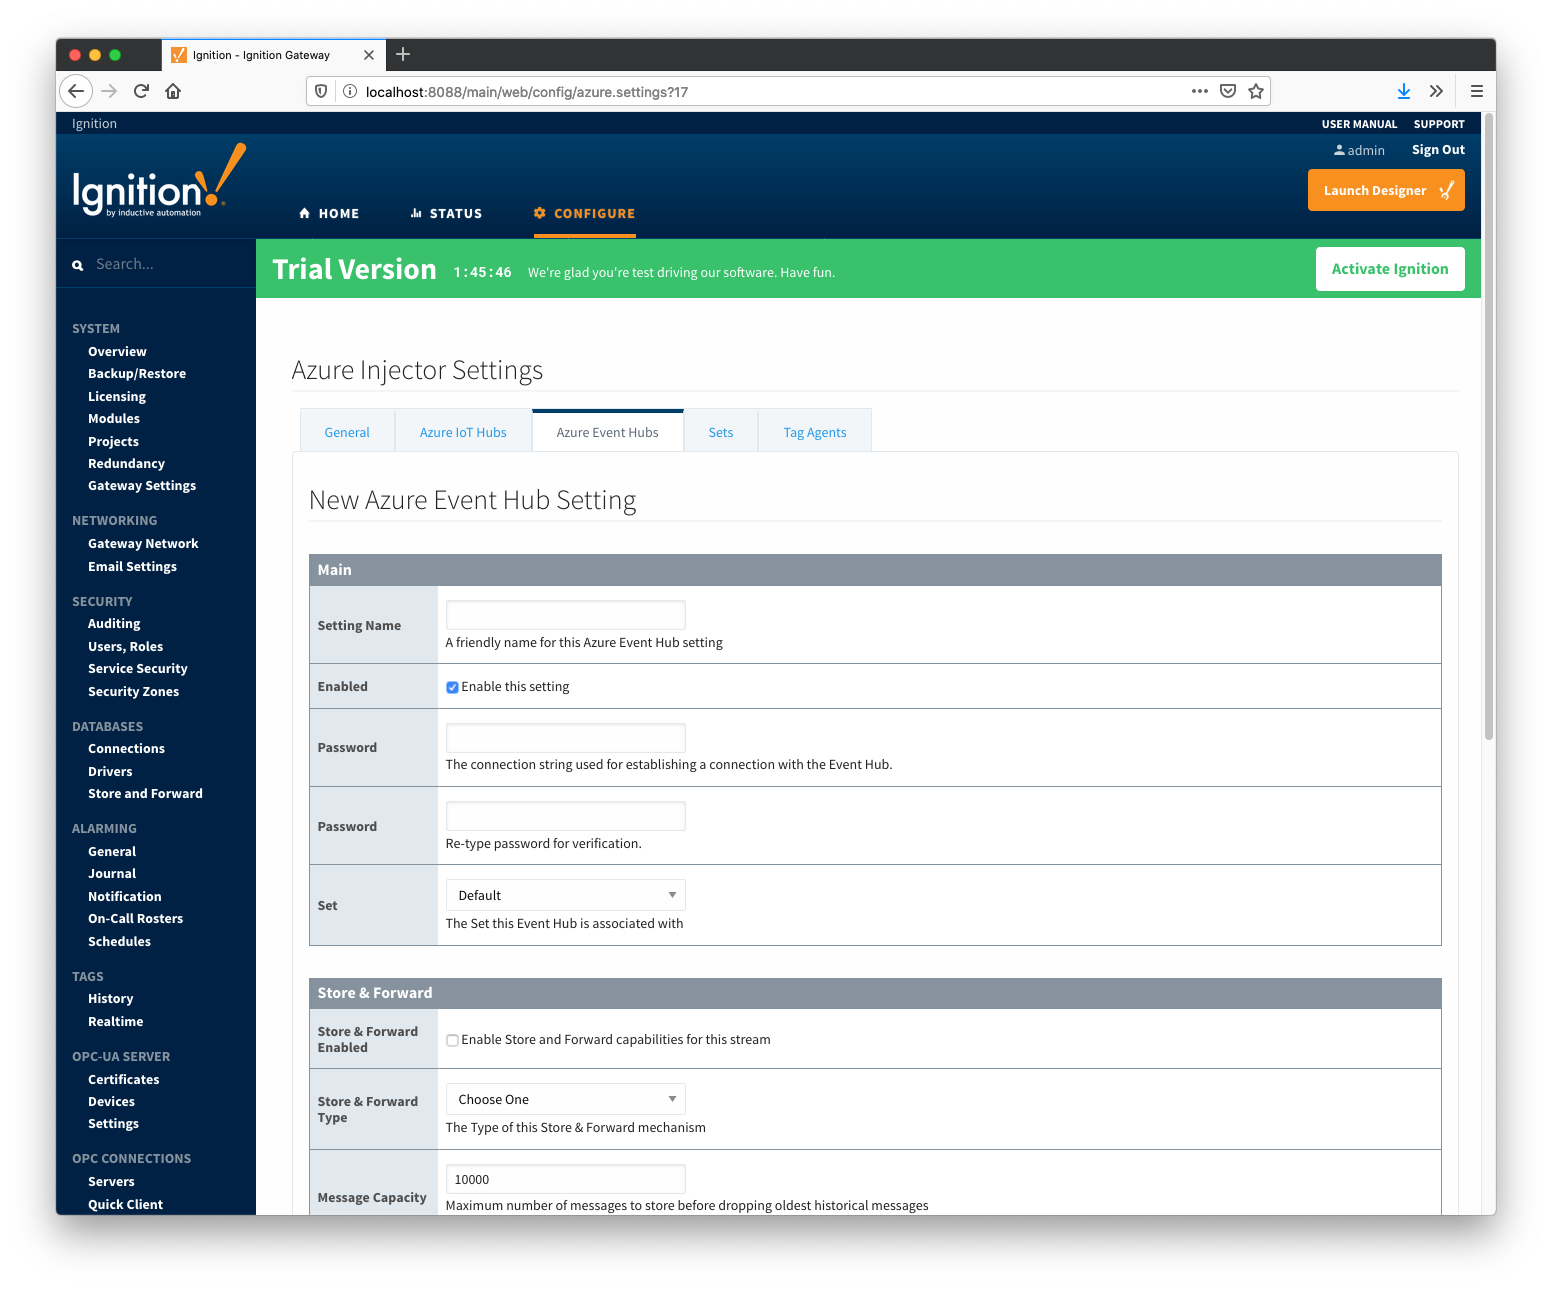
Clicking on the "Create new Azure Event Hub Setting..." link will bring up the following form for adding a new Azure Event Hub endpoint.
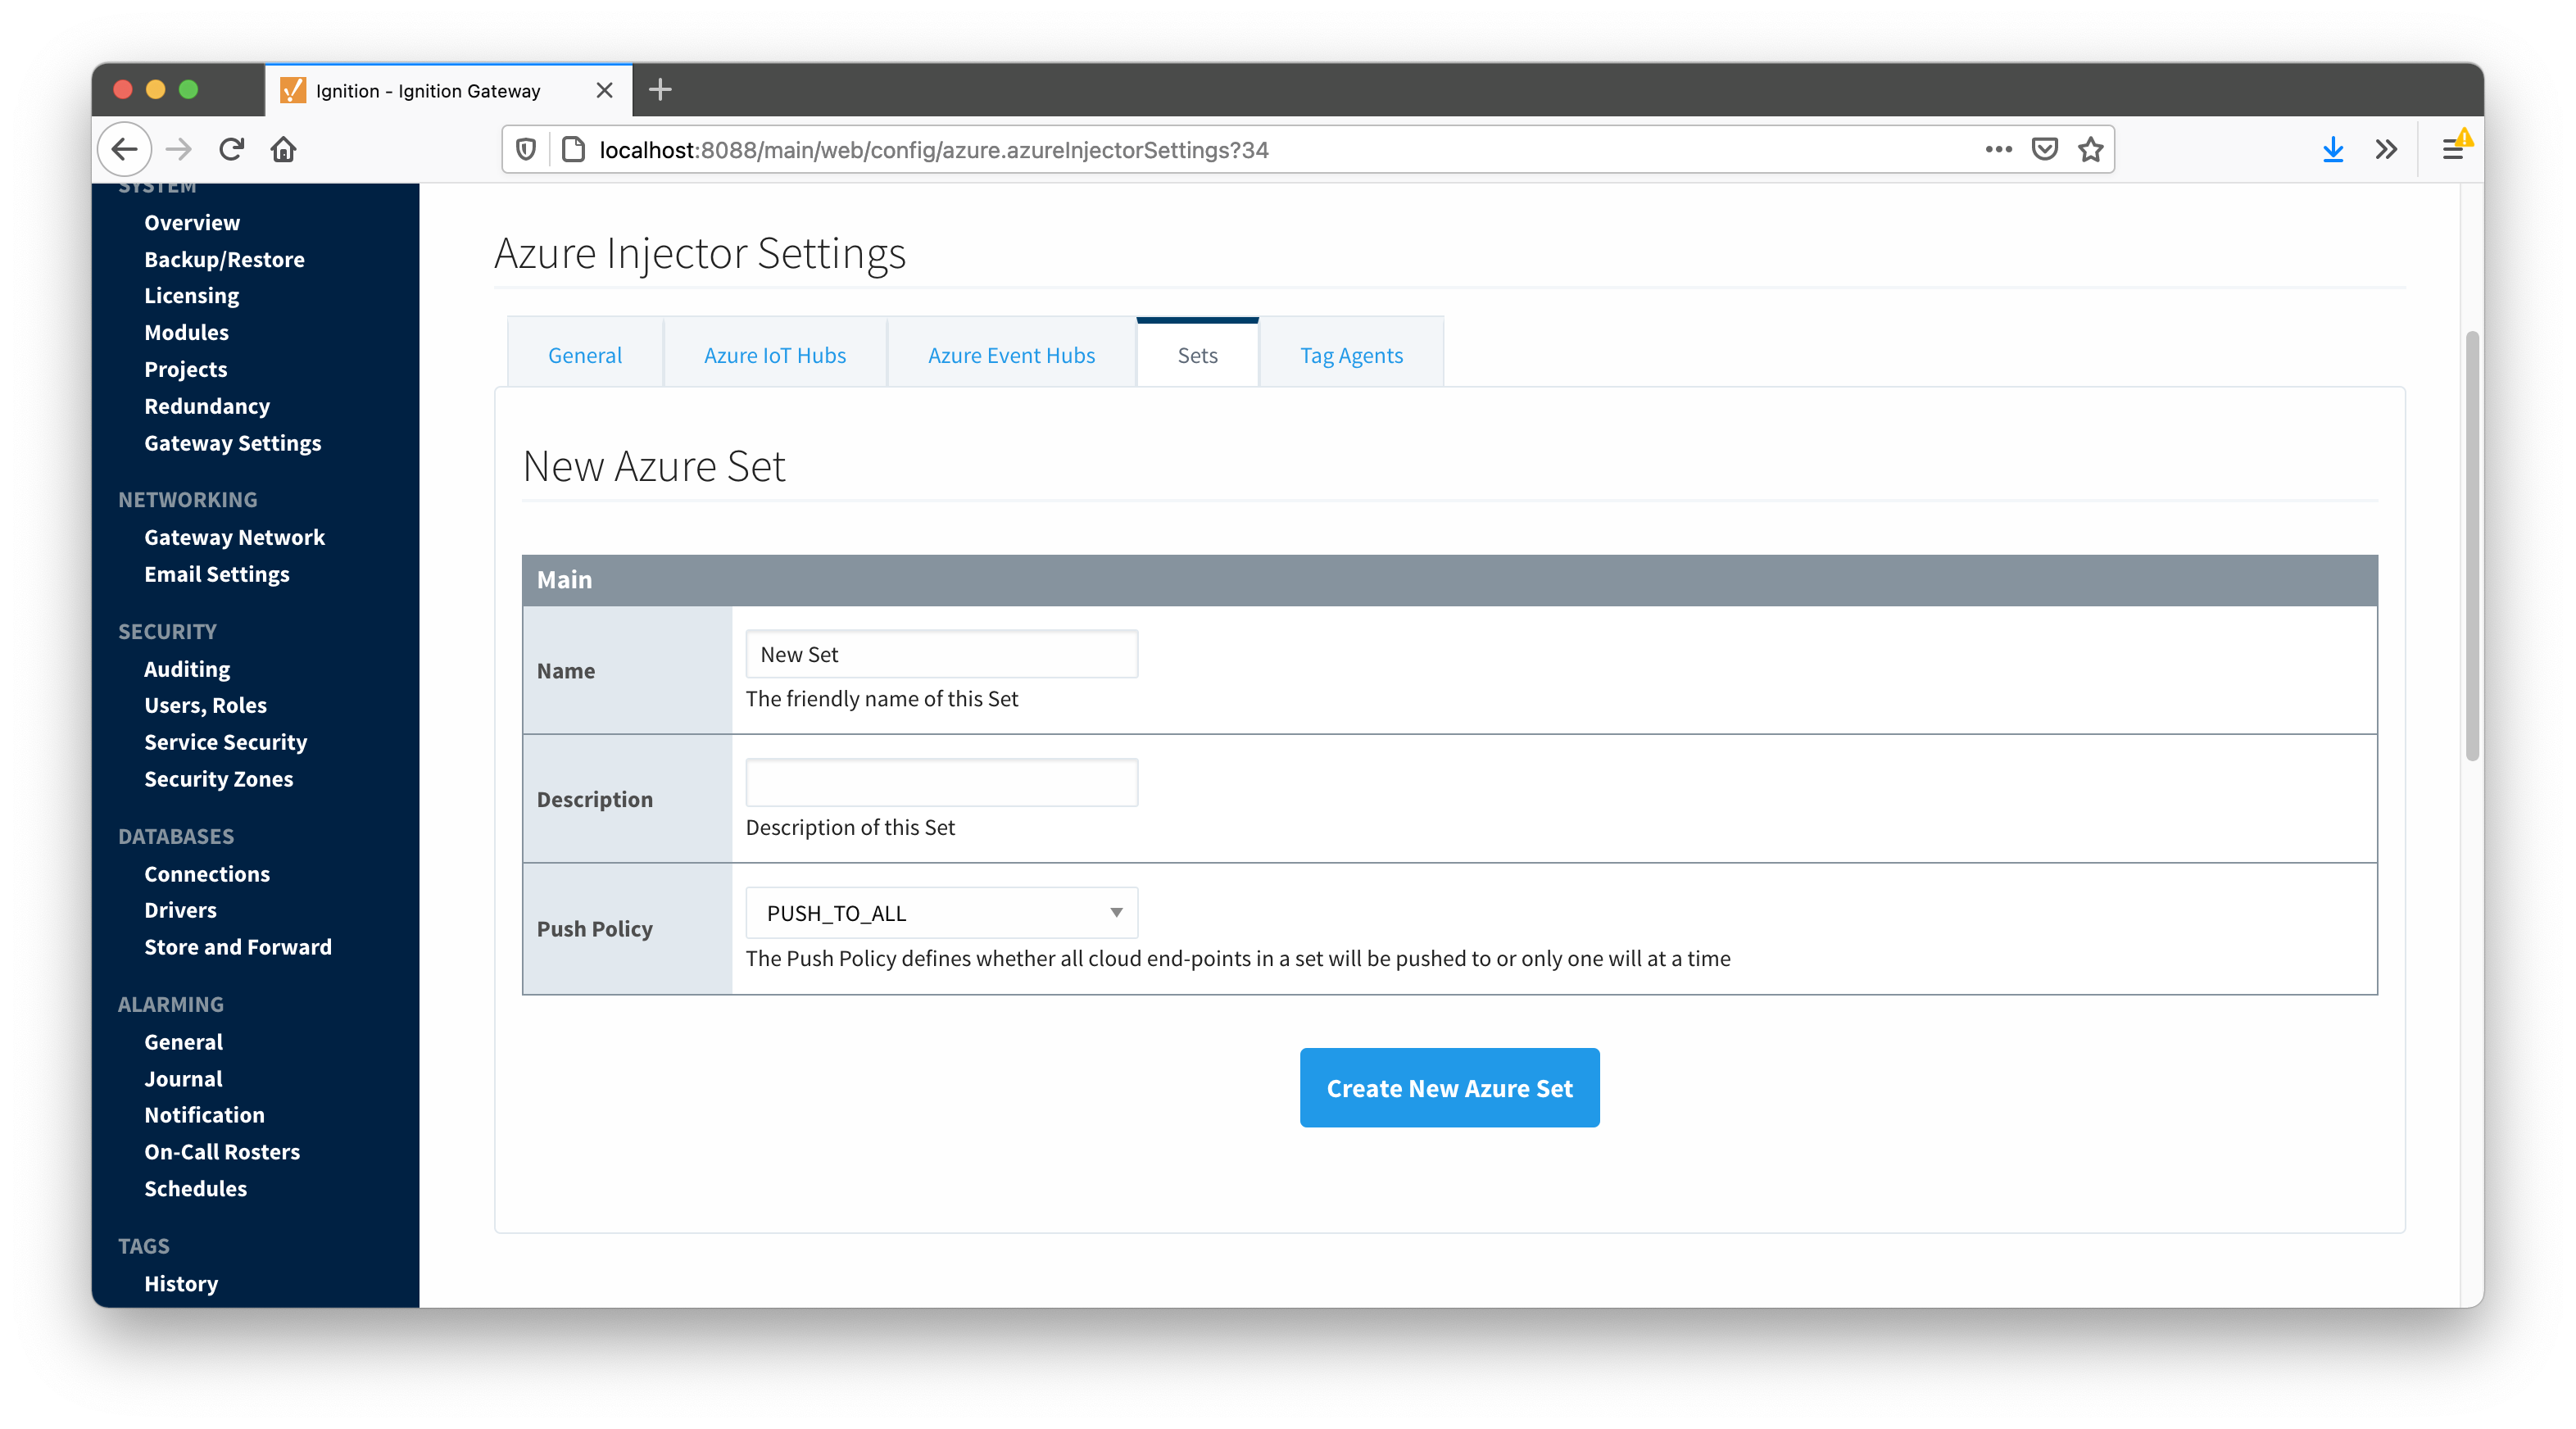
Sets
The Sets tab contains a list of Azure Sets. Each set represents a grouping of Azure IoT Hub endpoints. When a set is referenced by a Tag Agent the Agent will push Tag data to all Azure IoT Hub endpoints contained within that Set. The Sets are disjoint, meaning that a single Azure IoT Hub endpoint cannot be in more than one set. Out of the box the Azure Injector module will have one "Default" set defined.
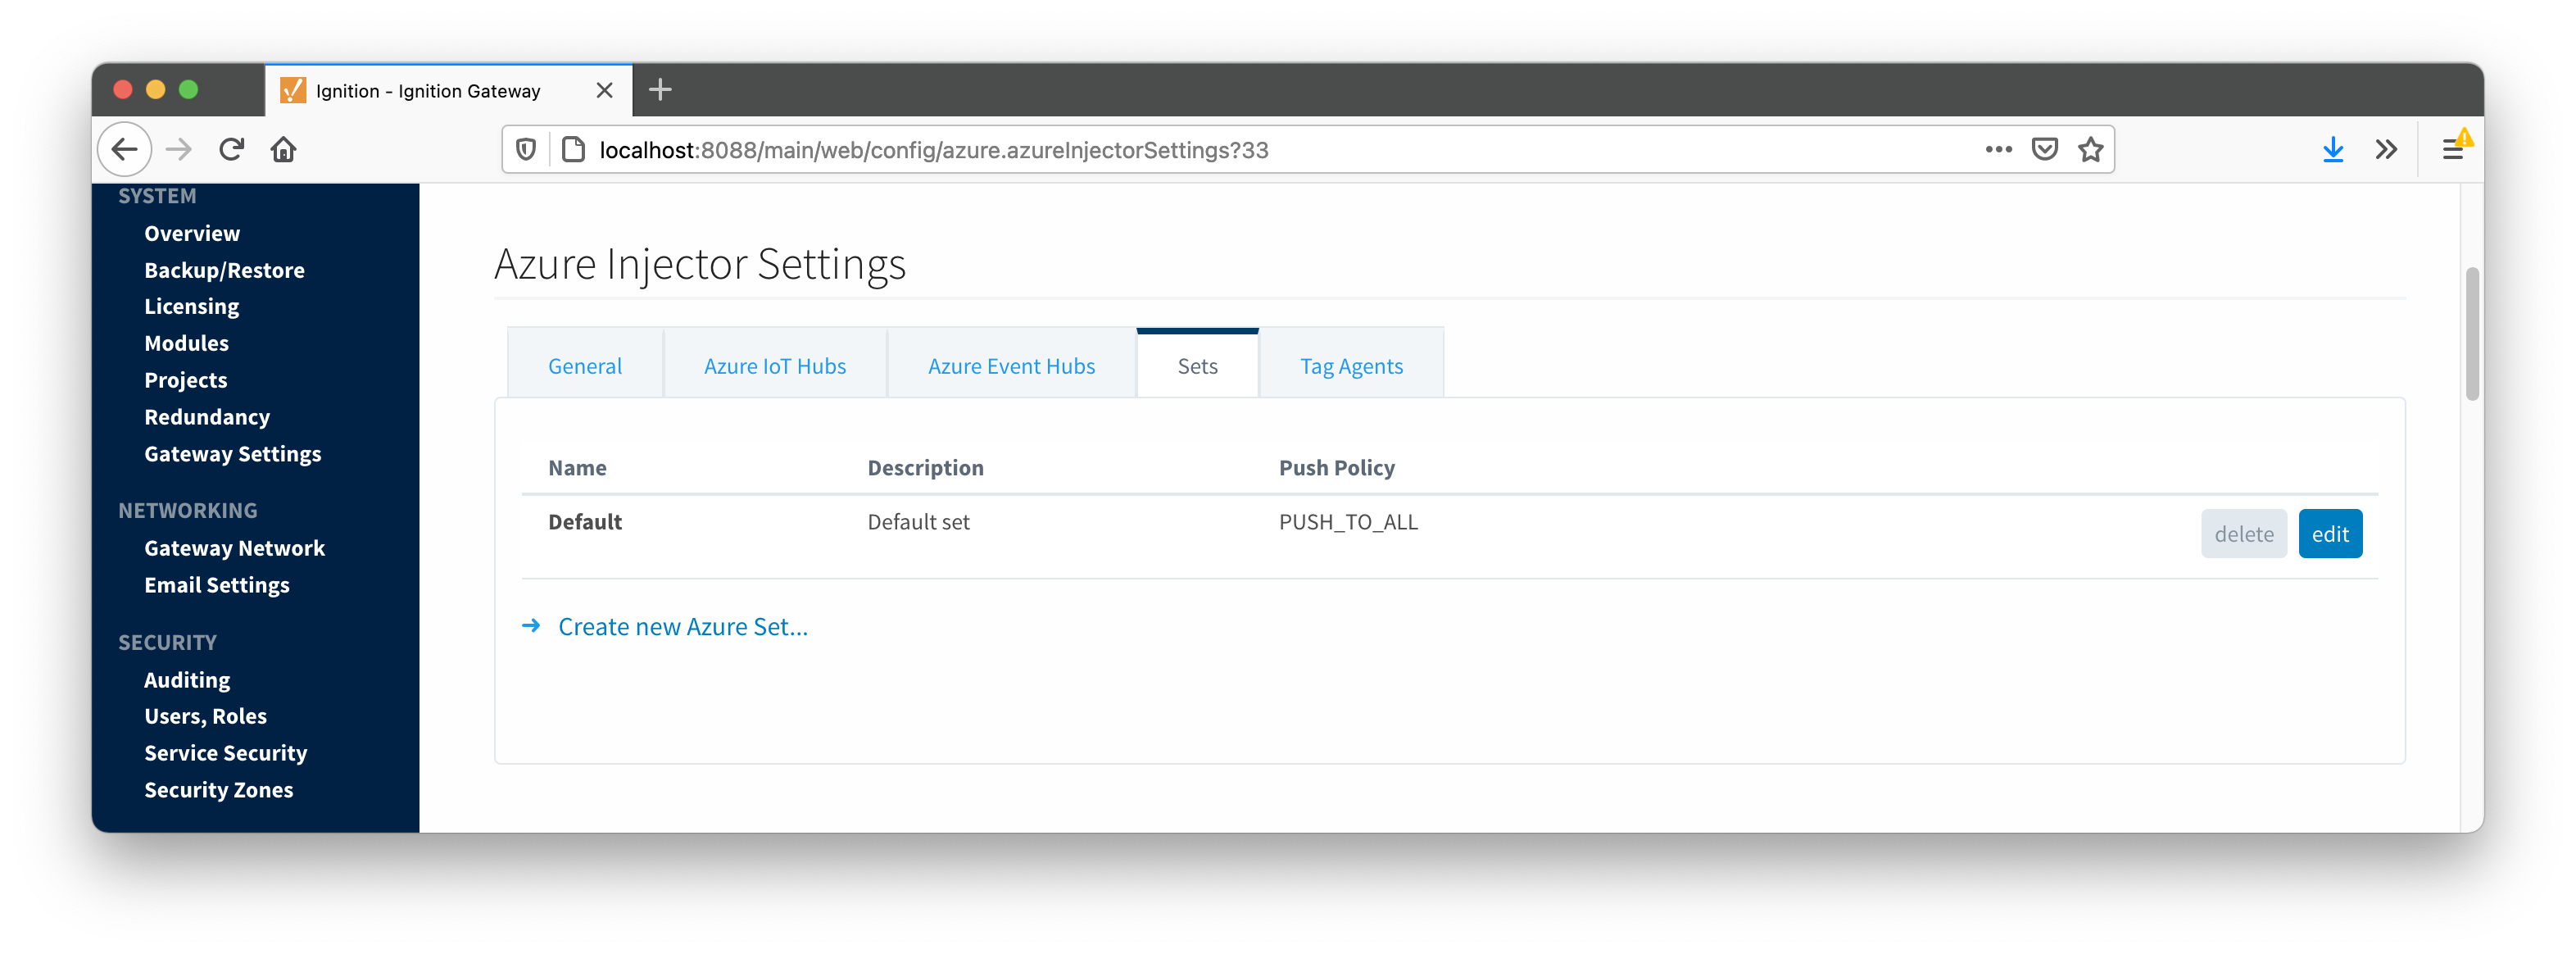
Additional Sets can be configured for situations where multiple Tag Agents will need to push to different Azure IoT Hub endpoints. The configuration options for Sets are listed below.
Main
- Name
- This is the friendly name of the set used to easily identify it.
- Description
- This is a friendly description of the set.
- Push Policy
- This defines which endpoints to push to. If PUSH_TO_ALL is selected, every endpoint that is part of this set will receive all messages. If PUSH_TO_ANY is selected, only one of the endpoints that is part of this set will receive any given message. PUSH_TO_ANY is useful when adding endpoint configurations to increase the throughput of the Injector.
Clicking on the 'Create new Azure Set...' link will bring up the following form to add a new Set.
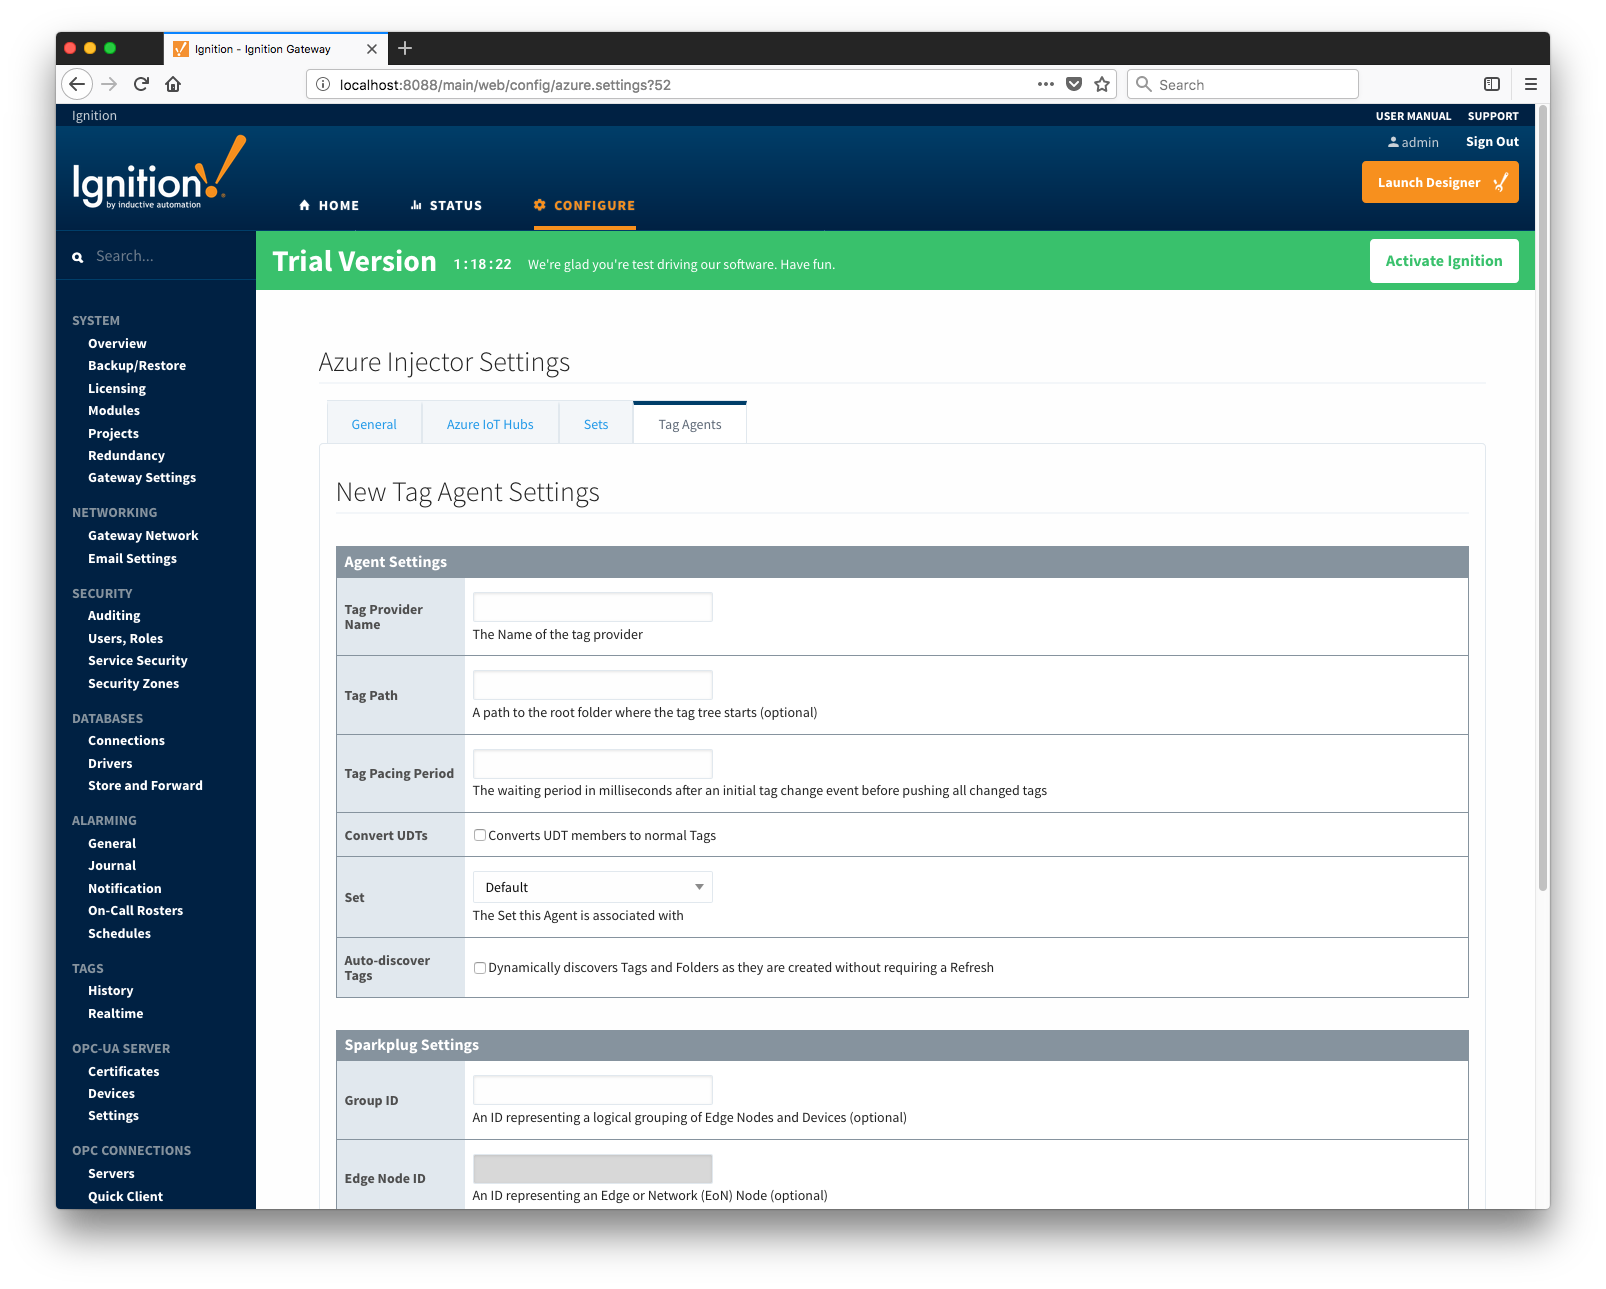
 Tag Agents
Tag Agents are the workers within Azure Injector that monitor tag events, convert them to a JSON representation, and push them to one or more Azure IoT Hub endpoints. Out of the box the Azure Injector module will have one "default" Tag Agent defined.
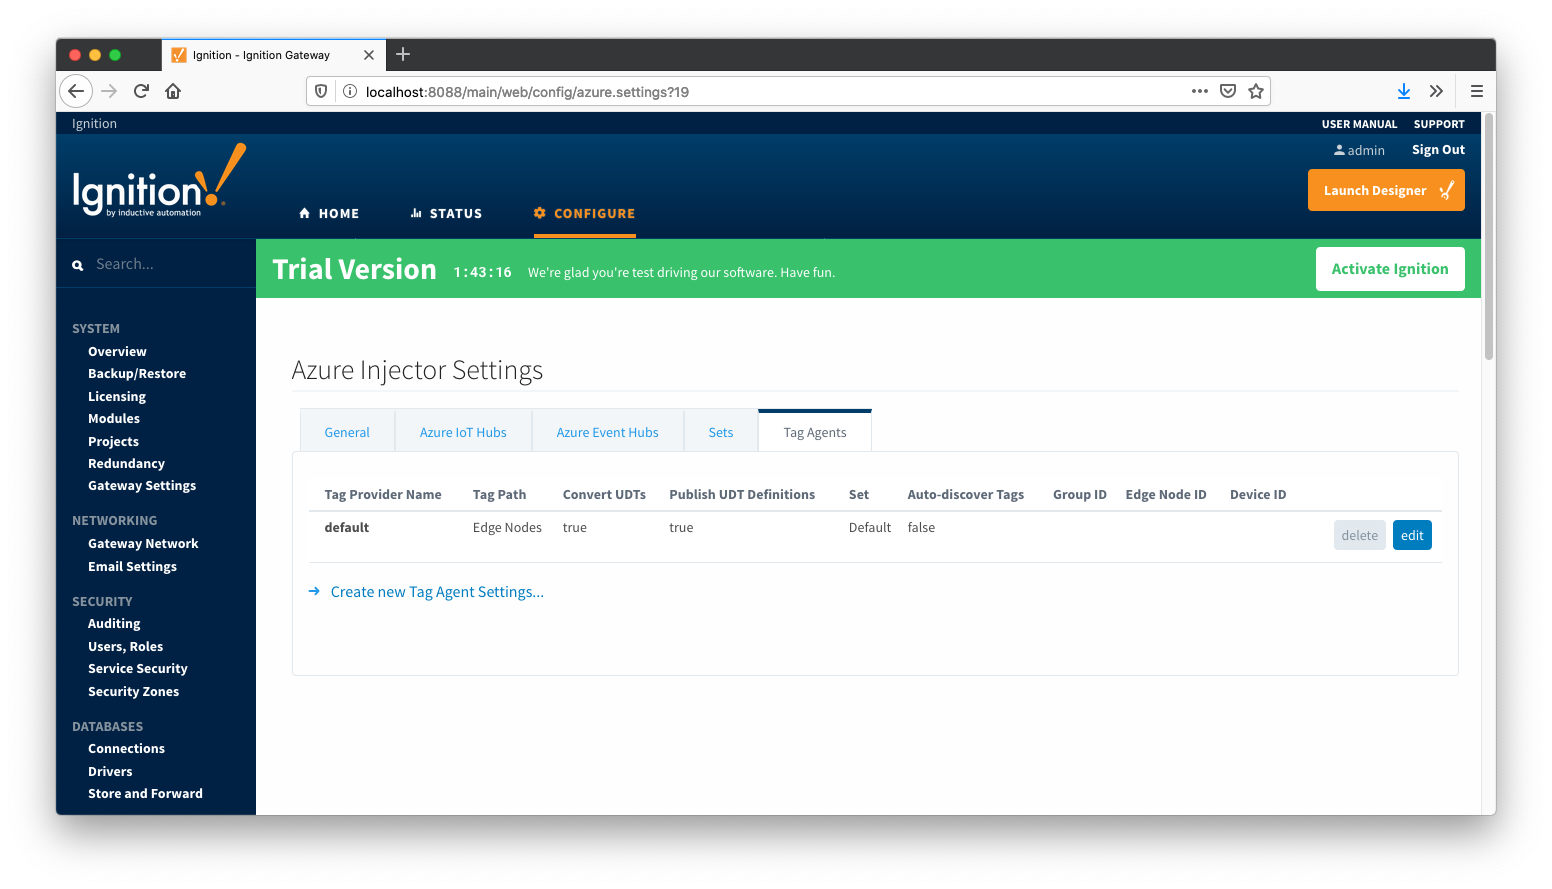
Tag Agents are configured to point to a single folder. All Tags within that folder will be monitored by the Tag Agent.
Agent Settings
- Tag Provider Name
- The name of the Tag provider containing the tags.
- Tag Path
- An optional folder path under the Tag provider where the root folder of the Tags can be found.
- Tag Pacing Period
- The buffer period, in milliseconds, that Tag events will be aggregated into a single payload before pushing.
- Convert UDTs
- Whether to convert UDT members to normal Tags before publishing. If enabled the Tags representing the UDT member will retain their member path prefixed by the UDT Instance name.
- Publish UDT Definitions
- This can only be set if 'Convert UDTs' is false
- Whether or not to publish UDT definitions in the NBIRTH messages
- Set
- The Set of Azure IoT Hub endpoints that the Tag Agent will push to.
- Auto-discover Tags
- Whether newly added tags should be dynamically scanned and their values pushed. This field is disabled by default. It should remain disabled while manually editing tags and/or their configurations. It should only typically be enabled in systems where tags are created in real time.
Sparkplug Settings
- Group ID
- An ID representing a logical grouping of MQTT Edge Of Network (EoN) Nodes and Devices into the infrastructure.
- Edge Node ID
- An ID that uniquely identifies the MQTT Edge Of Network (EoN) Node within the infrastructure.
- Device ID
- An optional ID that uniquely identifies a Device within the infrastructure.
The Sparkplug settings are optional and allow for an additional customization of how the Tag Agent scans and discovers tag within the specified Tag Path. Here is a brief description of how the Agent scans/discovers folders based on the different combinations of potential Sparkplug Settings.
- If all three IDs are left blank the Agent will assume the following folder structures follow the Tag Path:
- <groupFolder>/<edgeNodeFolder>/<deviceFolder>/<tags>
- <groupFolder>/<edgeNodeFolder>/<tags>
- If only the Group ID is specified the Agent will assume the following folder structure follows the Tag Path:
- <edgeNodeFolder>/<deviceFolder>/<tags>
- <edgeNodeFolder>/<tags>
- If the Group ID and the Edge Node ID are specified the Agent will assume the following folder structure follows the Tag Path:
- <deviceFolder>/<tags>
- <tags>
- If the Group ID, Edge Node ID, and the Device ID are specified the Agent will assume the following folder structure follows the Tag Path:
As you can see, the Sparkplug settings can be used to either hard-code these IDs, or leave them blank so that the Agent will scan and discover them based on the tag tree layout.
Clicking on the 'Create new Tag Agent Settings..' link will bring up the following form to add a new Tag Agent.