![]()
The Chariot® MQTT Server can be enabled to use SSL/TLS to allow secure communication with the Chariot Web UI (HTTPS) as well as secure communication between MQTT clients (MQTTS).
Self-signed certificates should not be used in a production environment on a public network.
Setting Up SSL/TLS
The first step in setting up SSL/TLS is obtaining the necessary files to provide to the Chariot MQTT Server. There are three files that need to be uploaded to the Chariot MQTT Server in order to setup SSL/TLS communication.
- Private Key
- A Private Key that was used to generate the Certificate Signing Request (CSR) and obtain the signed Server Certificate.
- Must be an RSA Provate Key of type PKCS1 or PKCS8 in PEM format. Note: PCKS8 support was added in release 2.3.1
- Review How to identify my Private Key type to verify type.SA private key in PEM format that was used to generate the server certificate.
- Server Certificate signed by a CA
- The signed Certificate that the Chariot MQTT Server will use for SSL/TLS communication.
- Must be a X.509 SSL Certificated in PEM format.
- Root CA Chain
- A public root Certificate Authority (CA) certificate and any/all public intermediate CA certificates between the root and the CA that issued the certificate in PEM format. If there are no intermediate CAs, then the chain is made up of only the public root CA certificate.
- Must be a list of X.509 certificates in PEM format.
See here for more information on obtaining a signed Certificate.
Once these files are obtained, log into the Chariot MQTT Server Web UI and navigate to the Configuration → System page as shown below:
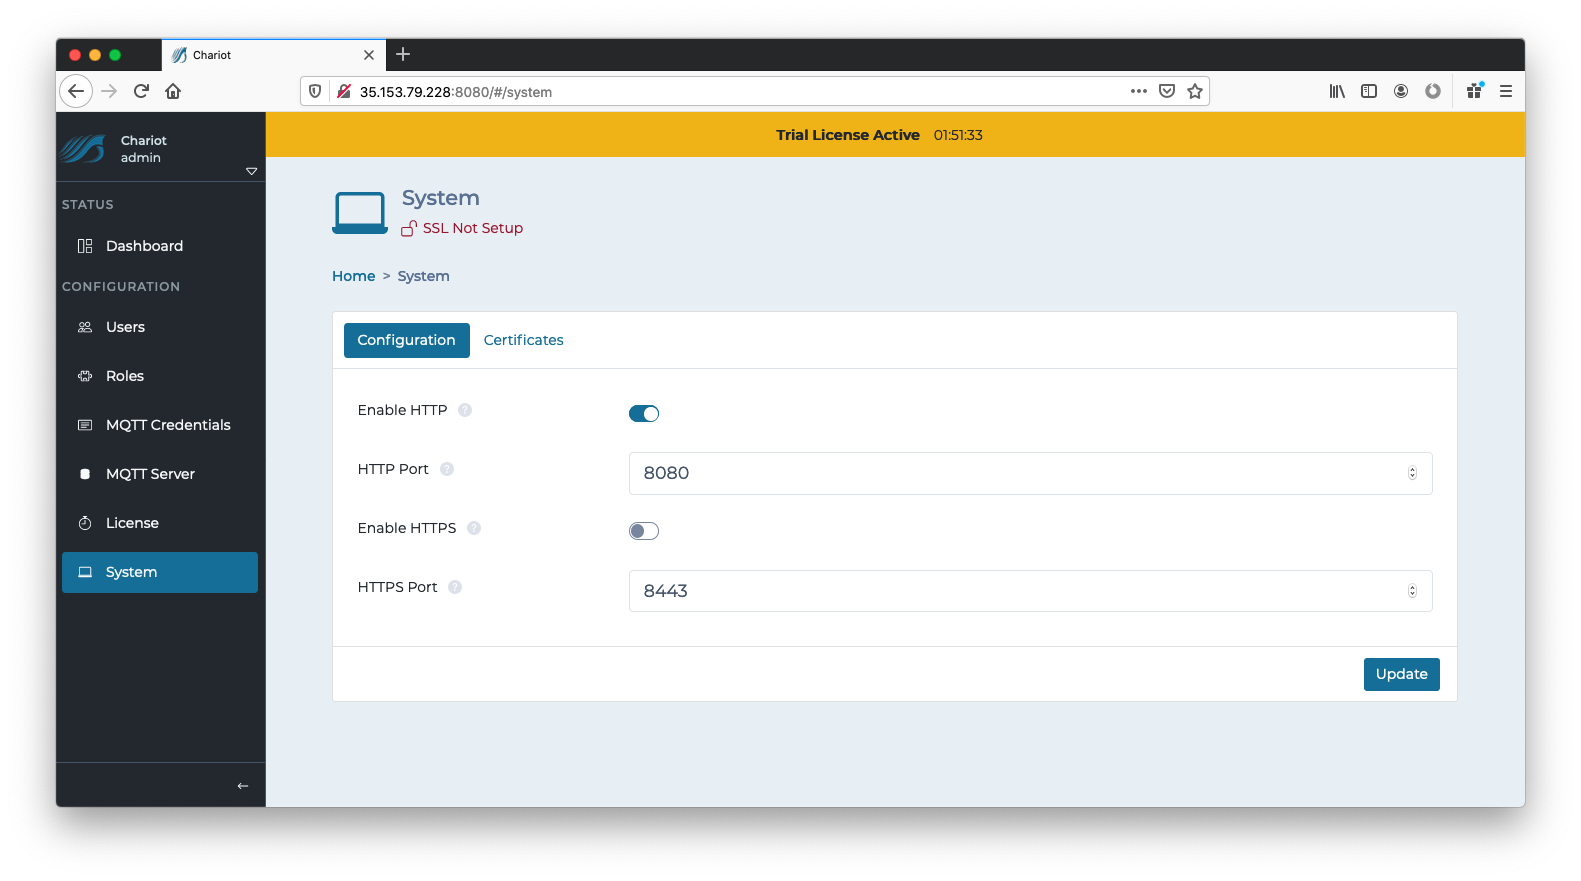
An "SSL Not Setup" indicator at the top should show that SSL/TLS has not yet been set up. If this indicator says "SSL Setup", you may need to first delete any existing Certificates before setting up a new one, see here for instructions. Click on either the indicator or the Certificates tab to navigate to the following page:
 Use the right side links to upload the three required files.

Once the three files have been successfully uploaded, click the "Setup SSL" button on the bottom right.
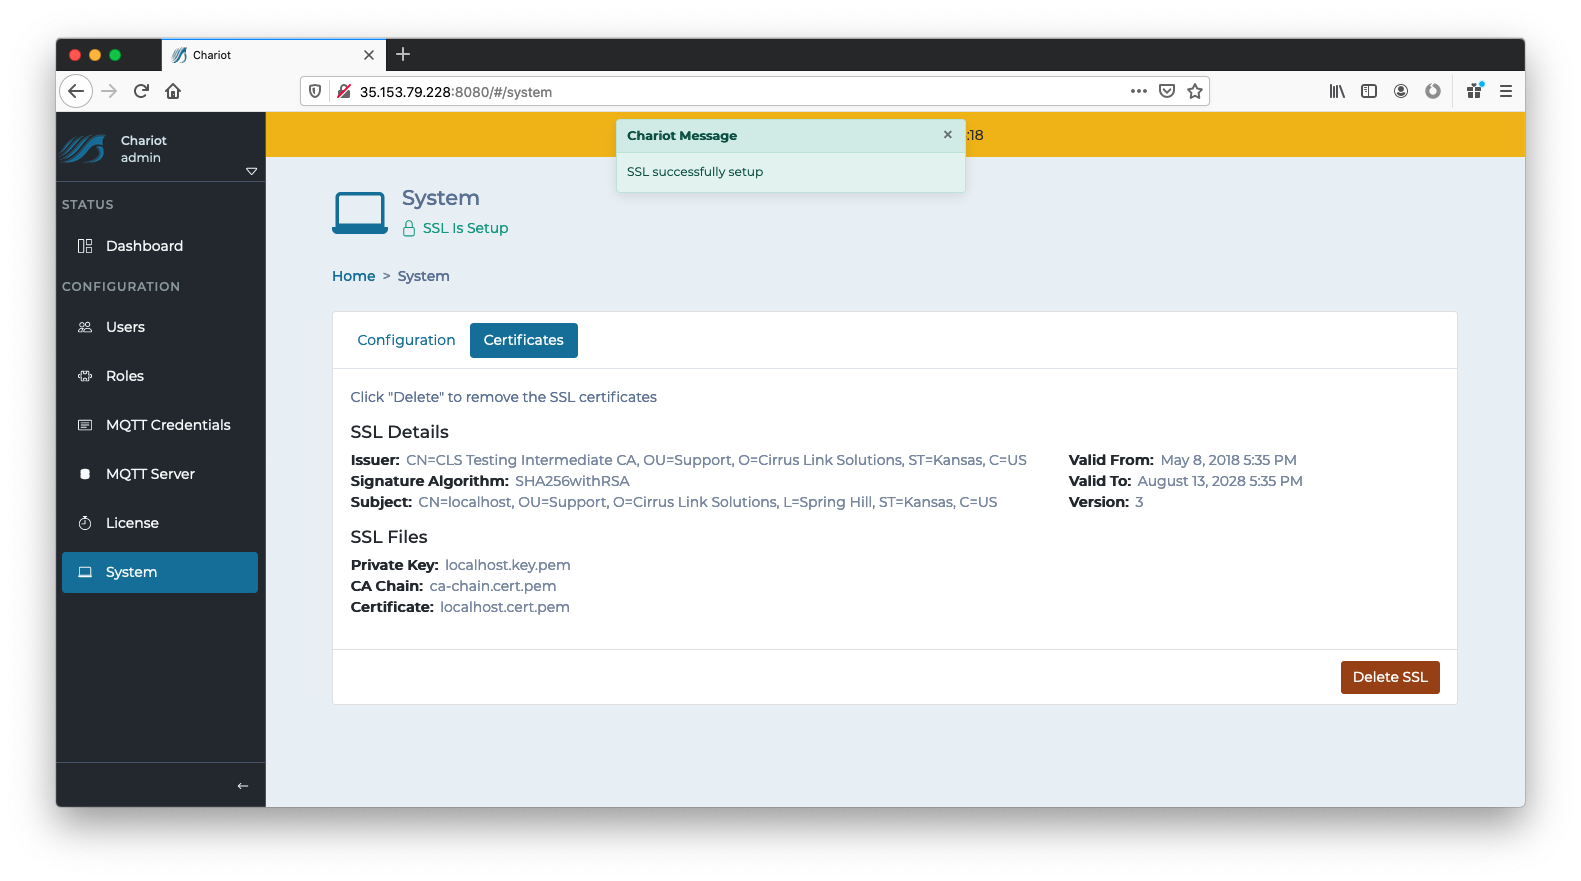 You should now see the SSL Certificate details along with the name of the files that were uploaded. SSL has now been setup.
Anonymous Client Connections
Chariot MQTT Server still requires MQTT credentials to authenticate incoming client connections, even when using client certificates to set up a TLS/SSL session. If clients will not be sending an MQTT username and password, anonymous connections must be enabled.
To enable anonymous connections, navigate to the Configuration → MQTT Server → Configuration tab and set Allow Anonymous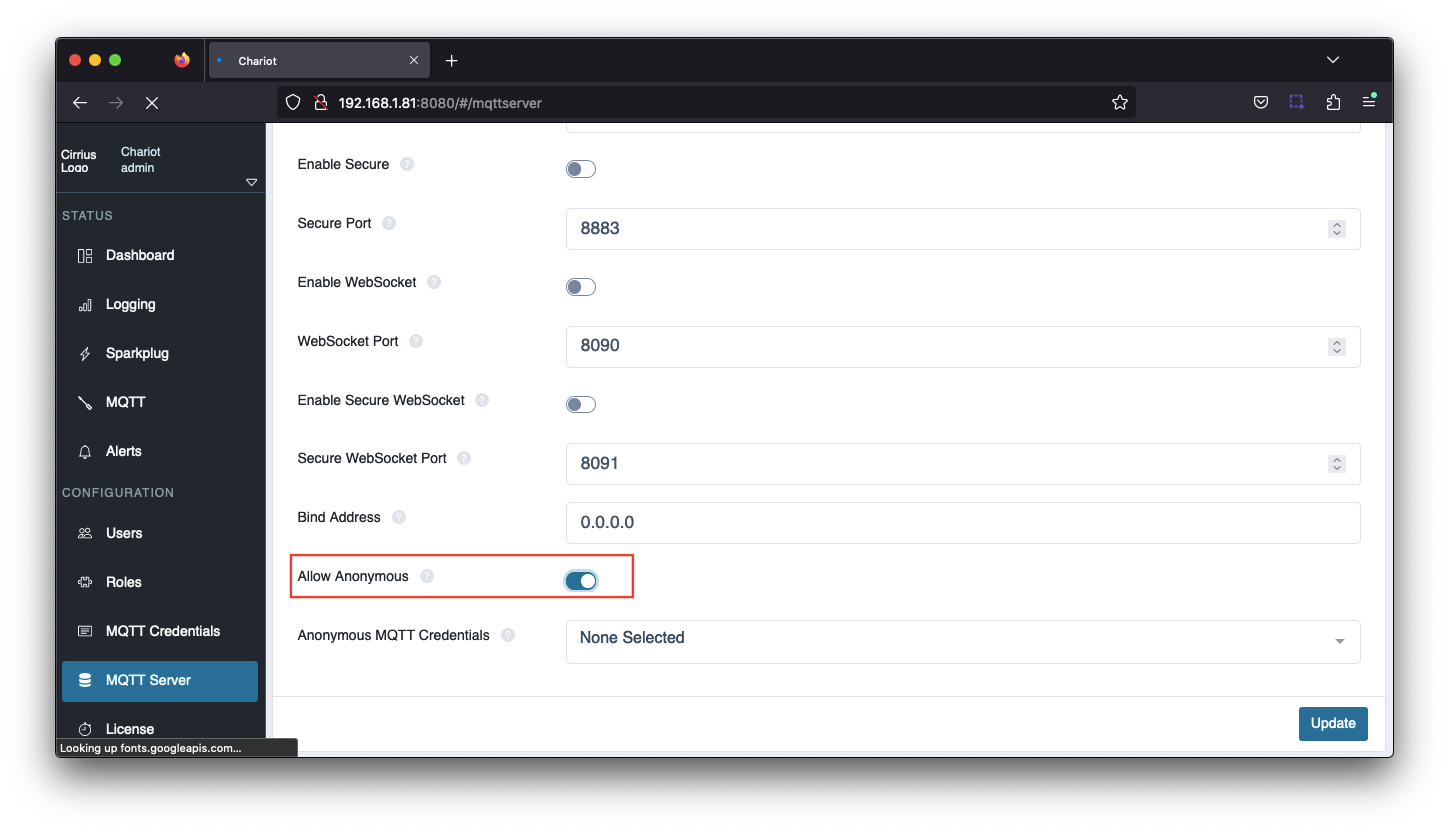
By default, an anonymous client connection will be allowed to publish and subscribe on # unless the Anonymous MQTT Credentials has been selected.
This will allow you to select any of the configured MQTT Credentials, configured under Configuration → MQTT Credentials, and MQTT Chariot will use the Publish and Subscribe ACLs for that MQTT Credential for all anonymous connections.
A Password will need to be configured for this MQTT Credential but will not be used by MQTT Chariot
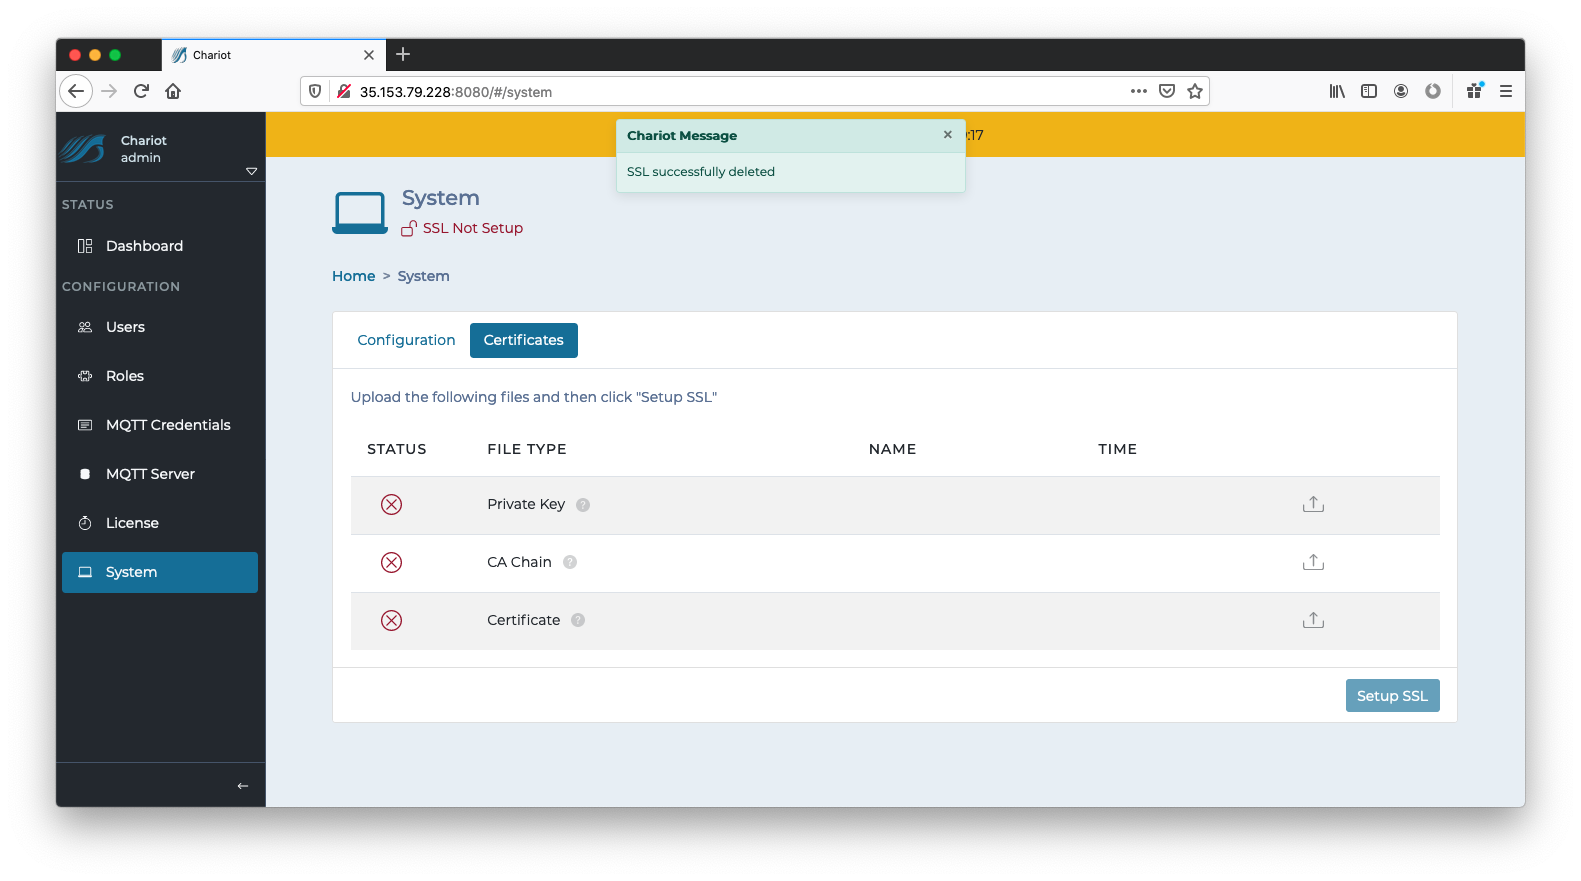
Deleting an SSL/TLS Certificate
In order to remove an SSL Certificate, navigate to the Configuration → System → Certificates tab where the SSL Certificate details are displayed. The "Delete SSL" button on the bottom right can be clicked to completely remove the SSL Certificates and keys that were previously uploaded to setup SSL. This will revert the Chariot MQTT Server to a pre-setup state as shown below:
Notes
Getting a Certificate from a Certificate Authority
The first step to securing MQTT communication is to get a certificate from a CA. There are many available such as Verisign, Thawte and RapidSSL. There are also a number of other certificate authorities available. The general process is as follows:
- Generate a RSA key
- This is the private key and used for encryption/decryption of data. Keep this private and don't share it with anyone including the CA. However, the Chariot MQTT Server will need it to encrypt/decrypt data.
- Create a Certificate Signing Request (CSR)
- Generally the CA can provide instructions on how to generate a CSR. Windows, Linux, and OSX all have tools available for generating a CSR and there is lots of documentation online about all of them.
- Make sure the Common Name specified in the CSR matches the server URL (i.e. example.com). Also, do not include www. because this will used for MQTT.
- Give the CSR to the CA
- The CA will then provide back a public certificate for use with MQTT Distributor
- In some cases depending on the CA an intermediate certificate may also be required. If so, the CA will also provide this.
Creating a Self-Signed Certificate
Creating your own CA, intermediate CA, and generating your own signed certificates can be done following the three steps below using some open source tooling. Note creating an Intermediate CA is not explicitly required, but is recommended if you will be using self-signed certs in a private network in production. If this is simply for development that step can be skipped and the root CA can be used to sign server certificates. Again, using self-signed certs in production over the Internet is not recommended.
- Create the Root Pair
- Create and Sign the Intermediate Pair
- Create and Sign the Server pair
- Make sure the Common Name specified in the CSR matches the server URL that will be used by the clients (i.e. 192.168.1.100). It could also be the network hostname.
Overview
Content Tools