![]()
Contents
Cirrus Link Resources
Cirrus Link Website![]()
Contact Us (Sales/Support)![]()
Forum![]()
Cirrus Link Modules Docs for Ignition 7.9.x![]()
Inductive Resources
Ignition User Manual![]()
Knowledge Base Articles![]()
Inductive University![]()
Forum![]()
![]()
Cirrus Link Website![]()
Contact Us (Sales/Support)![]()
Forum![]()
Cirrus Link Modules Docs for Ignition 7.9.x![]()
Ignition User Manual![]()
Knowledge Base Articles![]()
Inductive University![]()
Forum![]()
...
| Note |
|---|
| This is only supported |
...
| in |
...
| 4.0.7 or newer release of Azure Injector. |
...
Upon completion of this module tutorial you will have an Ignition Gateway with the Azure Injector module connected and publishing live Tag tag data to an Azure IoT Hub and being . Those messages will then be automatically routed and stored to in an Azure Storage Container.
...
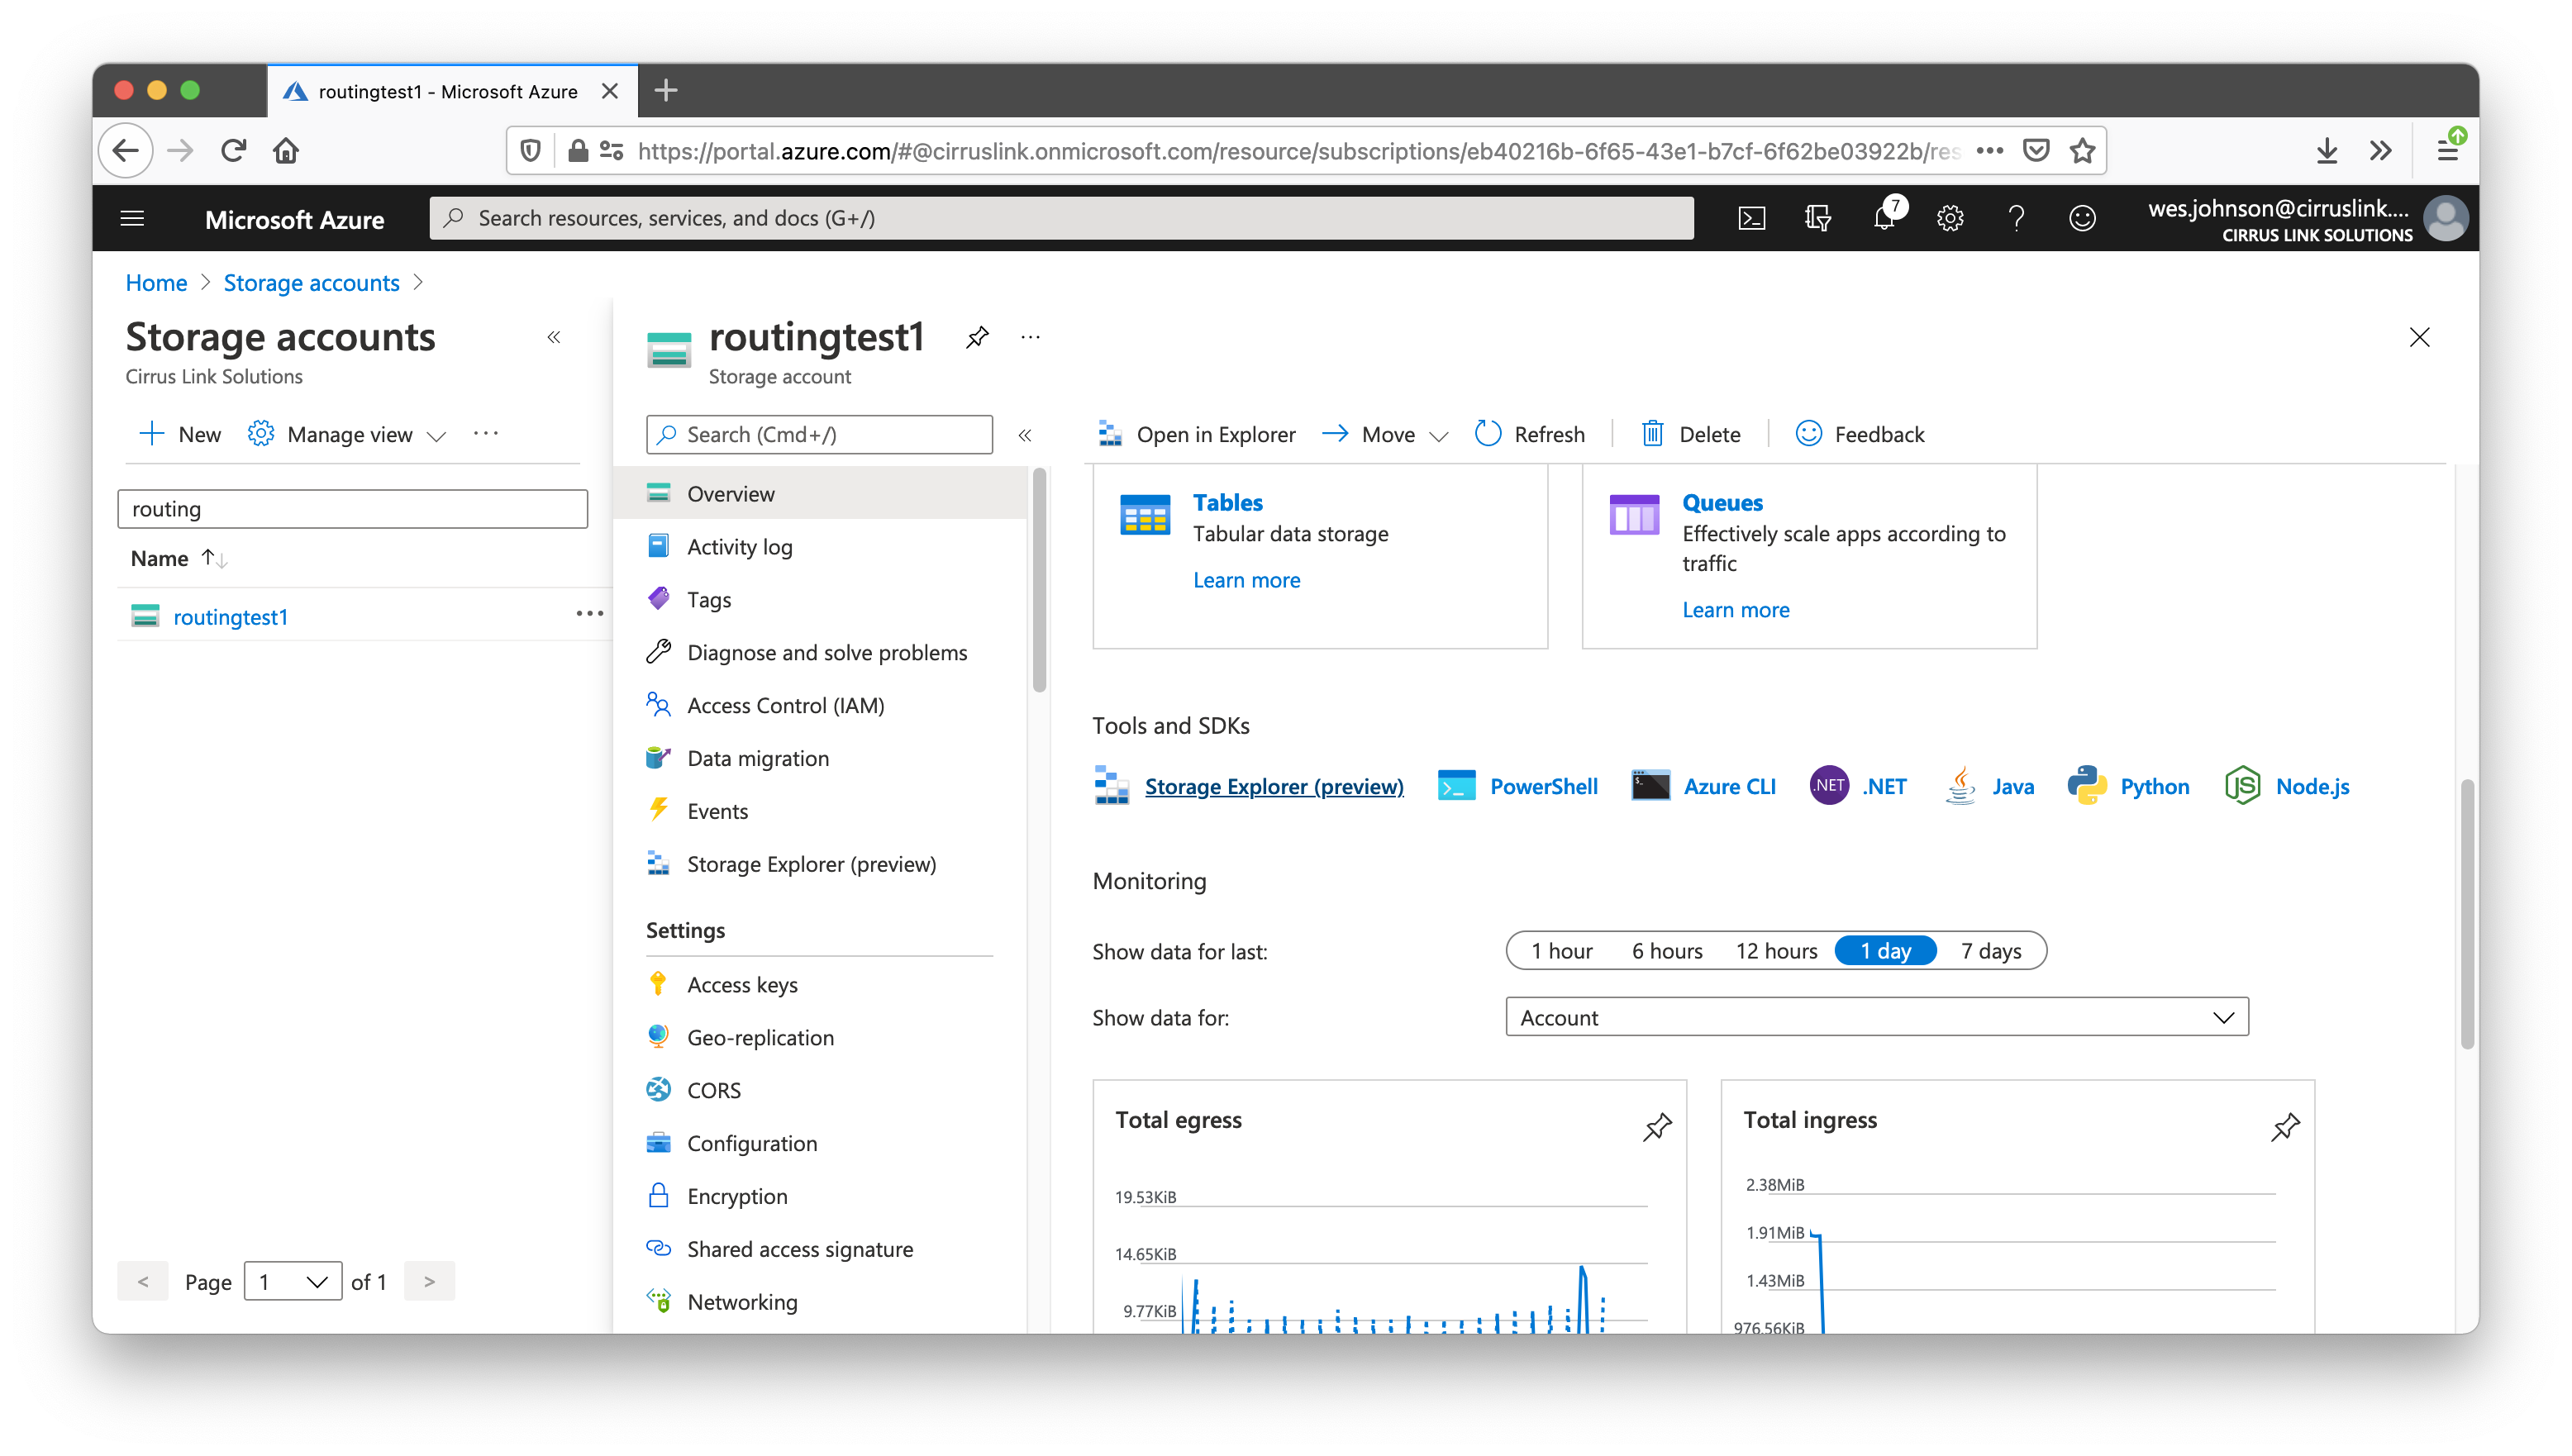
Specify the Subscription, Resource Group, Storage account name, and Location as shown above. Leave the other fields default. Now click 'Review + Create' near the bottom of the screen. All of the other tab fields (under Networking, Data Protection, Advanced, and Tags) can be left default for the purposes of this example. However, if this is intended to run in production make sure to visit these tabs and set up the Storage Account appropriately for your use case and security needs. After creating the Storage accountAccount, you should see it on the main Storage Accounts page as shown below:
...
In the Azure portal, browse to the IoT Hub that was provisioned as part of the prerequisites of this tutorial. Using the left navigation pane, scroll down to 'Message routing' under the 'Messaging' heading as shown below.
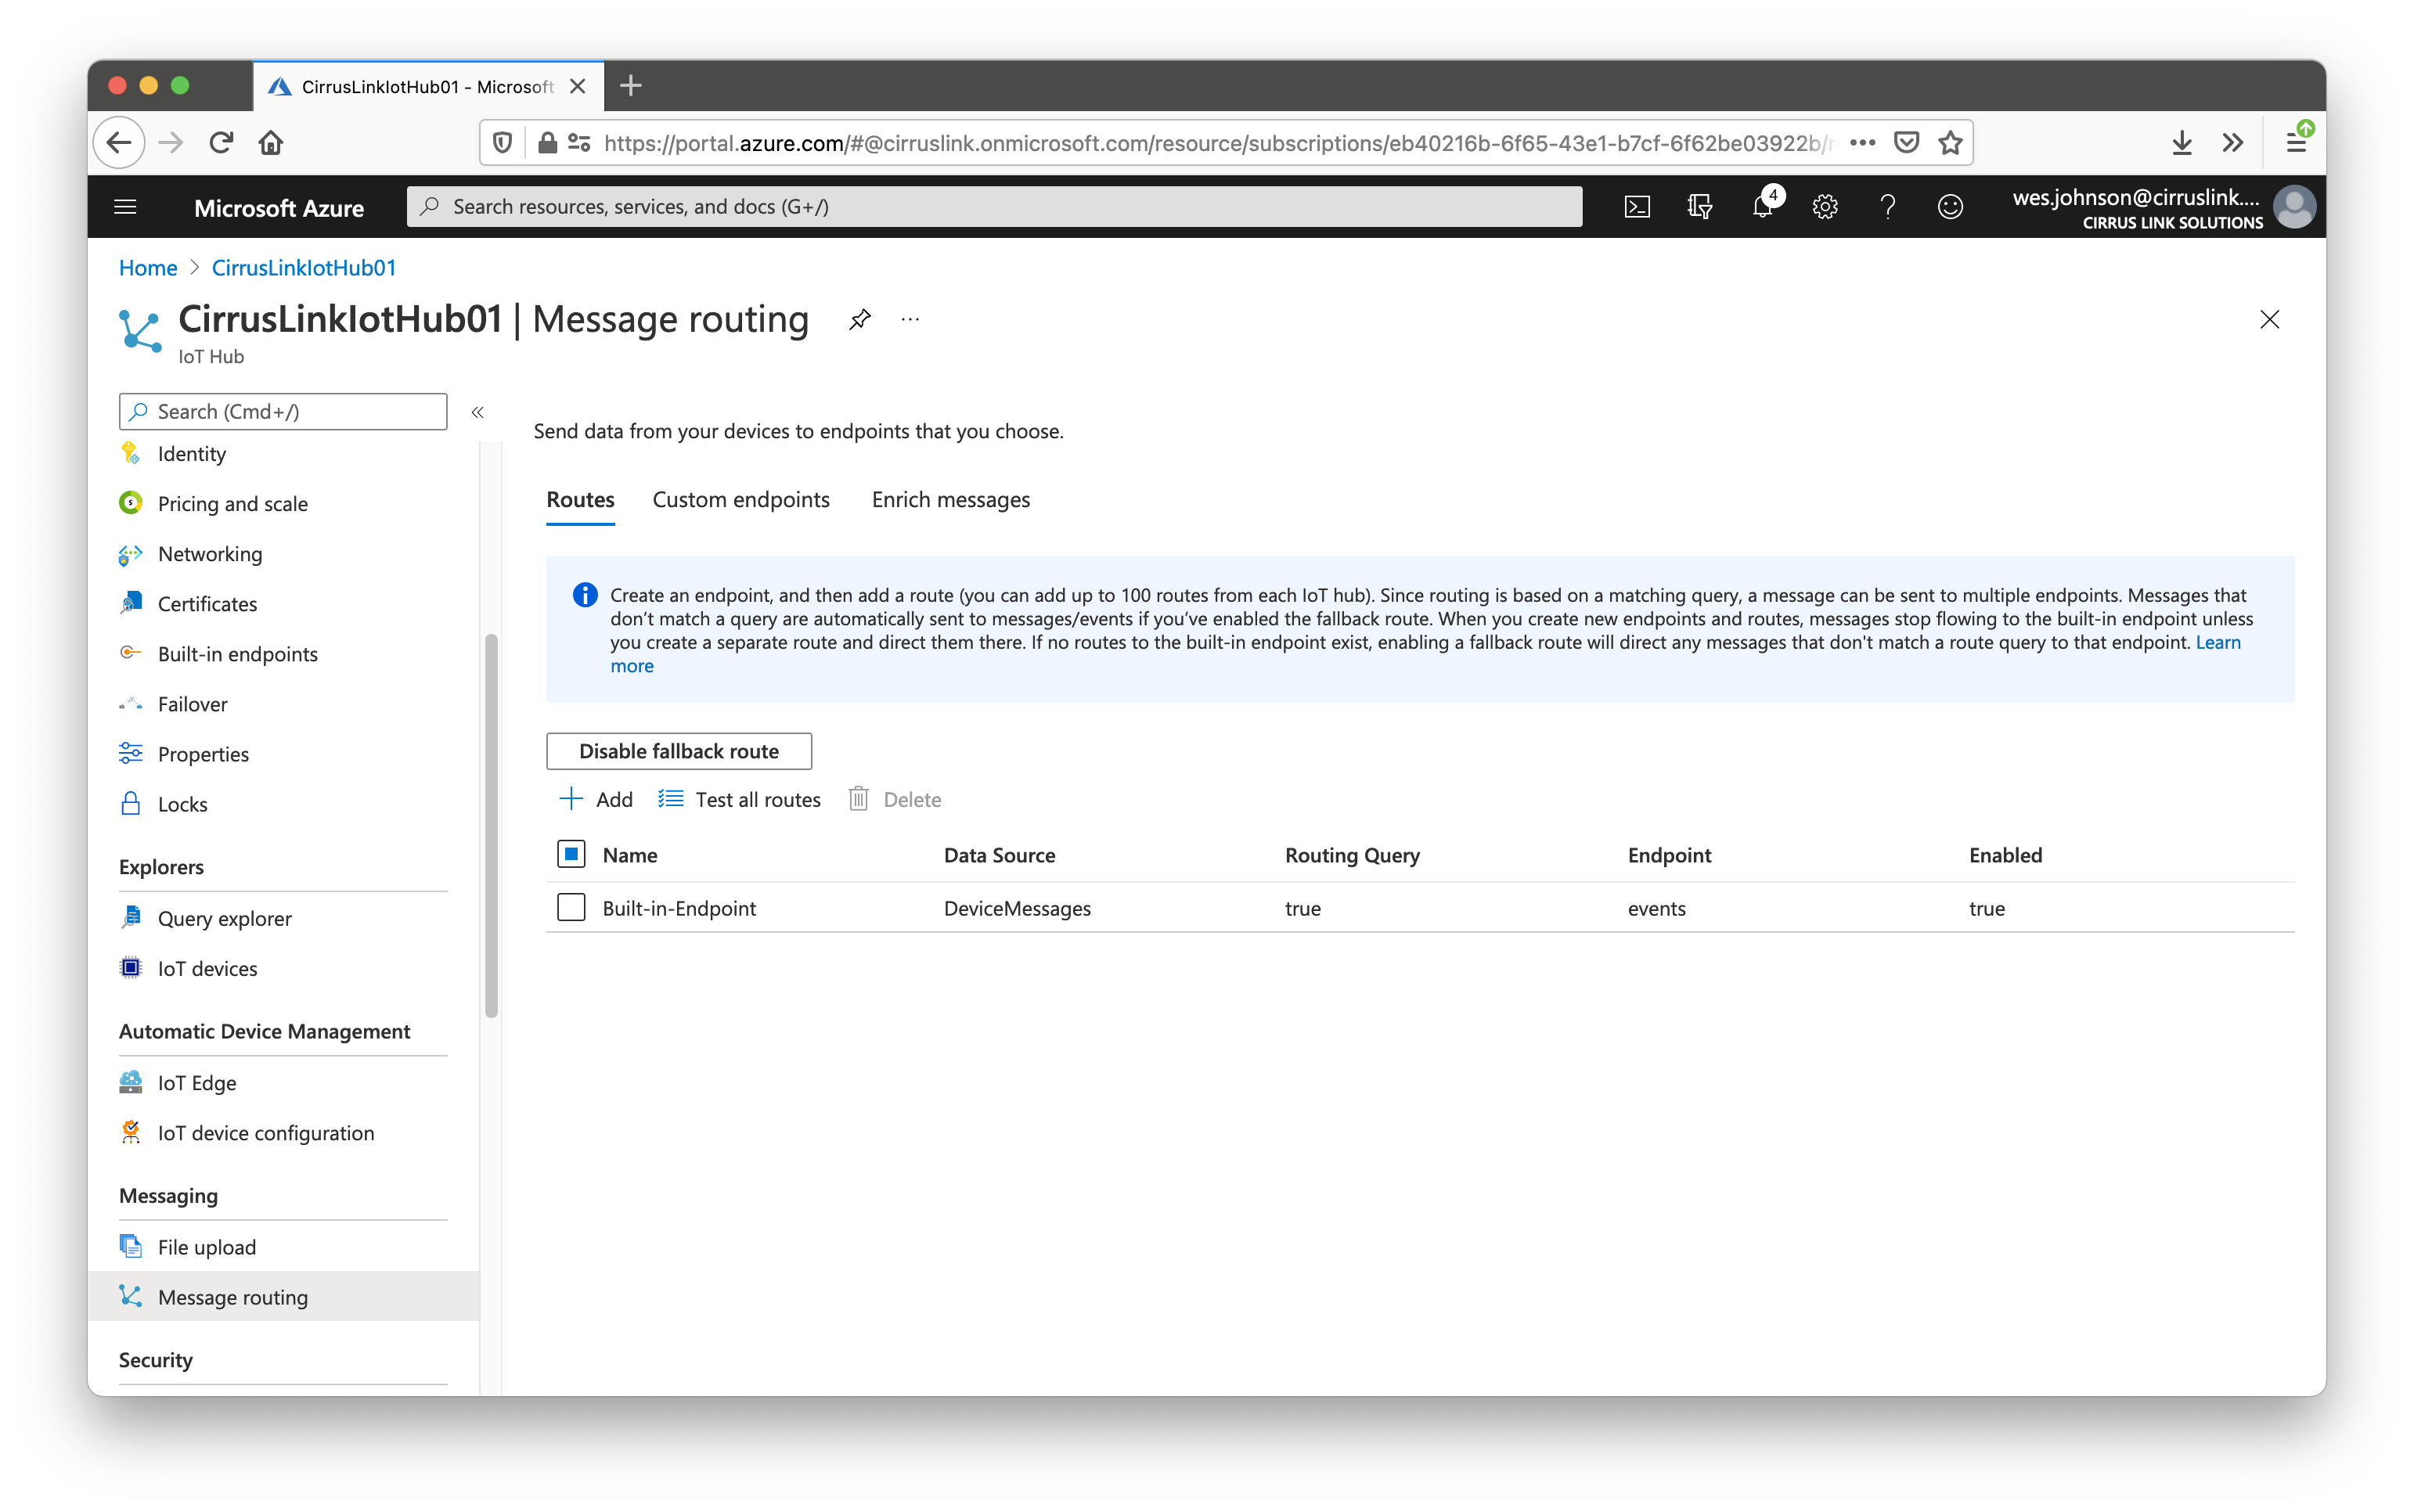
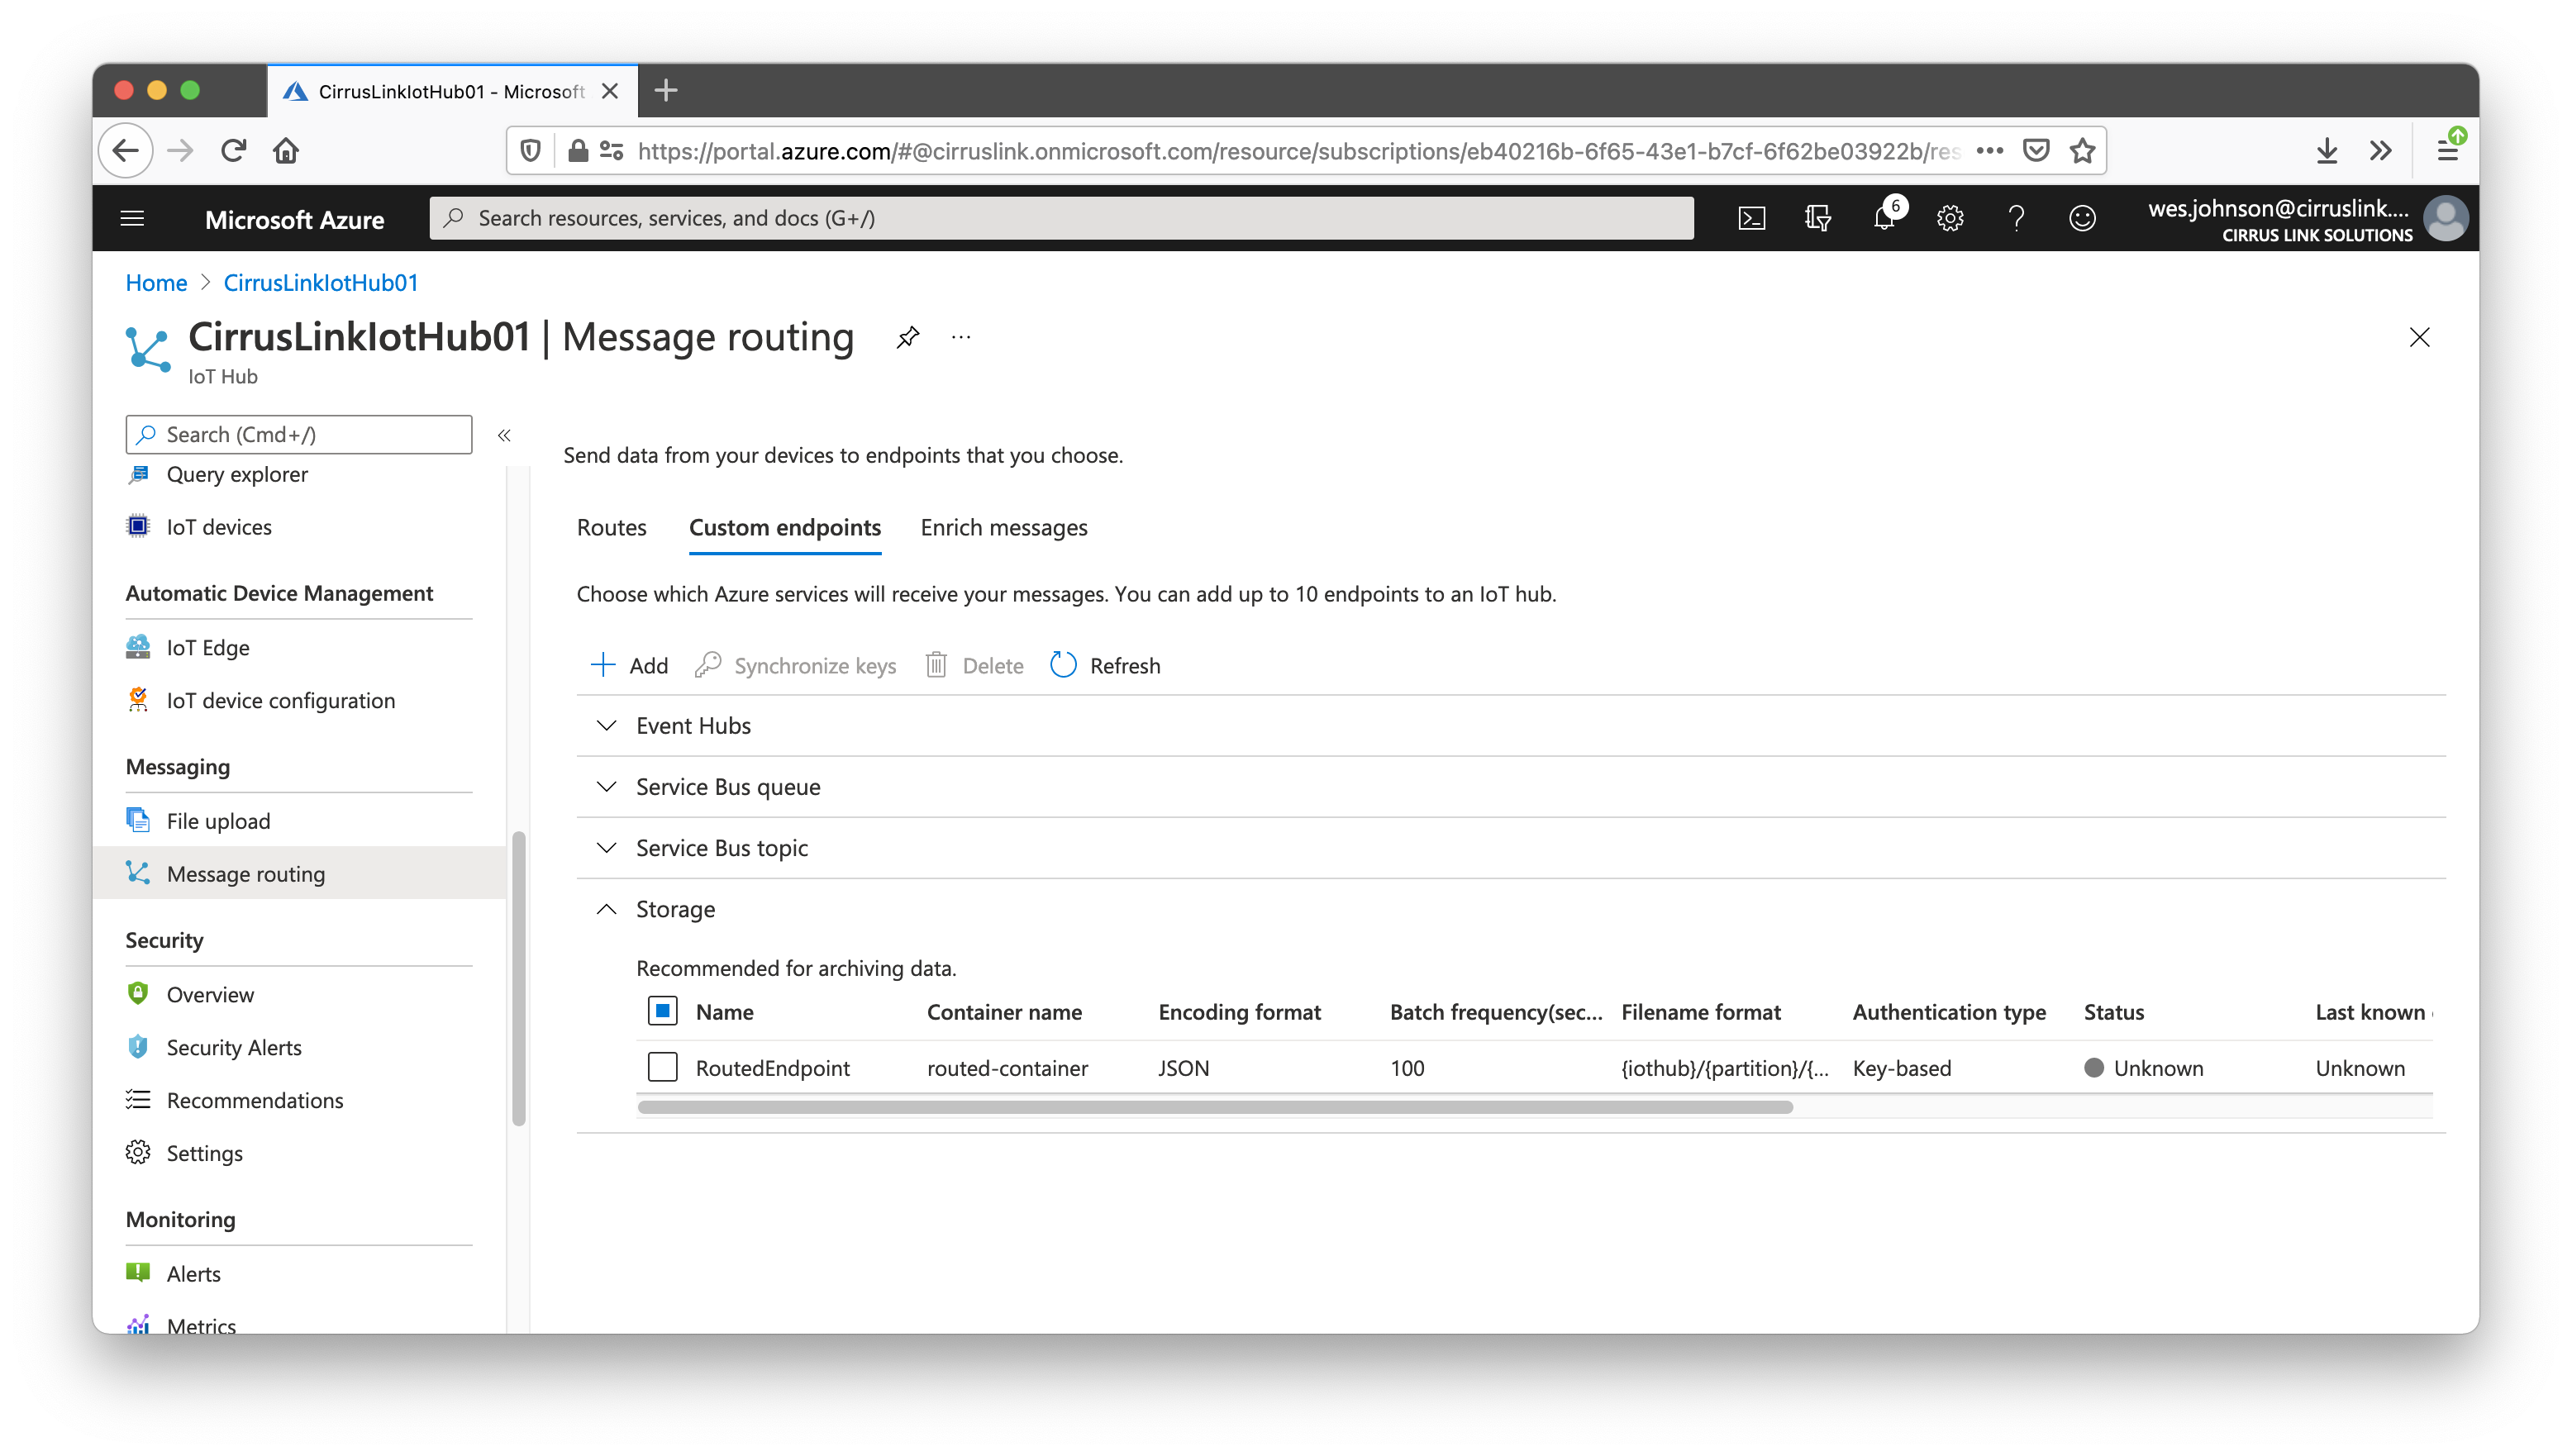
In the main panel you will see tabs including 'Routes', 'Custom Endpoints', and 'Enrich messages'. Select 'Custom endpoints' as shown below:
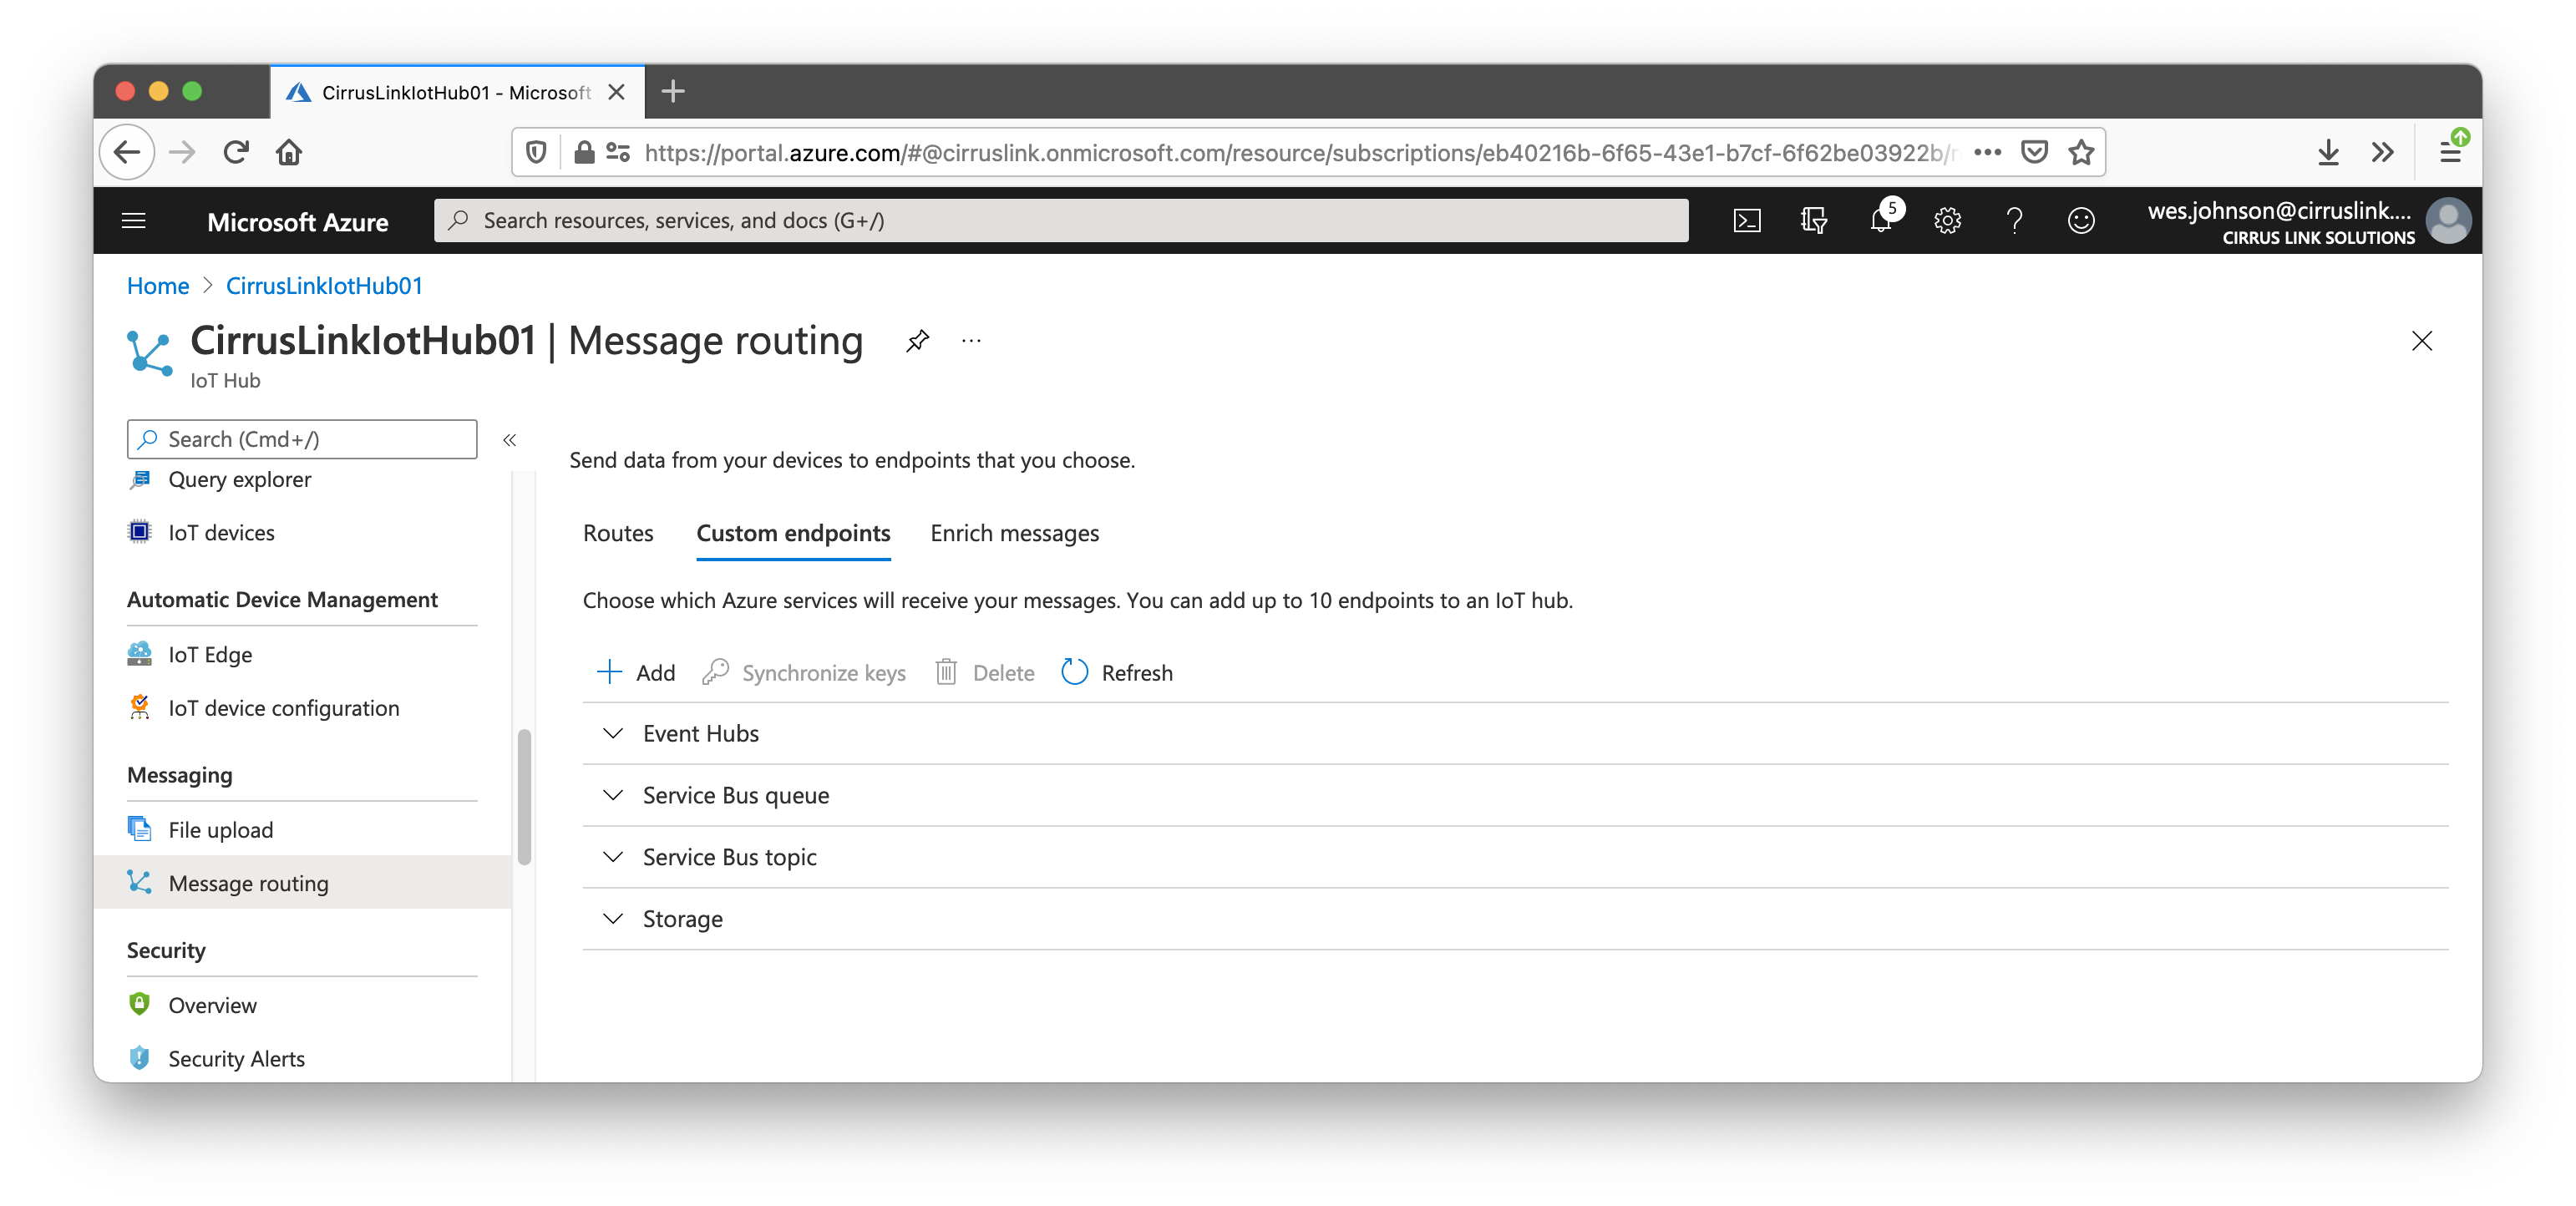
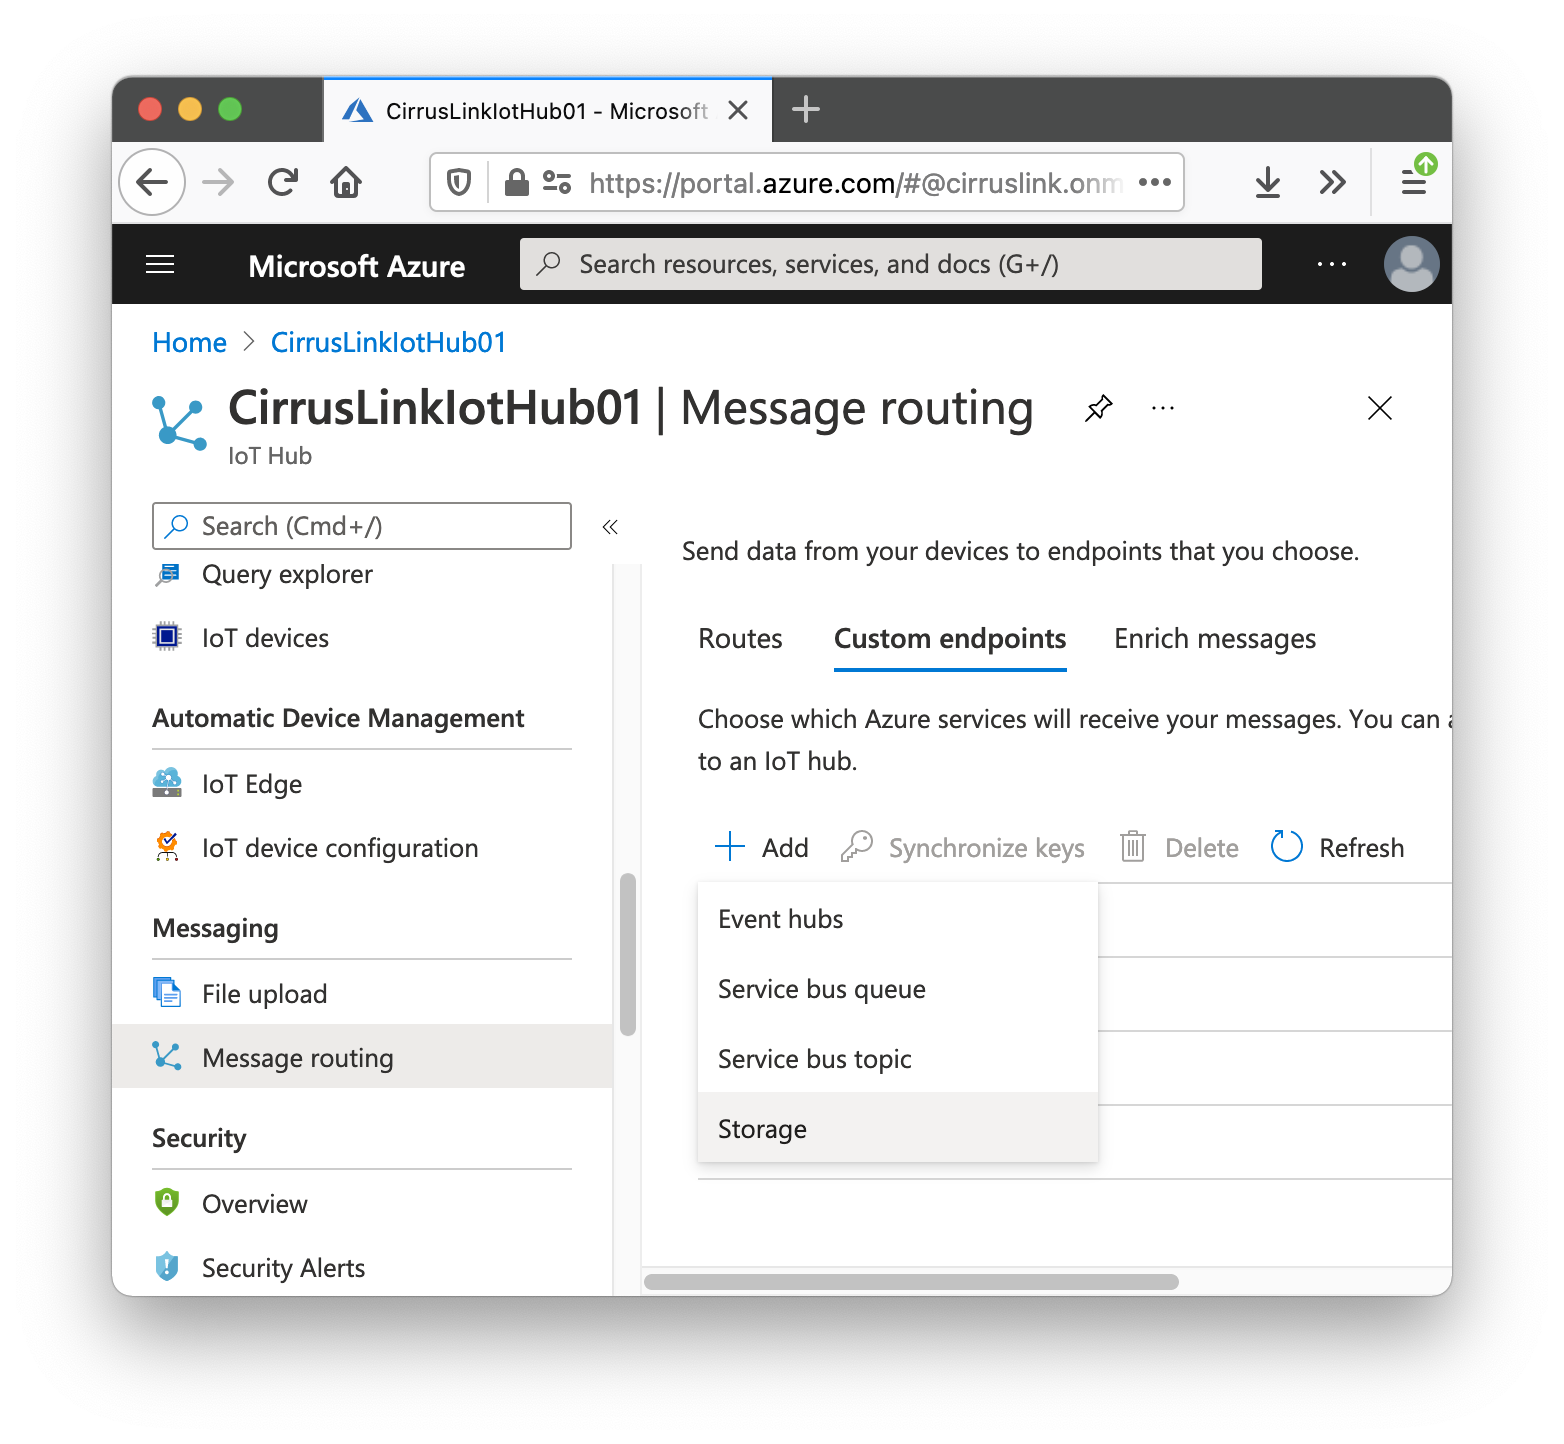
Now click the '+ Add' button to add a new Custom Endpoint. This will open a drop down menu. Select 'Storage' as the endpoint type as shown below.
This will open the window below:
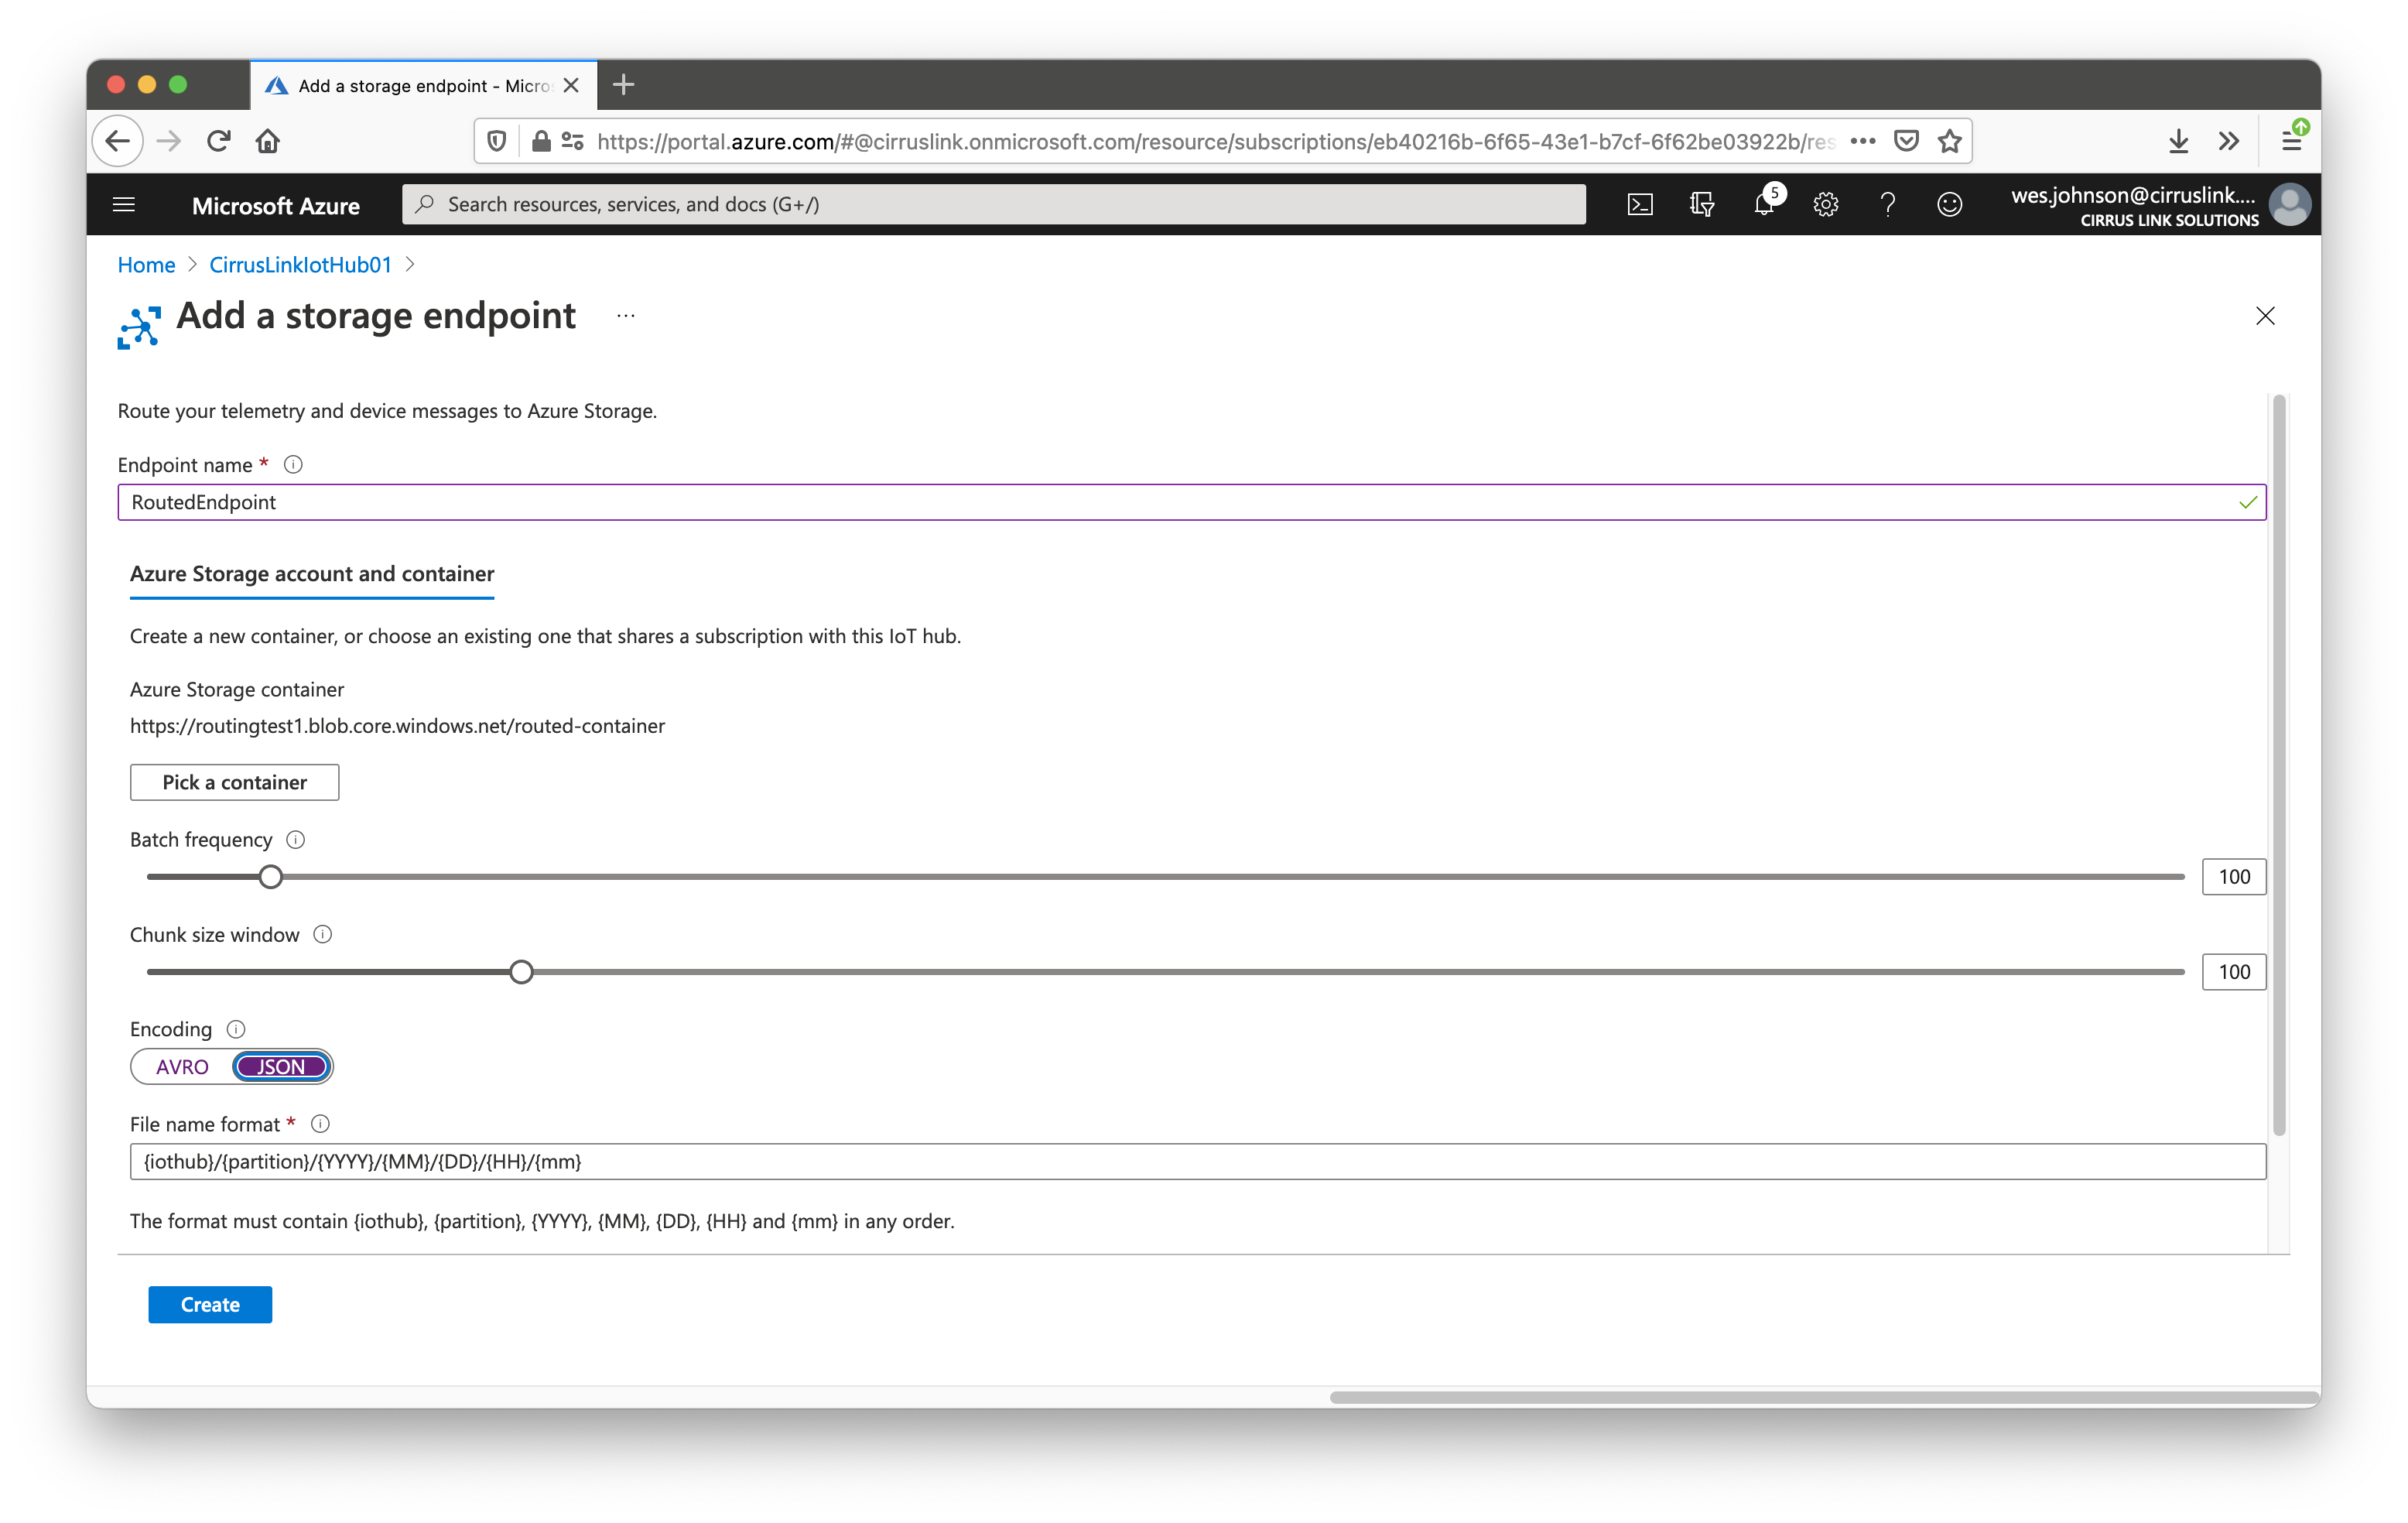
Now give it a name and also select the Storage Container that was created during Step 2 of this tutorial. Also, make sure to set the 'Encoding' type to JSON as shown above. Leave all other fields default. Finally click 'Create'. When the endpoint creation completes, you should see the created endpoint as shown below.
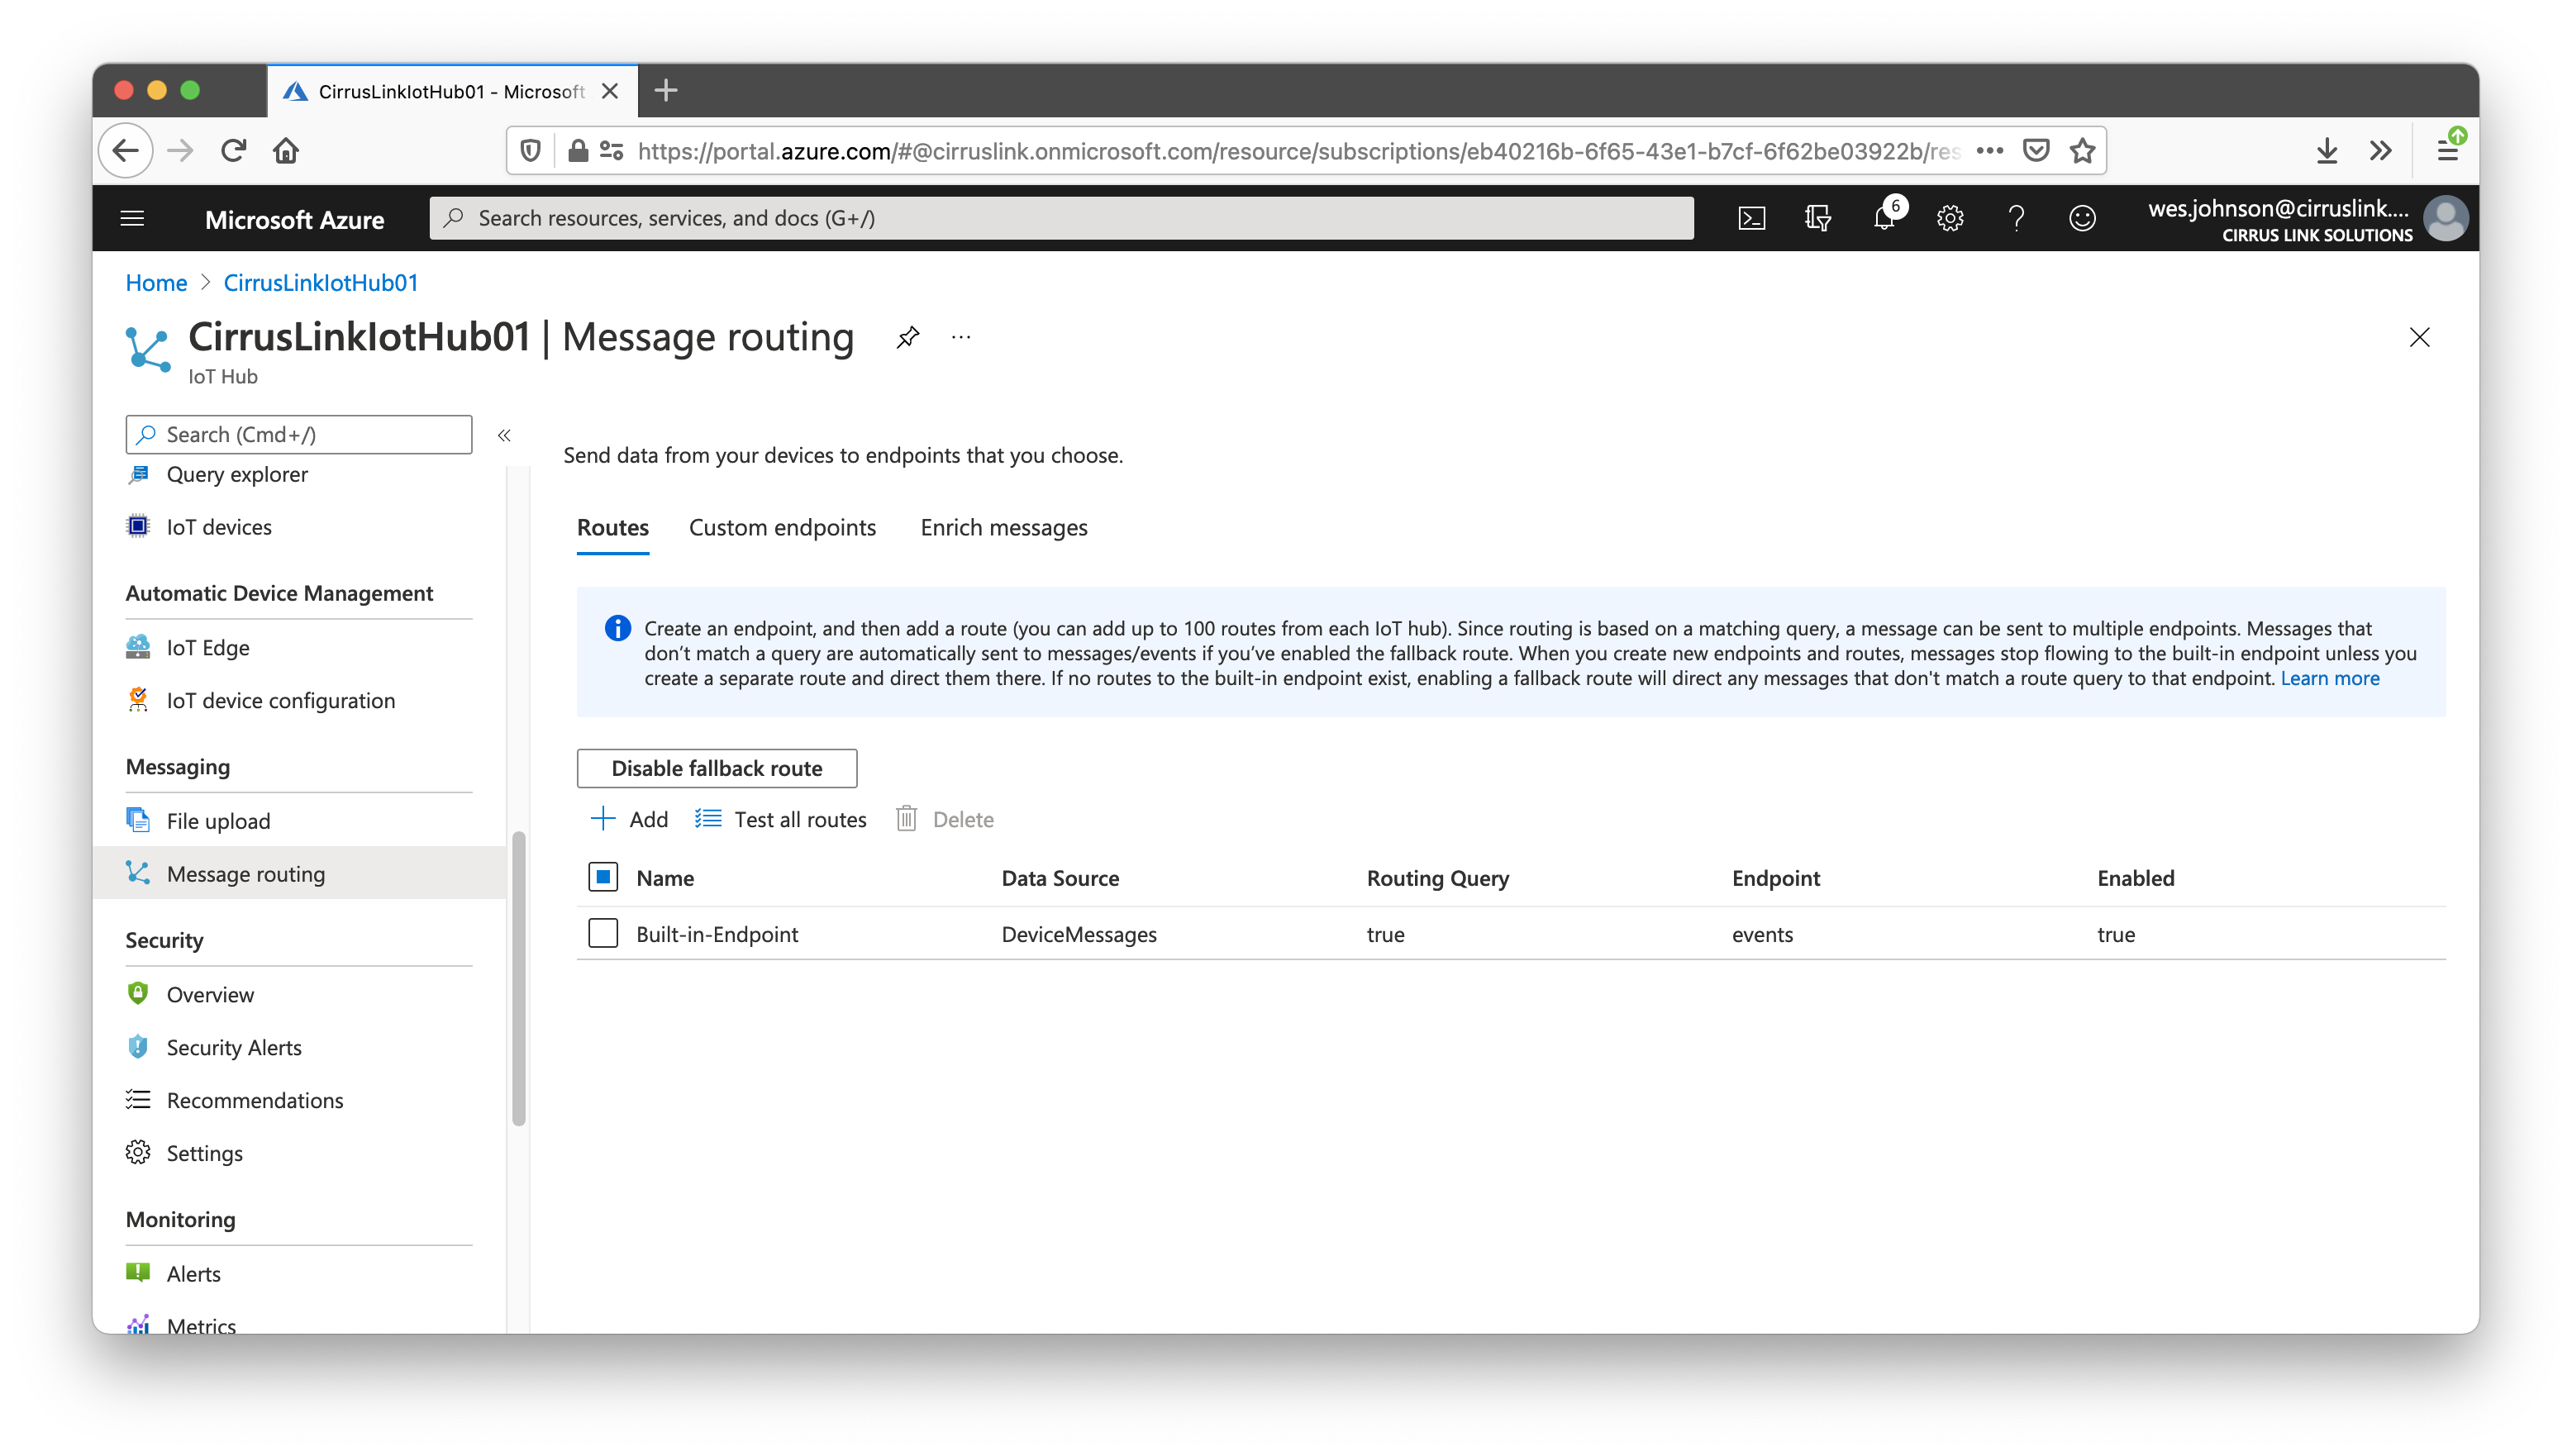
Now switch back to the 'Routes' tab at the top of the main panel as shown below.
Now click the '+ Add' button to create a new route. This will open the following window.
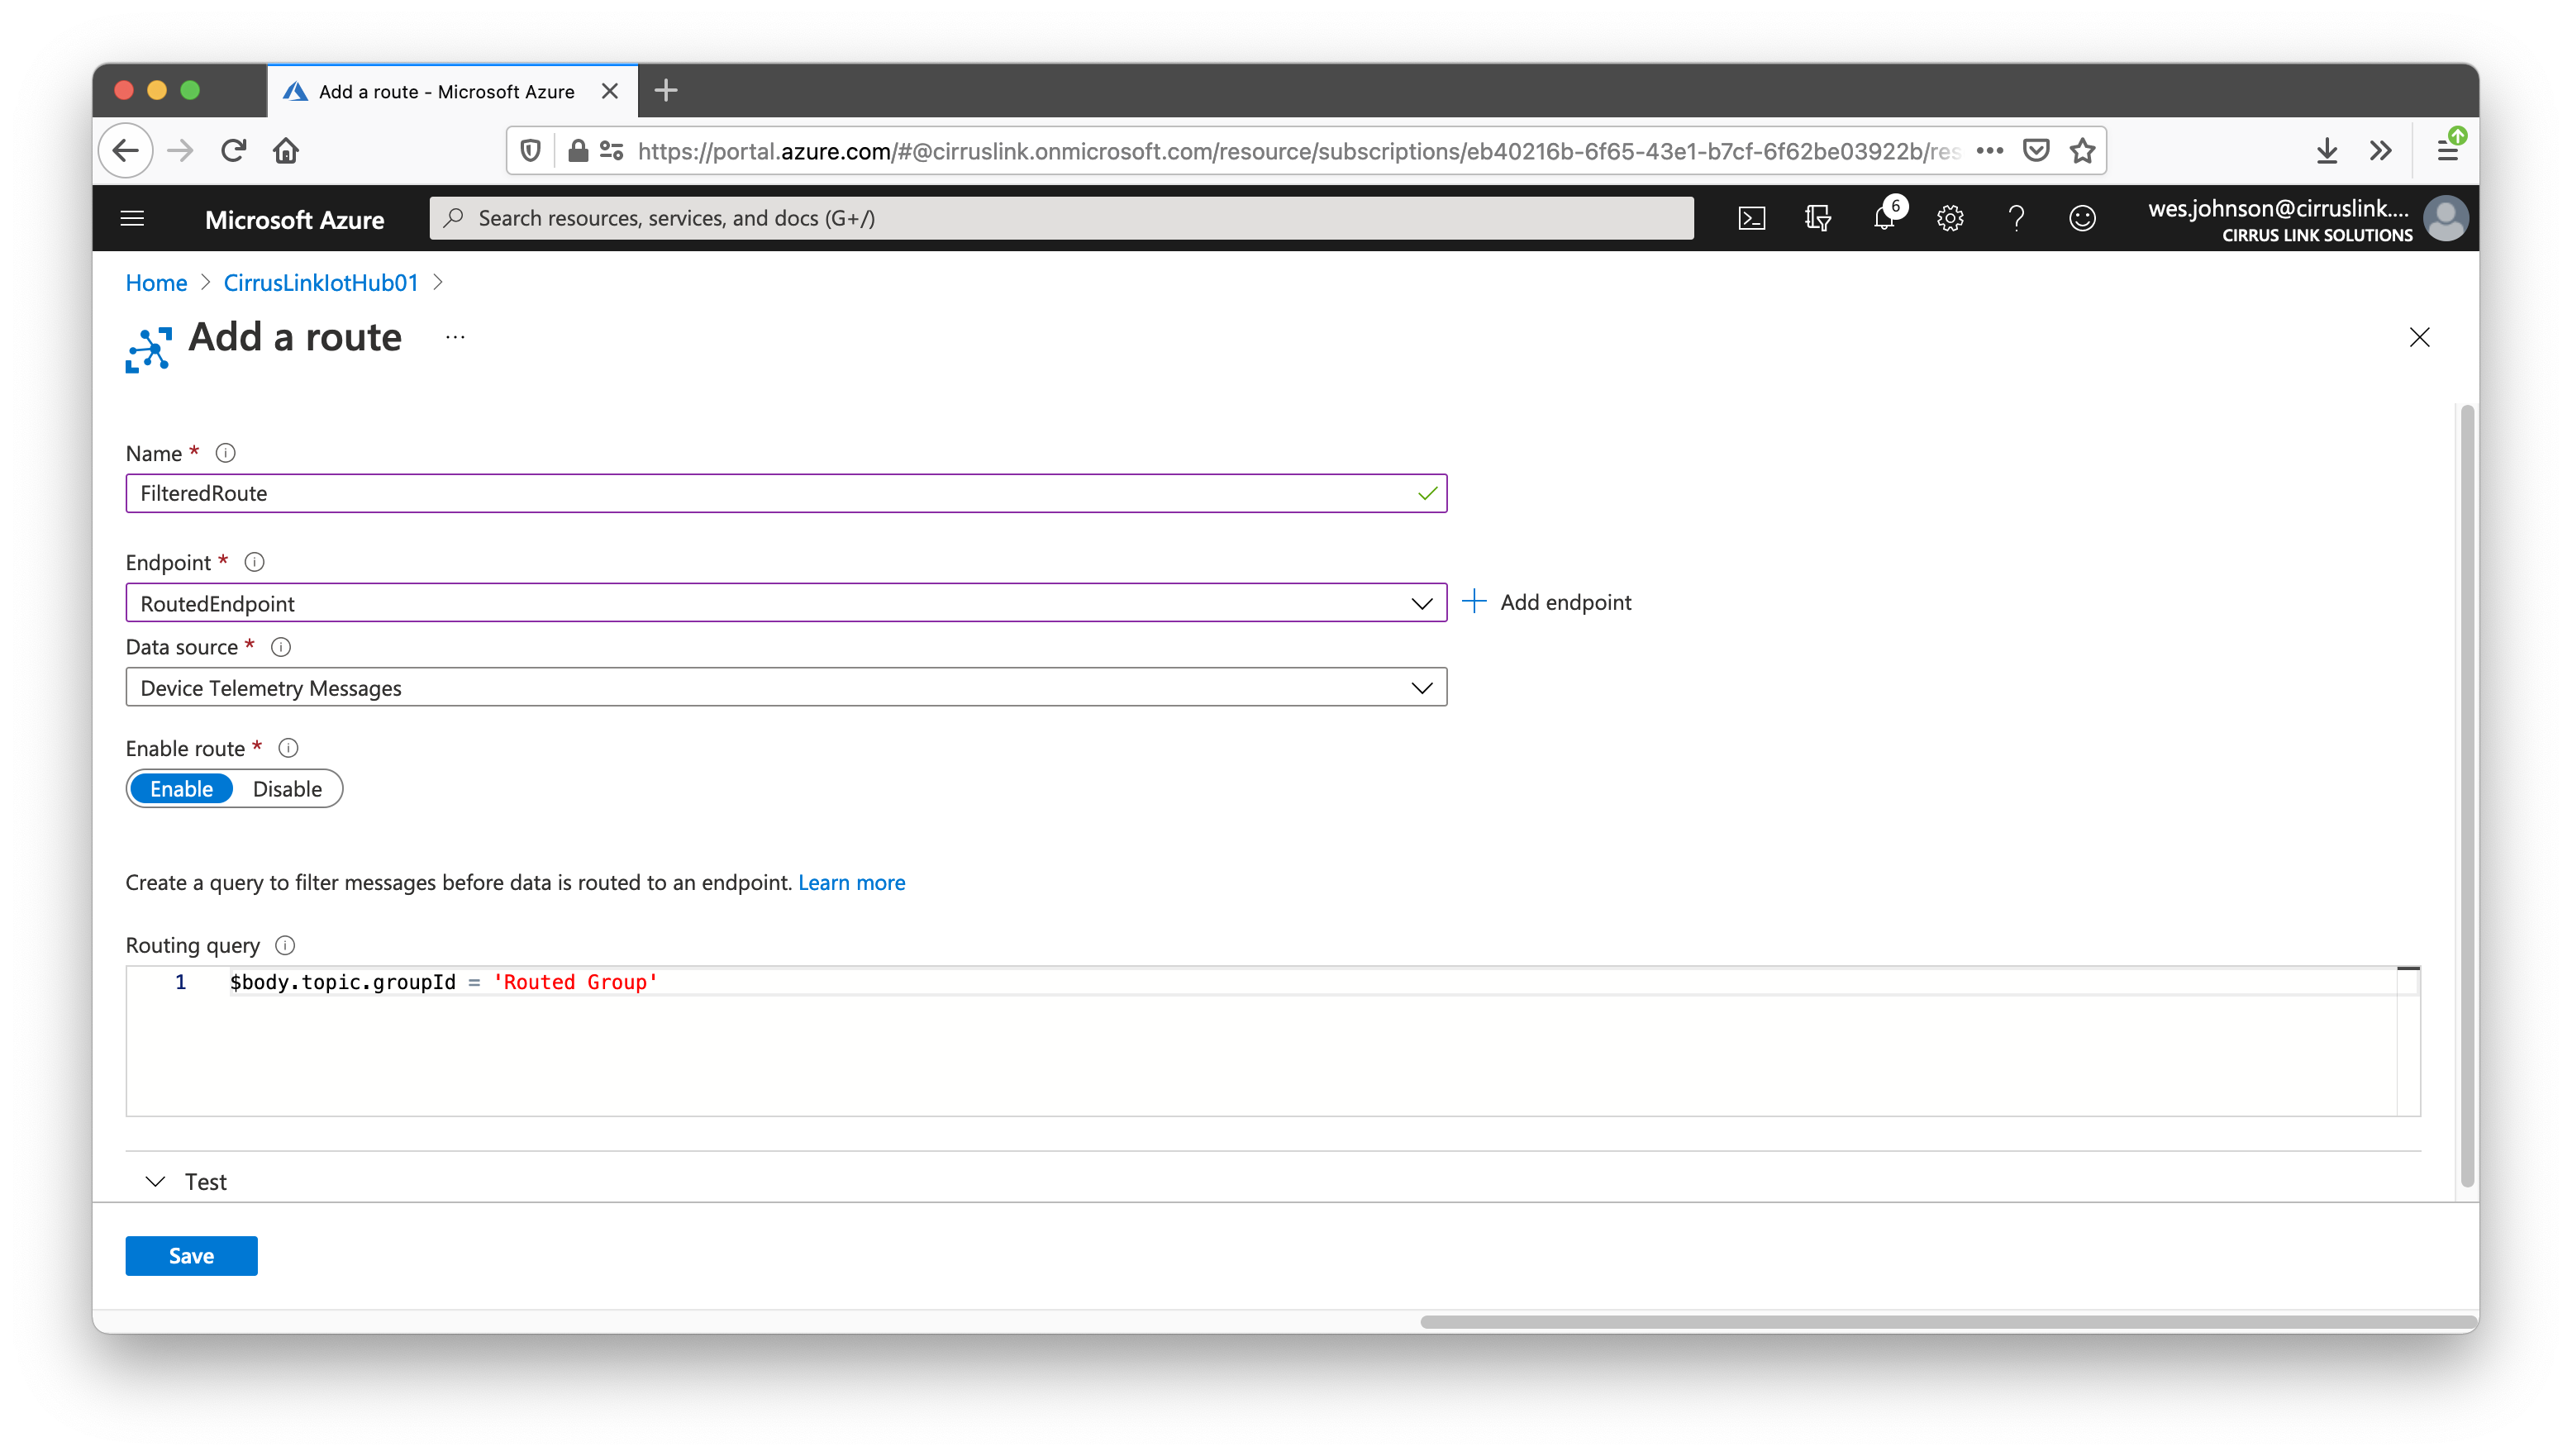
Set the Name, Endpoint (use the storage endpoint you just created) and leave the Data source to the default of 'Device Telemetry Messages'. Also set the Routing Query to the following (and as shown above):
| Code Block |
|---|
$body.topic.groupId = 'Routed Group' |
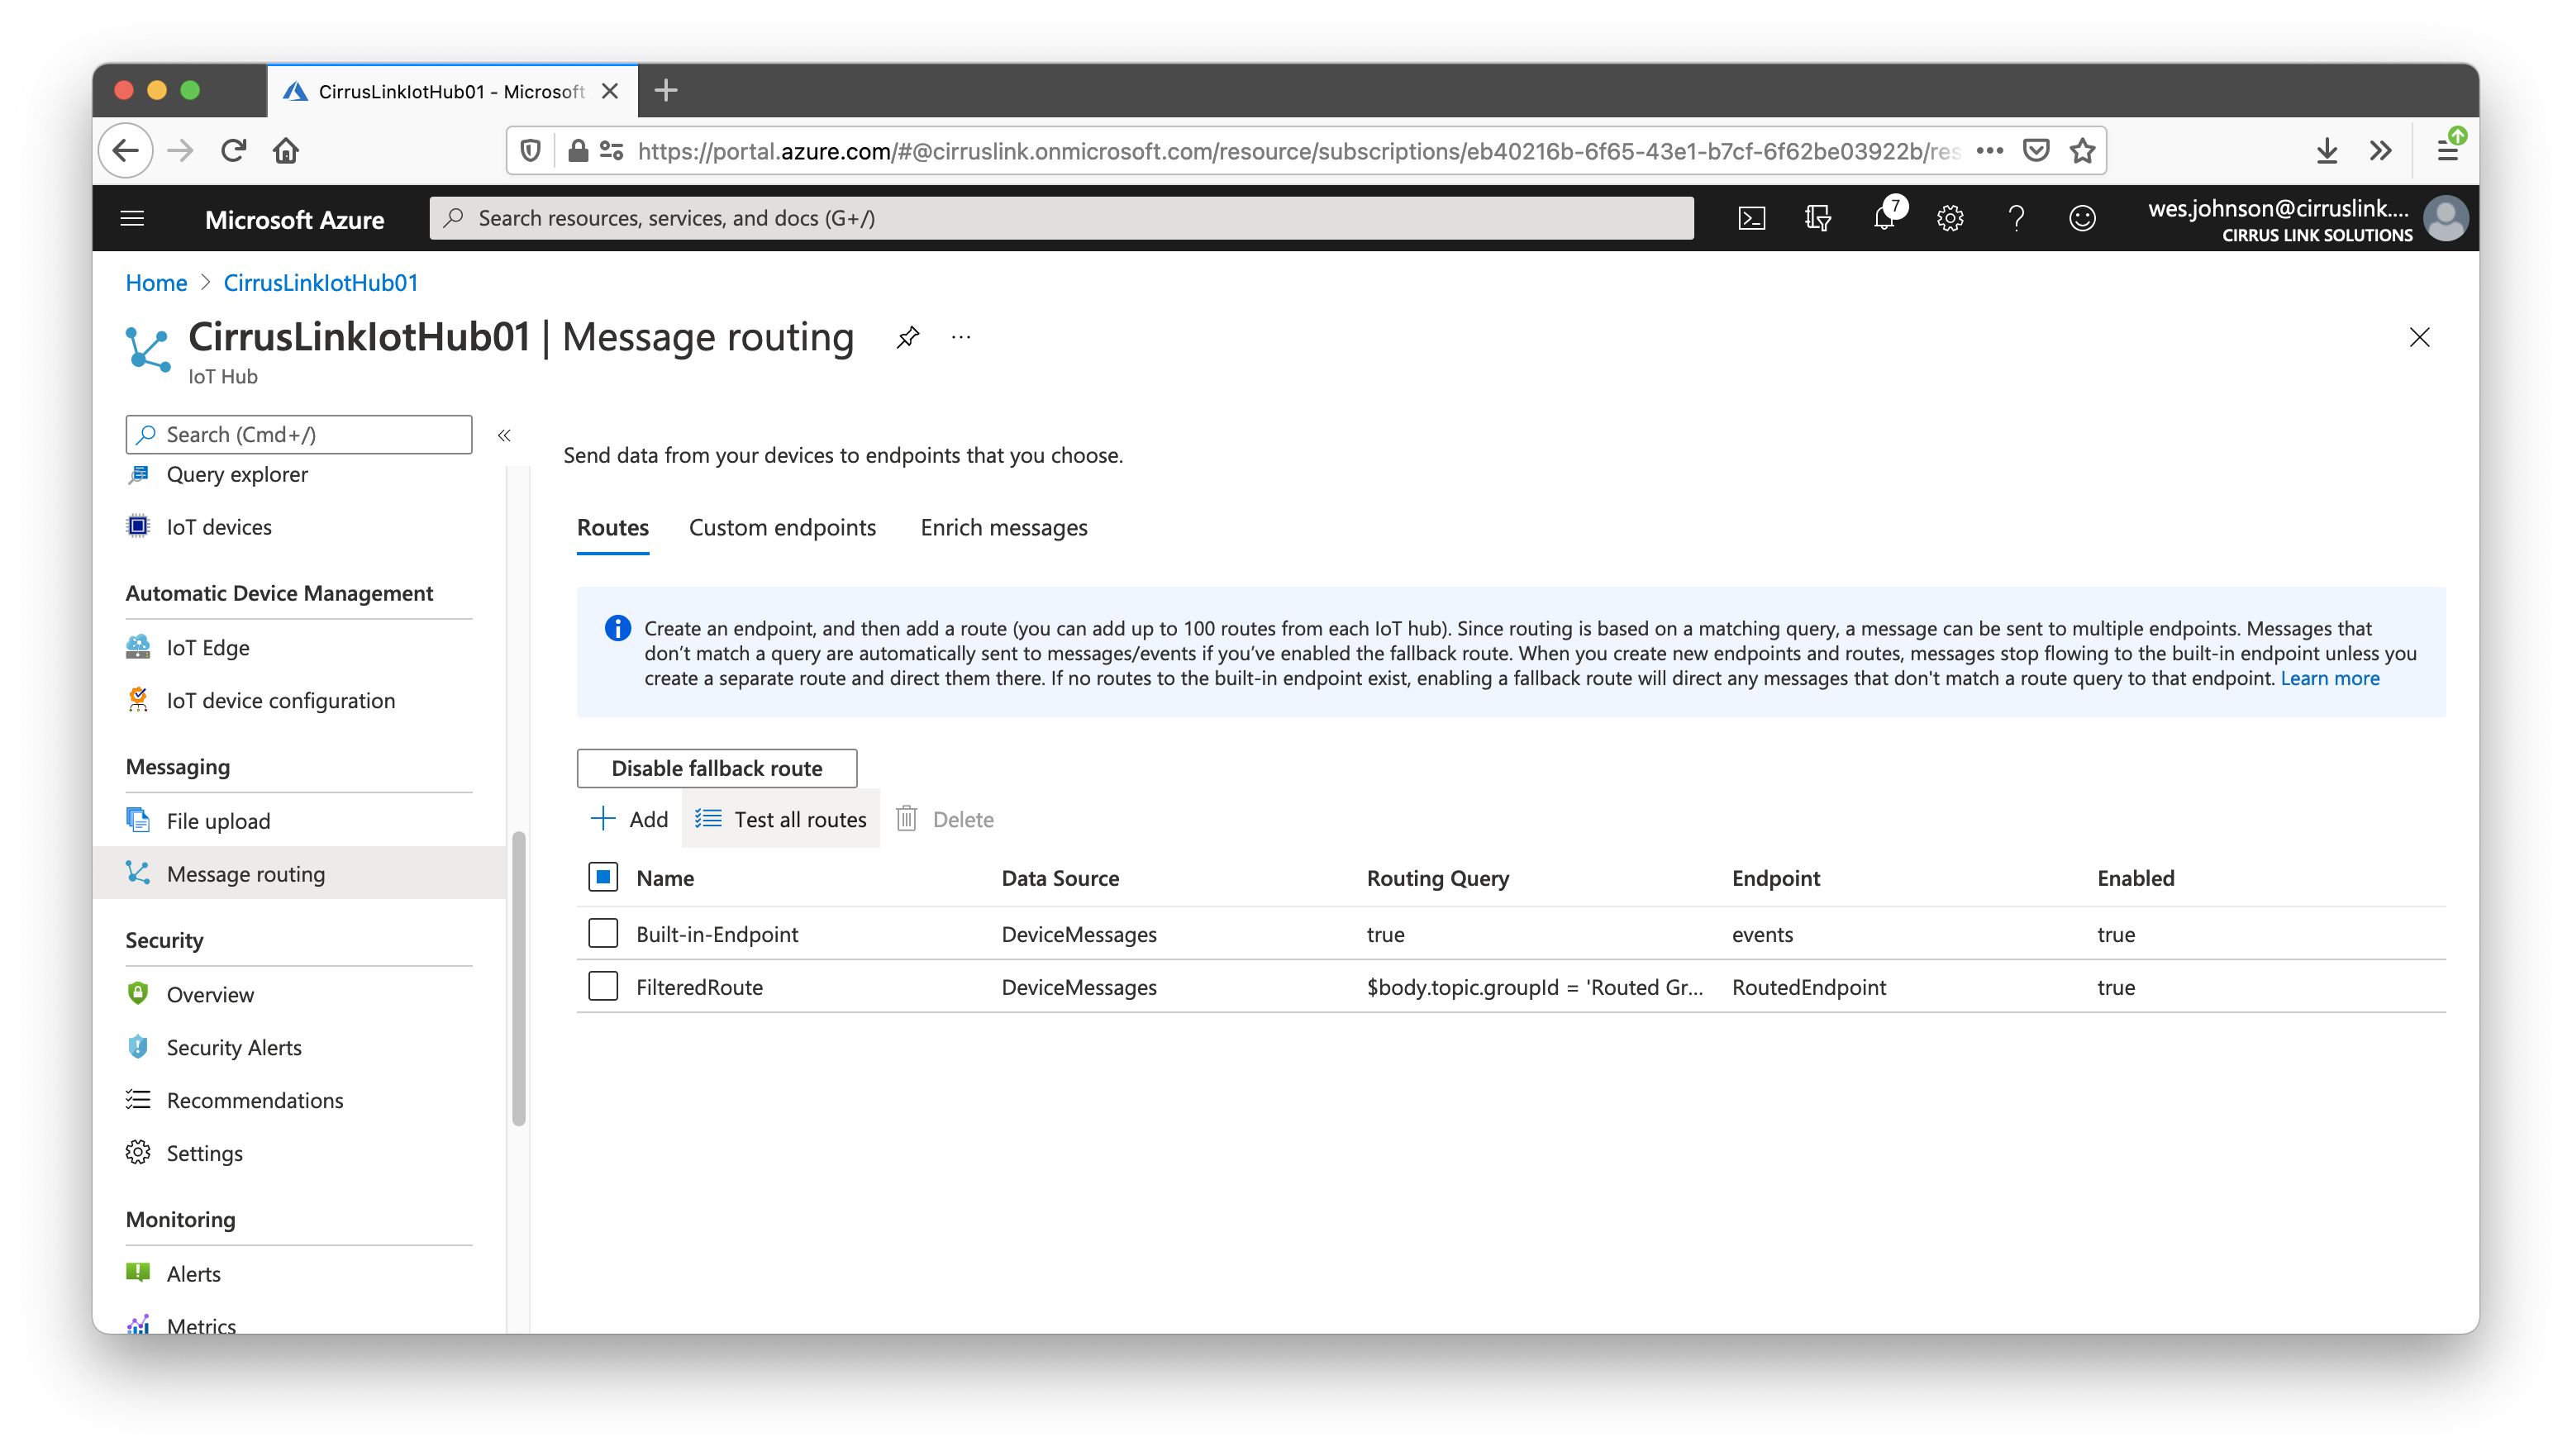
Finally, click Save to save the route. You should now see the newly created route as shown below.
At this point, IoT Hub should be ready to route messages based on the content of the message.
Now browse to the Ignition Gateway Web UI and to the Azure Injector Settings and finally to the 'Azure IoT Hubs'. You should see the 'Test Setting' that was created in the prerequisite tutorial as shown below.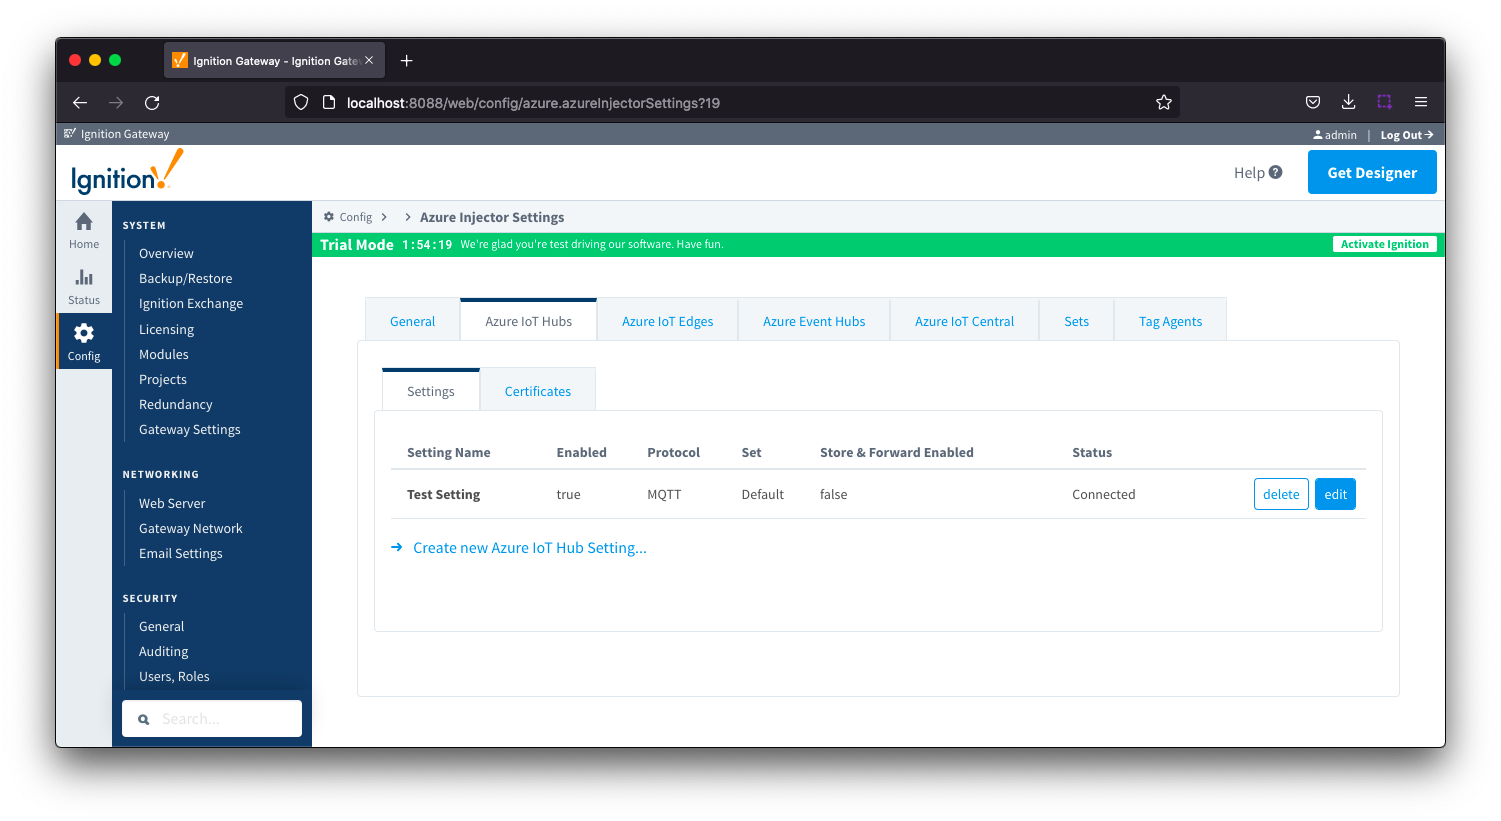
Click the 'edit' button on the right for that setting to edit it. Then scroll down and click the 'Show advanced properties' checkbox near the bottom as shown below.
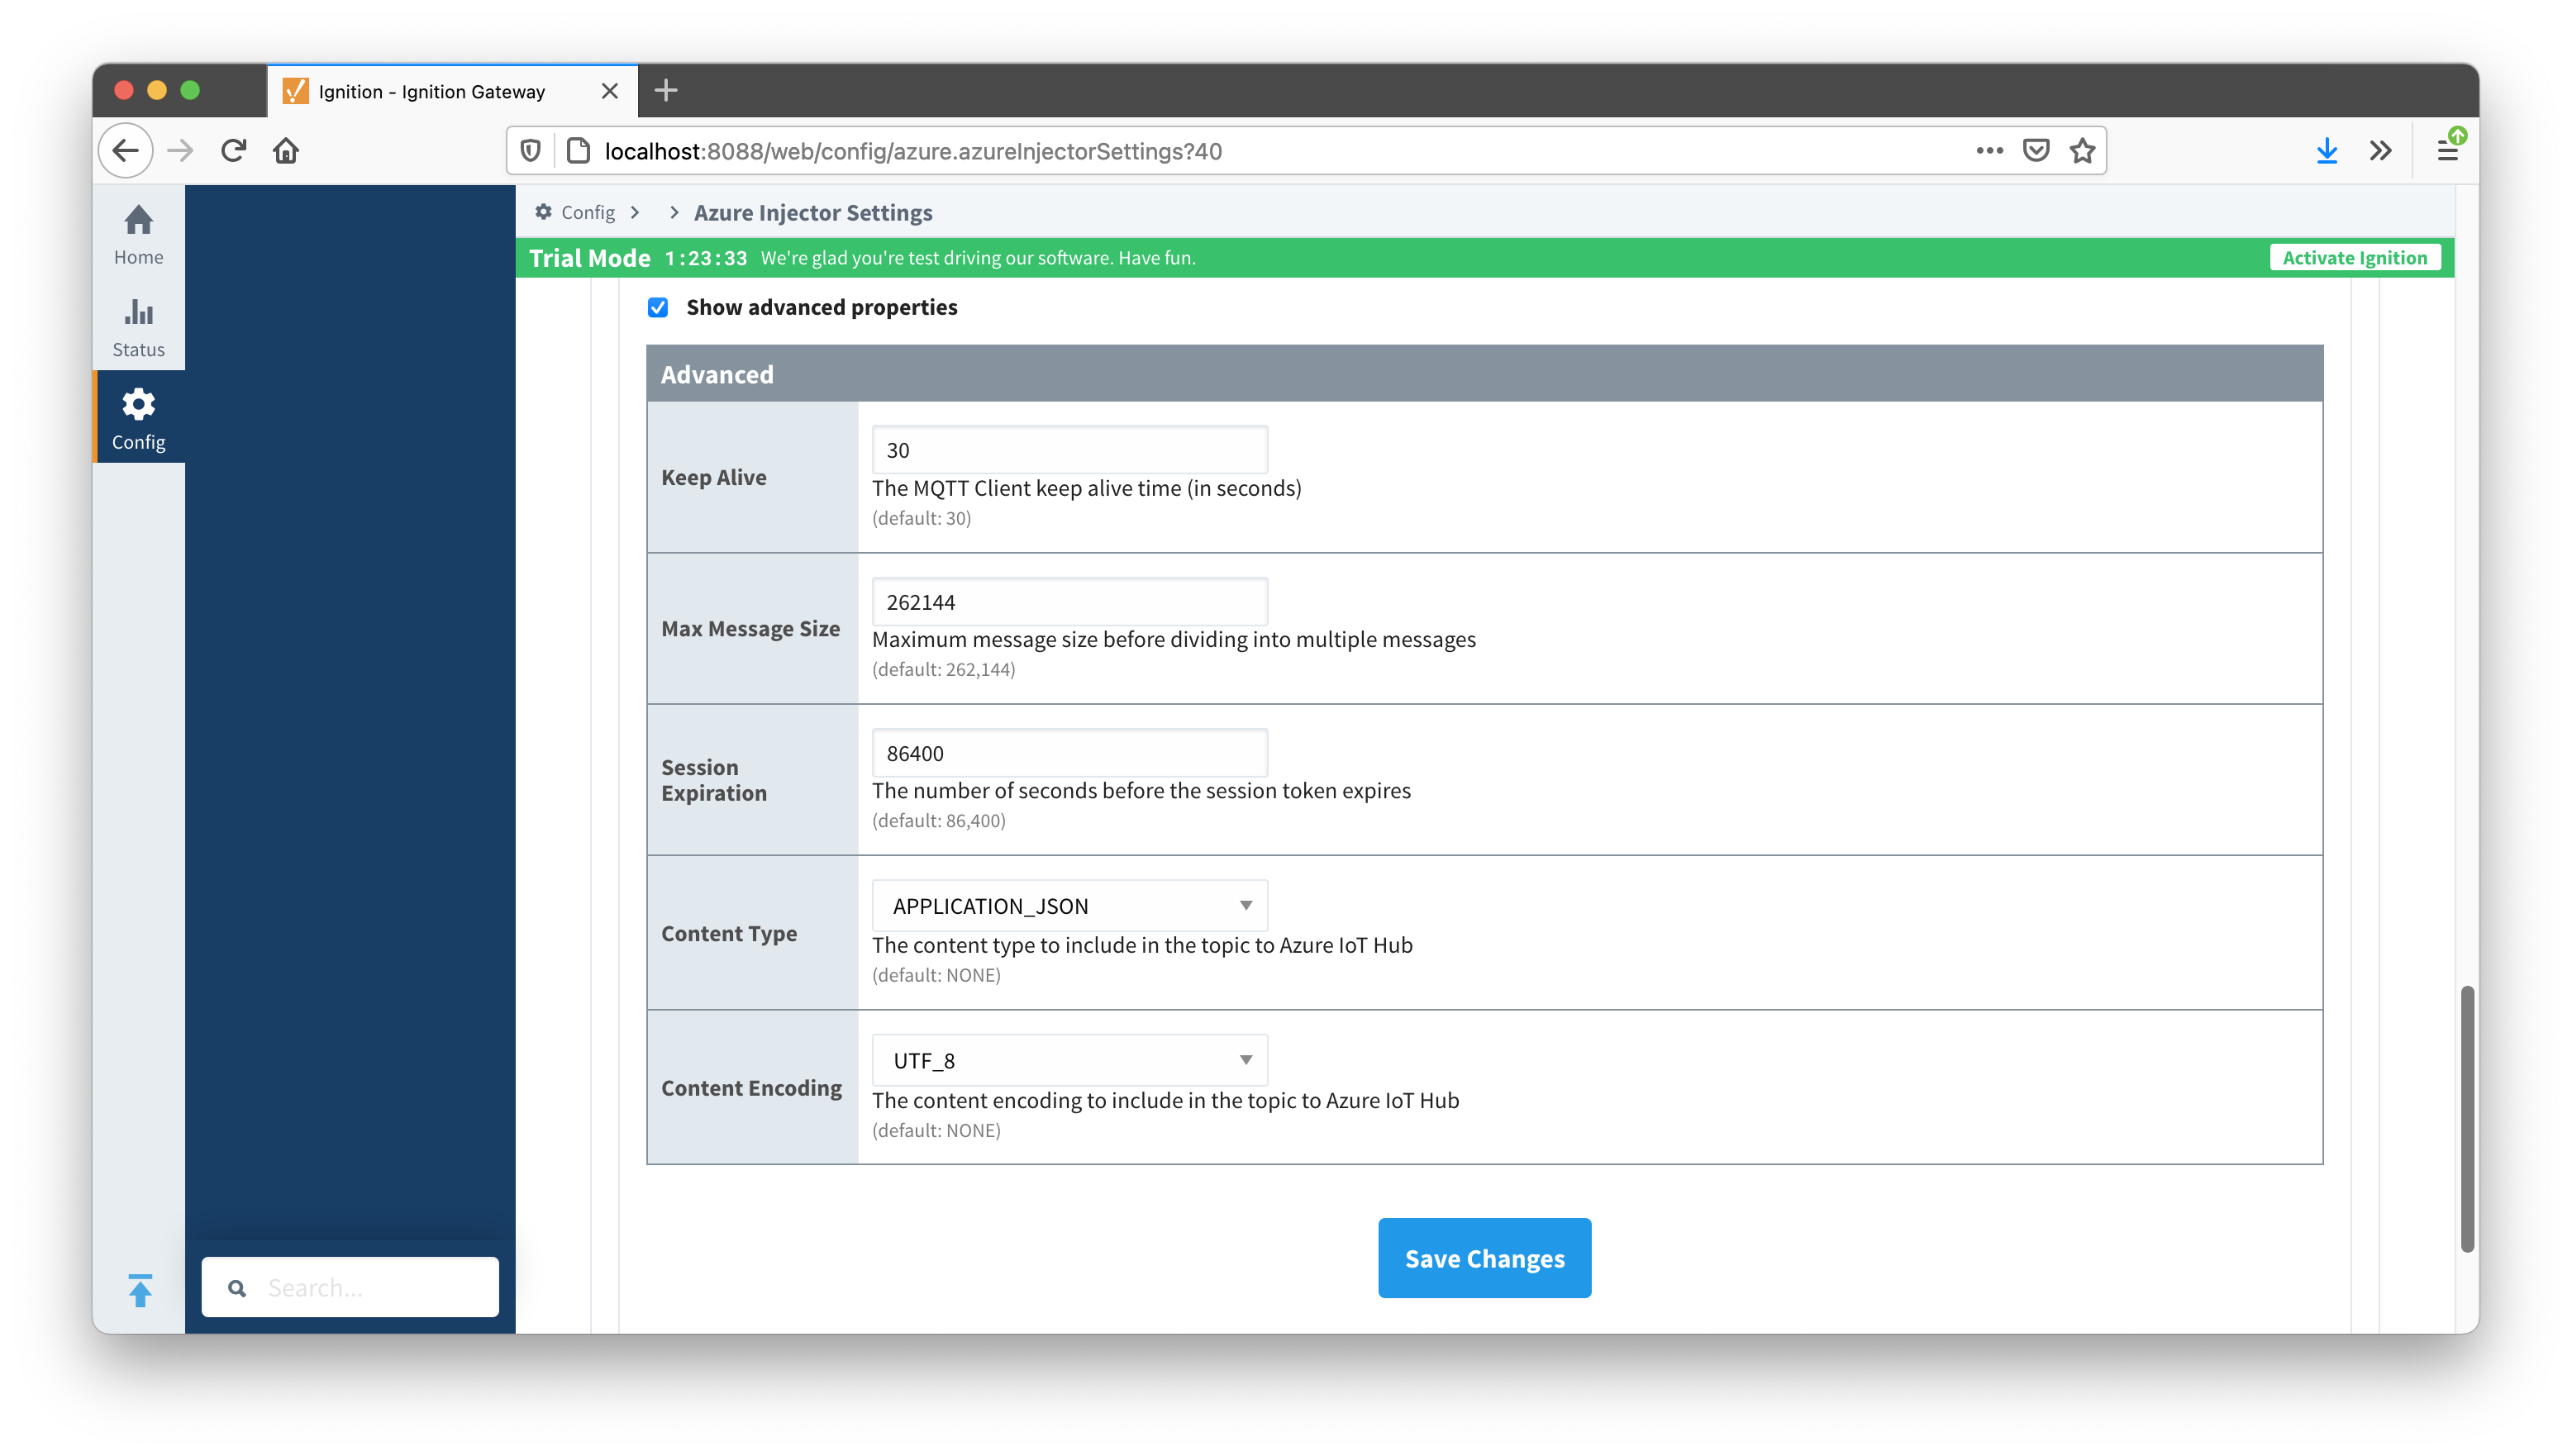
Note the 'Content Type' and 'Content Encoding' fields. In order for Azure message routing to work, the 'Content Type' MUST be set to APPLICATION_JSON and the 'Content Encoding' should be set to UTF_8.
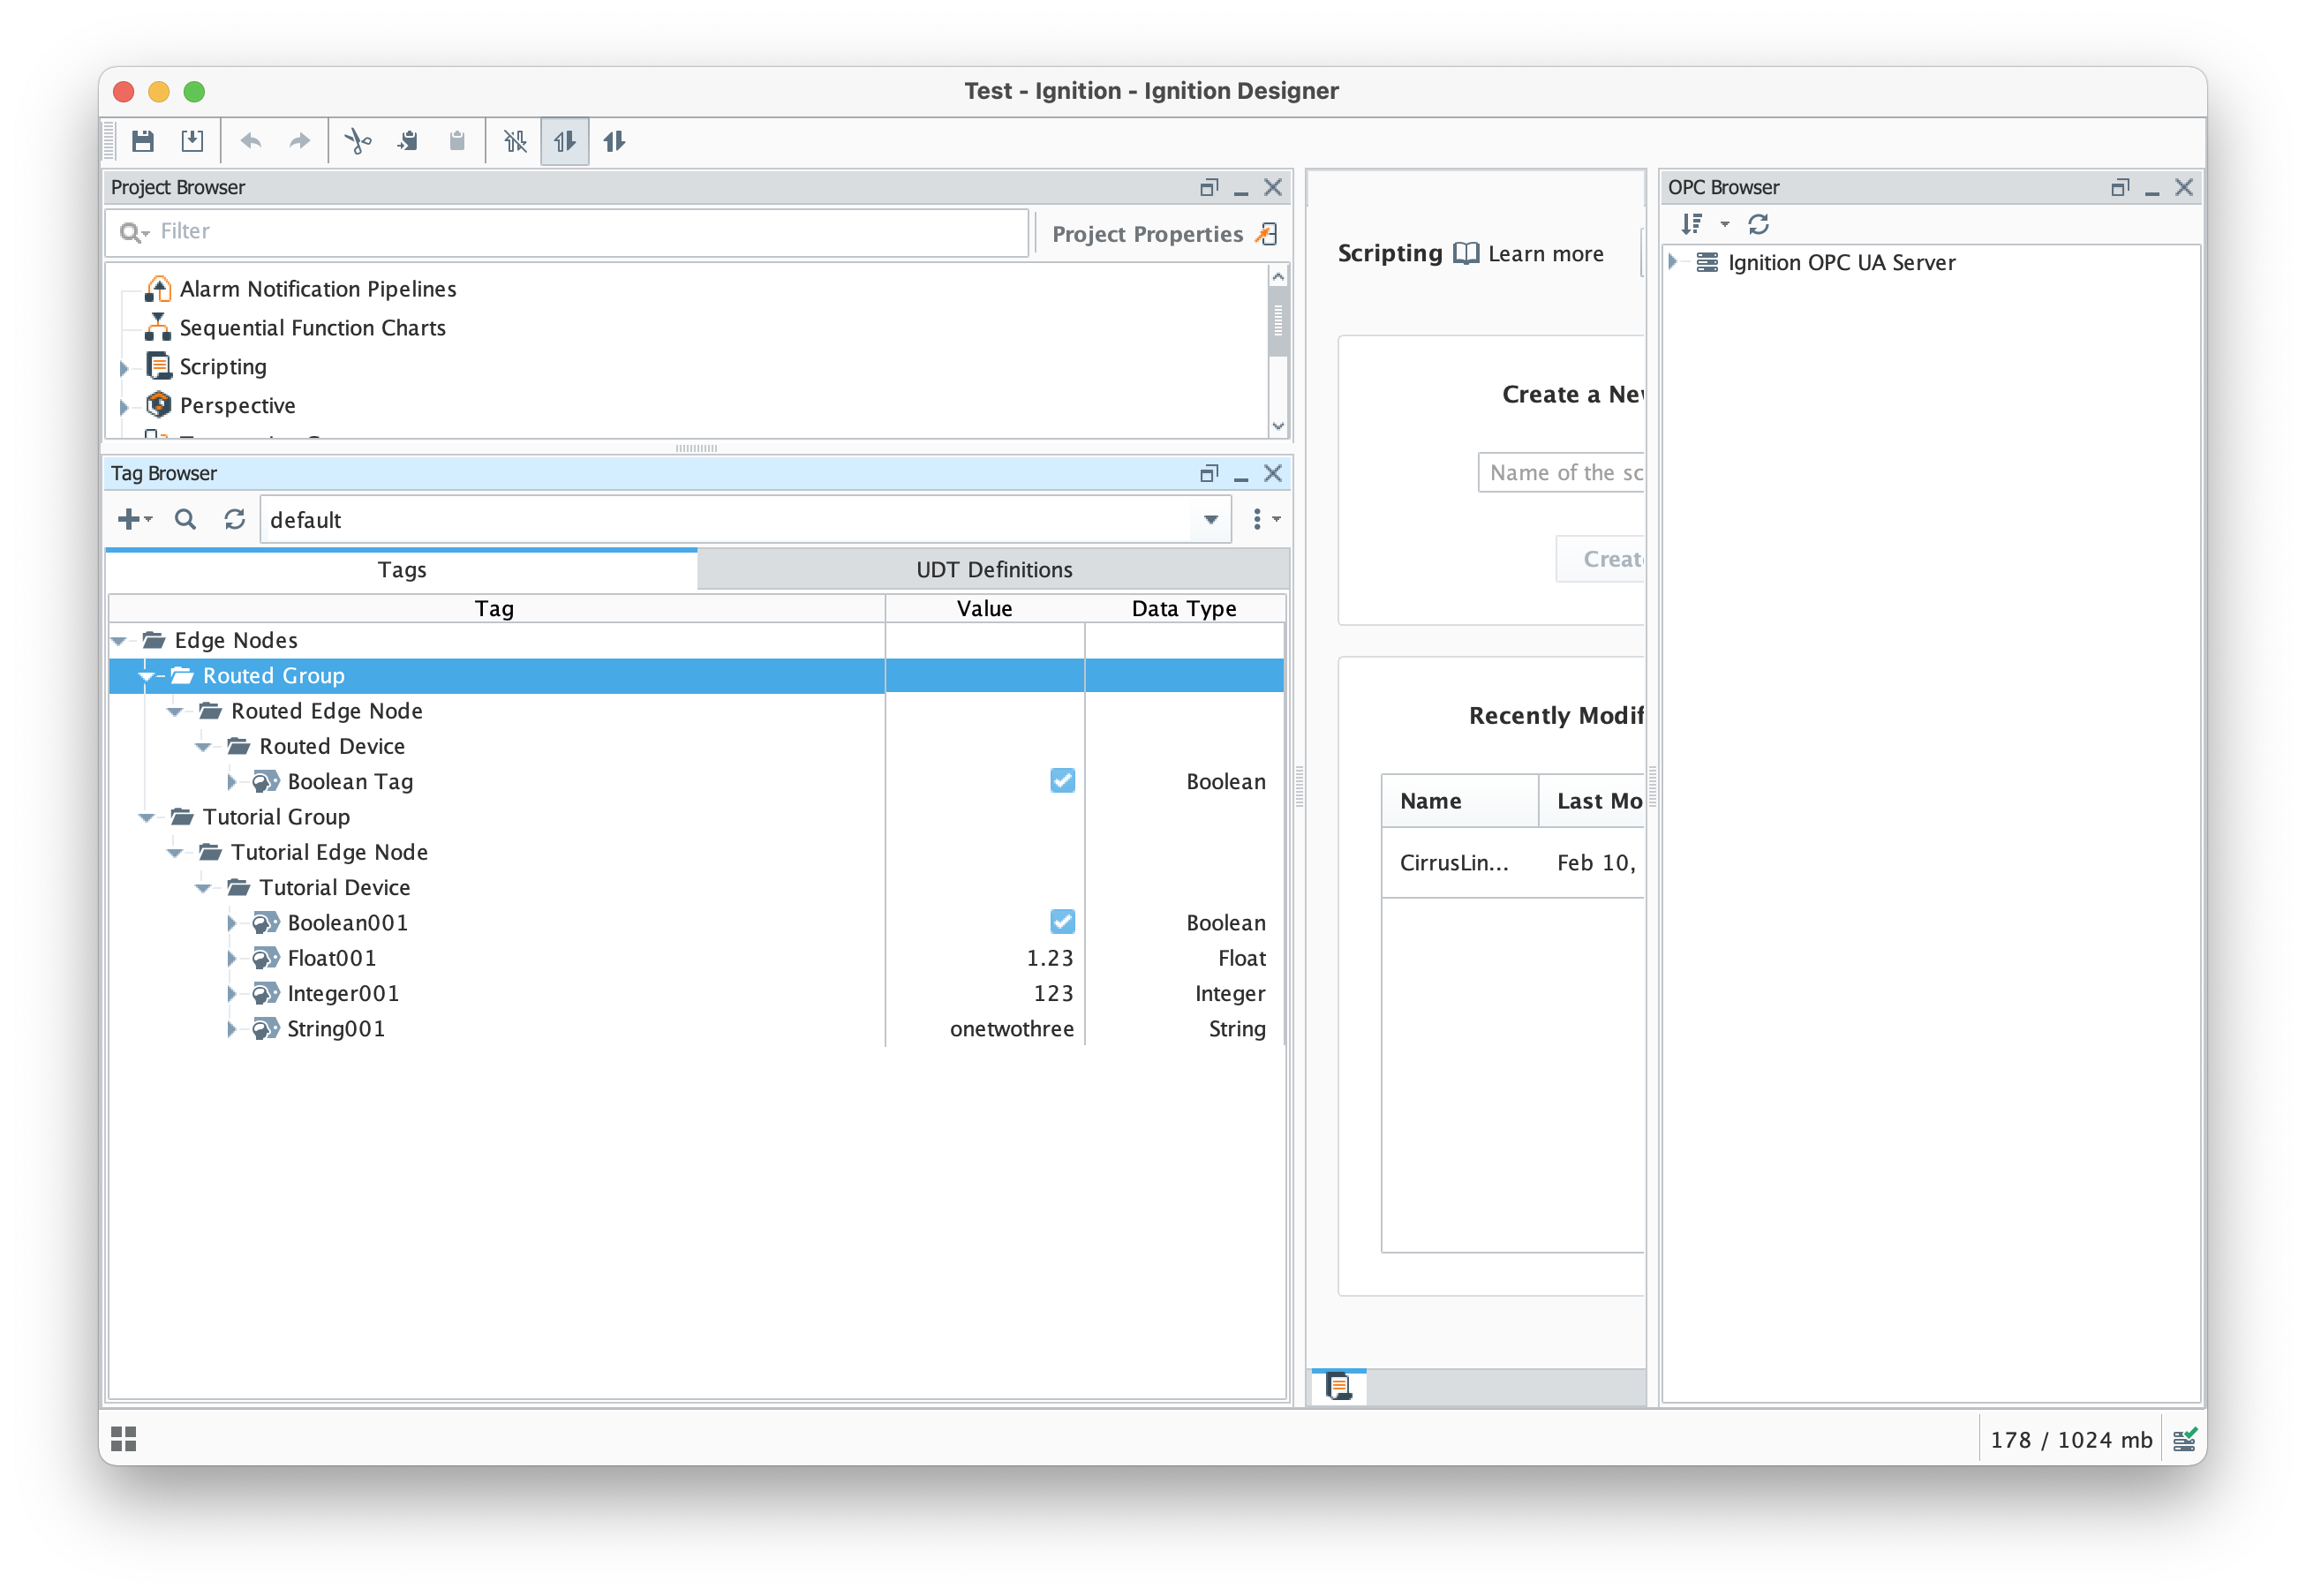
During the prerequisite tutorial a set of tags were created to publish to Azure IoT Hub. At this point, we will create some new tags that will be will be routed to the container based on the configuration that now exists in Azure. Because we created a message route that filtered on a Sparkplug Group ID of 'Routed Group' we should create a structure that includes this in the tag tree. Expanding on the tag tree created previously, add a new Sparkplug Group, Edge Node, and Device folder structure with a single boolean tag along side the original structure created in the quickstart as shown below. Note for the message route in Azure to work properly, the Group ID MUST be 'Routed Group' as shown below.
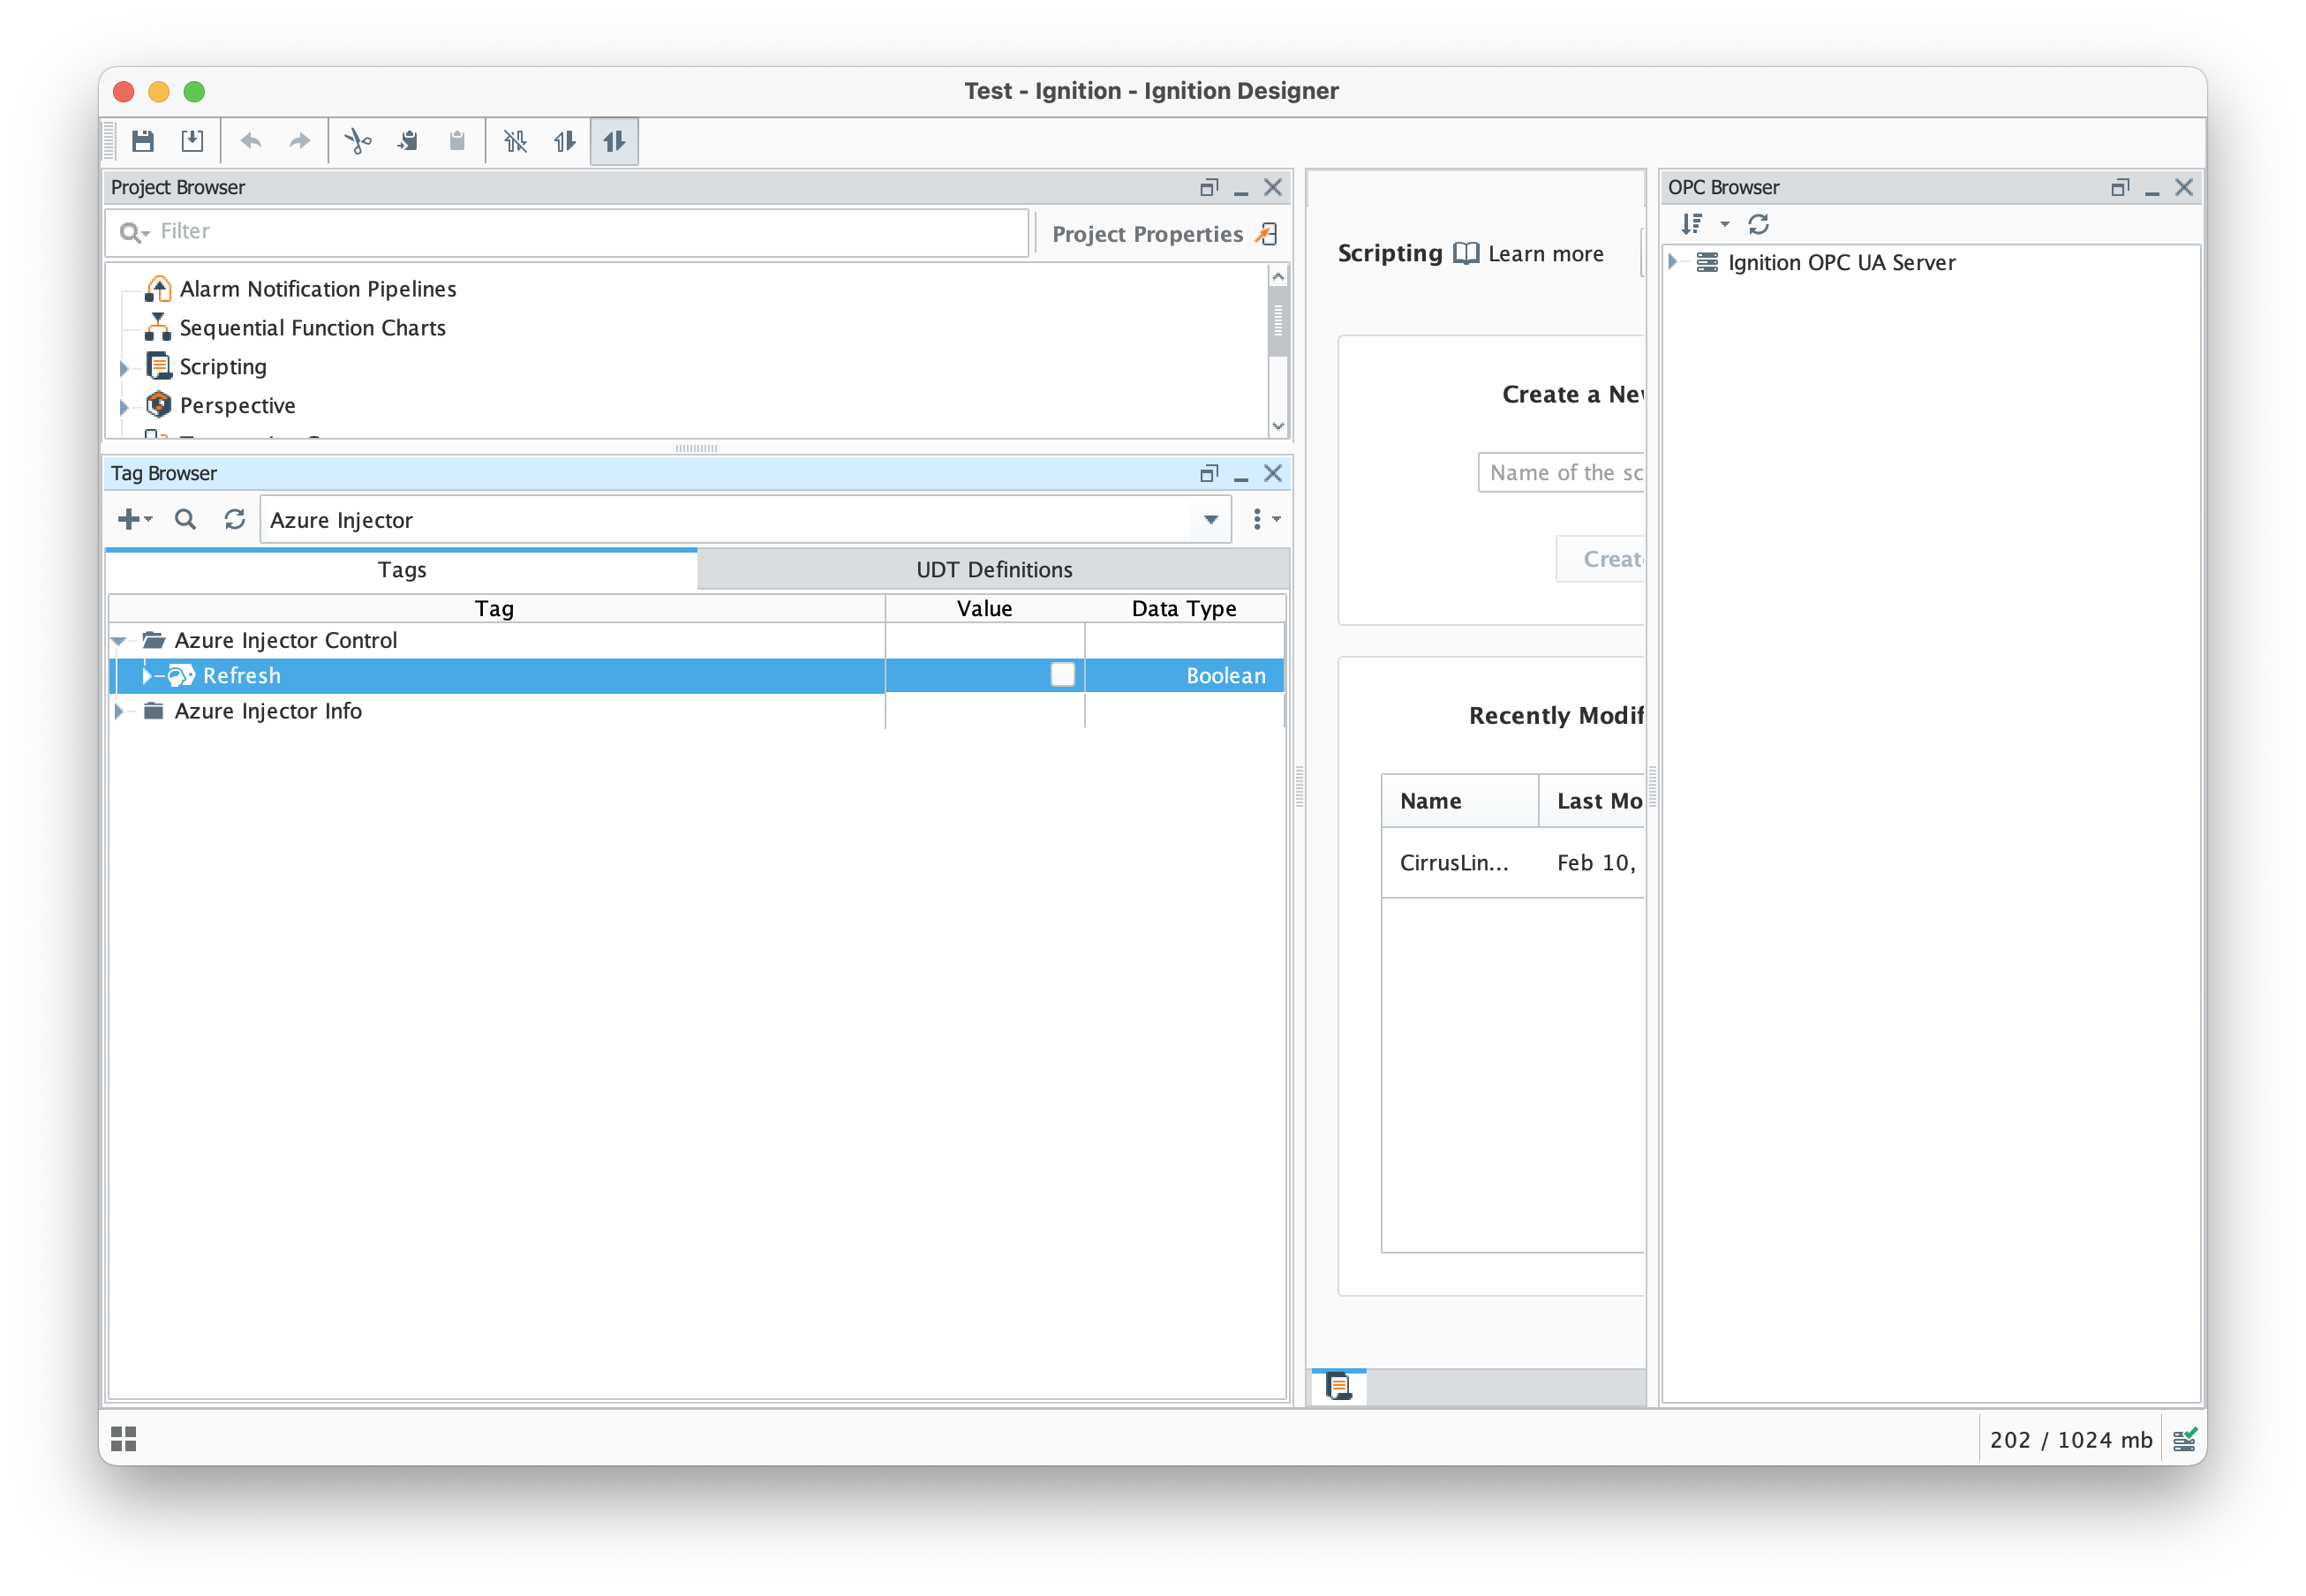
After creating this tag structure with the 'Routed Group', browse to the Azure Injector tag provider and write a 'true' to the 'Azure Injector Control/Refresh' tag shown below. This will cause Azure Injector to rescan the tag tree and publish messages to IoT Hub.
Now that Azure Injector has scanned the tag tree, generate some tag change events by manually changing the following two tags. Make sure as you change these values you wait a couple of seconds between each change. This will ensure that a series of MQTT messages will be published to Azure IoT Hub.
[default]Edge Nodes/Routed Group/Routed Edge Node/Routed Device/Boolean Tag
[default]Edge Nodes/Tutorial Group/Tutorial Edge Node/Tutorial Device/Boolean001
At this point, Azure should route the 'Routed Group' messages to the storage container but ignore the 'Tutorial Group' messages. This can be verified in the next step of this tutorial.
At this point, the data should be flowing into the container. To view it, browse back to your Storage Account in the Azure portal. In the main panel is a 'Storage Explorer' option (shown below) which is in preview at the time of this writing (Feb 26, 2021). Click this link to open the Storage Explorer.
After opening the Storage Explorer, you should see something similar to the following
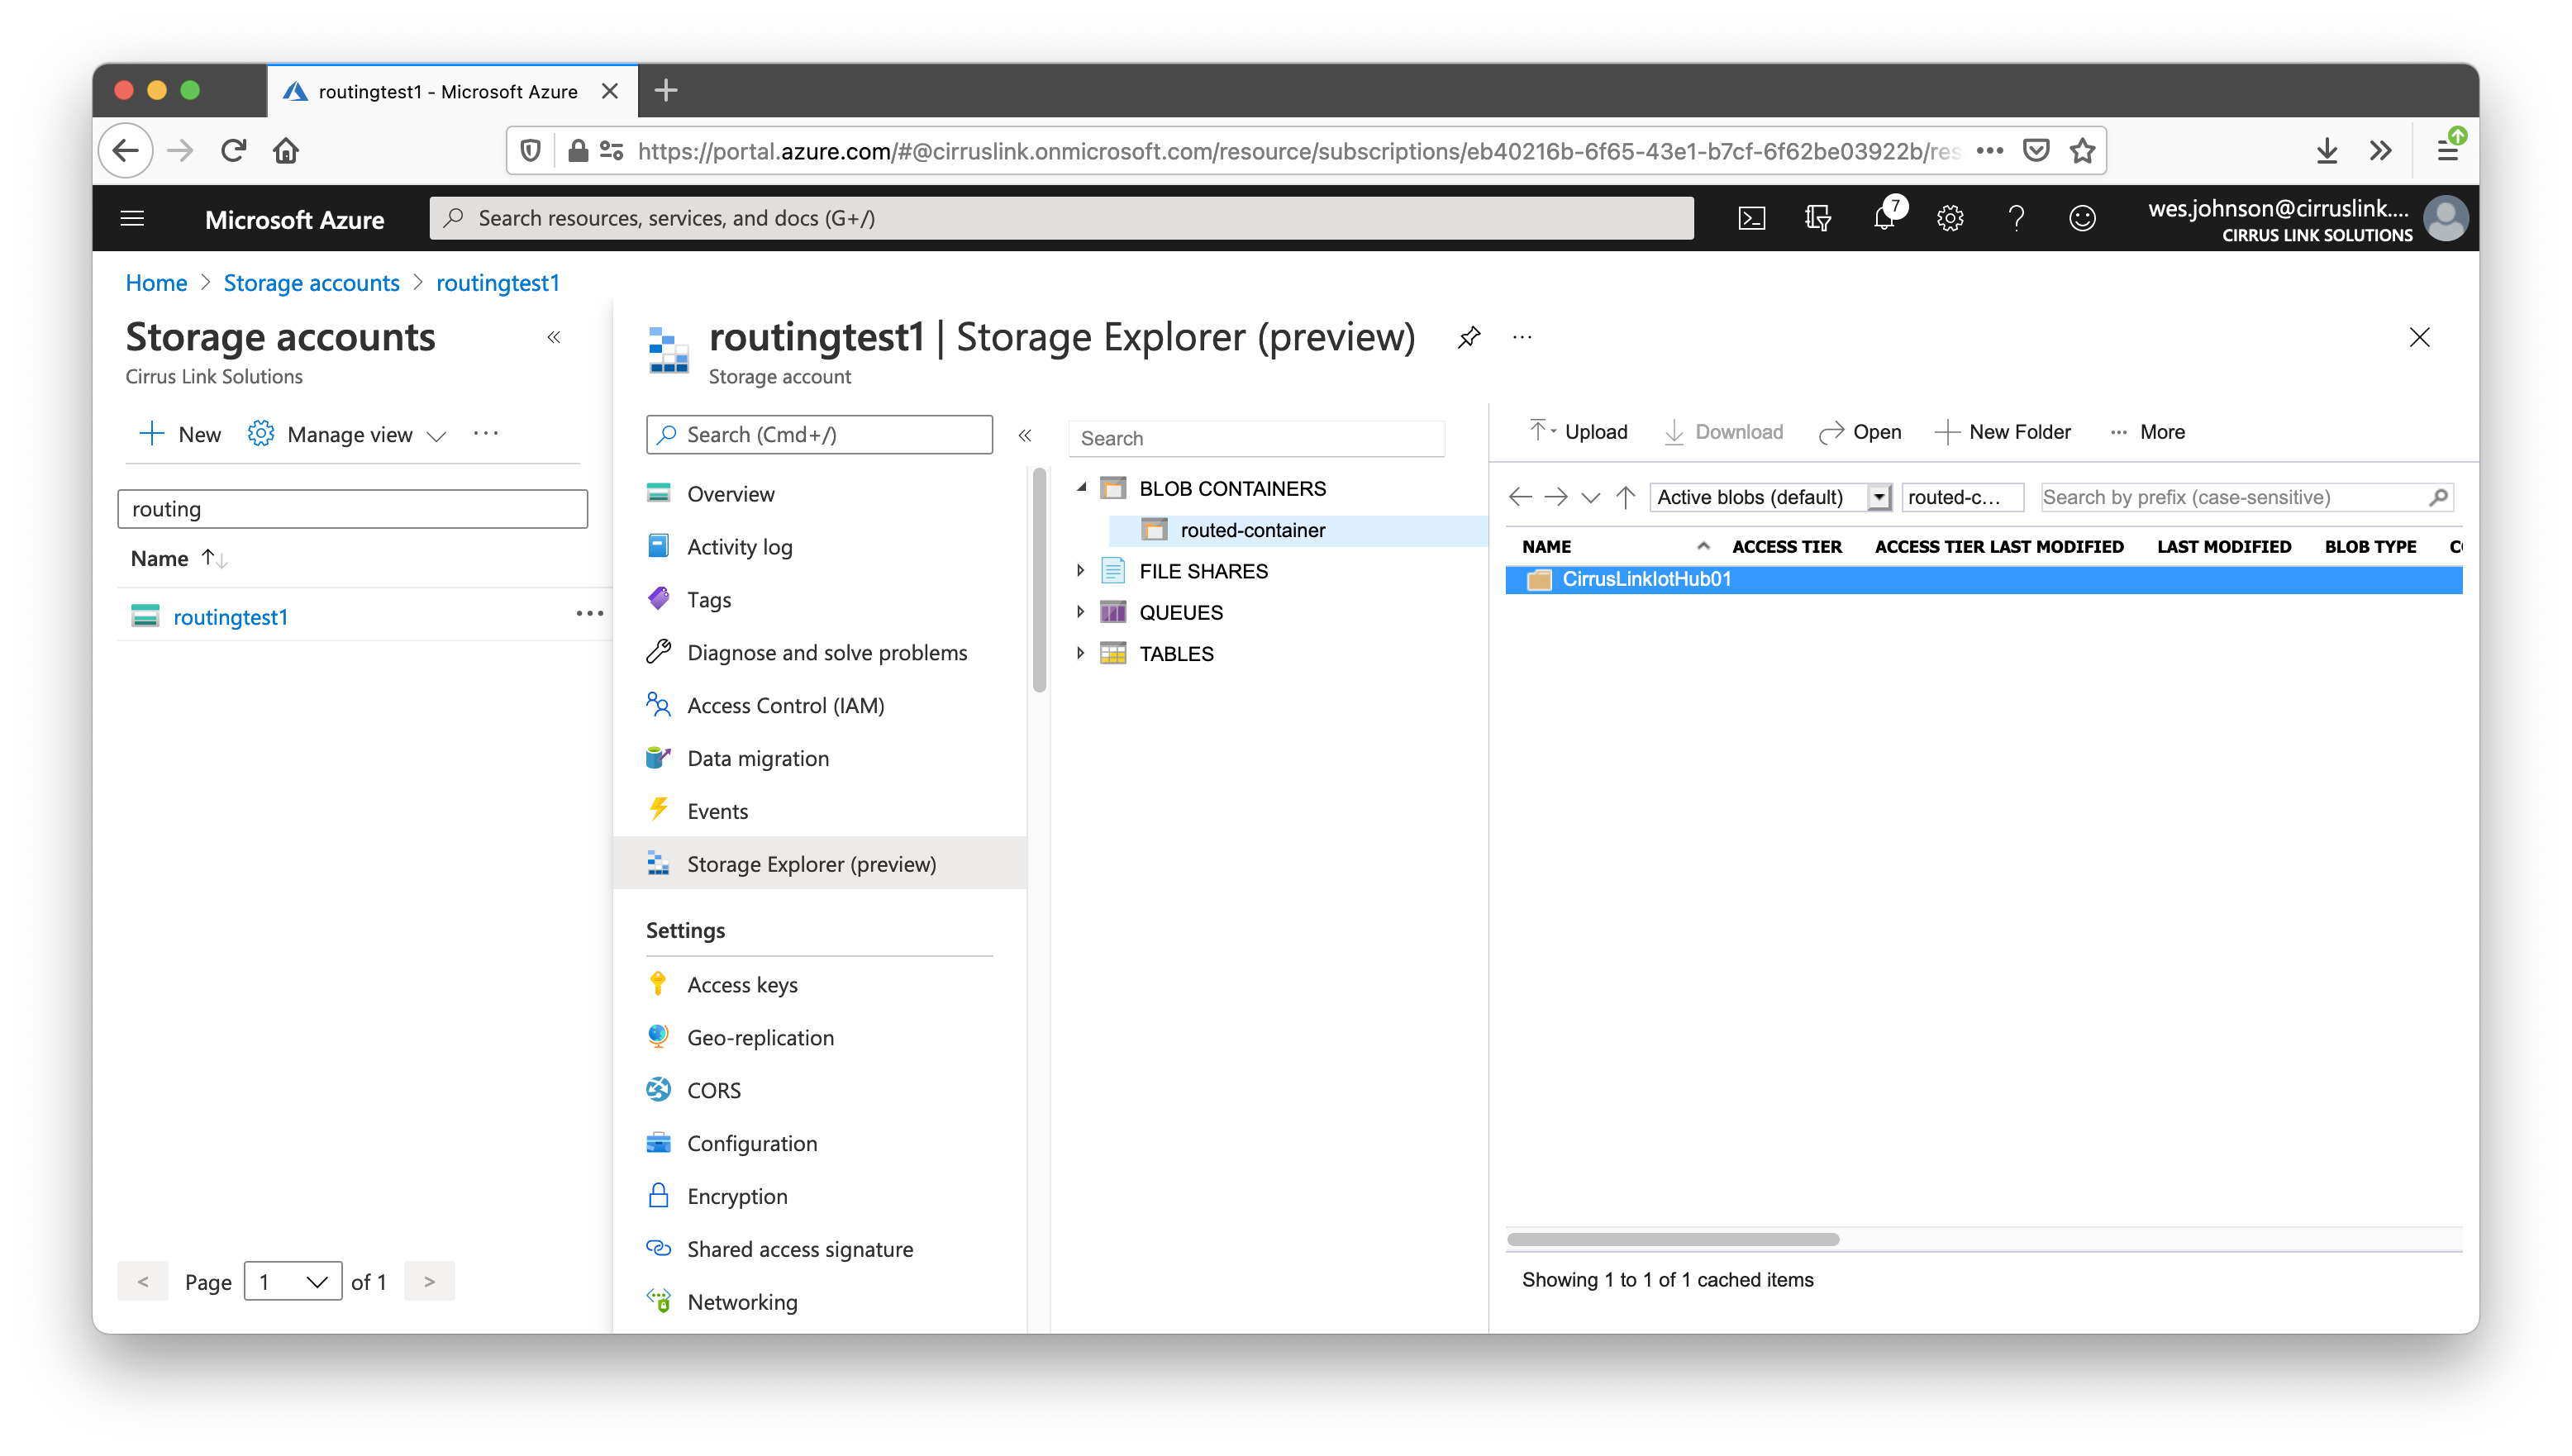
Under the 'BLOB CONTAINERS' there should be a link with your container as well a folder showing your IoT Hub name. Note it may take a few minutes for this data to appear even with everything configured properly. Once the IoT Hub name is present, double click it in the far right panel and click through the series of folders shown there. These folders represent the time at which various files were created. When you get to the final folder, you should see something similar to what is shown below in that the final leaf folder contains one or more JSON files.

Select one of these files and download it. Upon opening with a text editor, you should see something similar to the following.
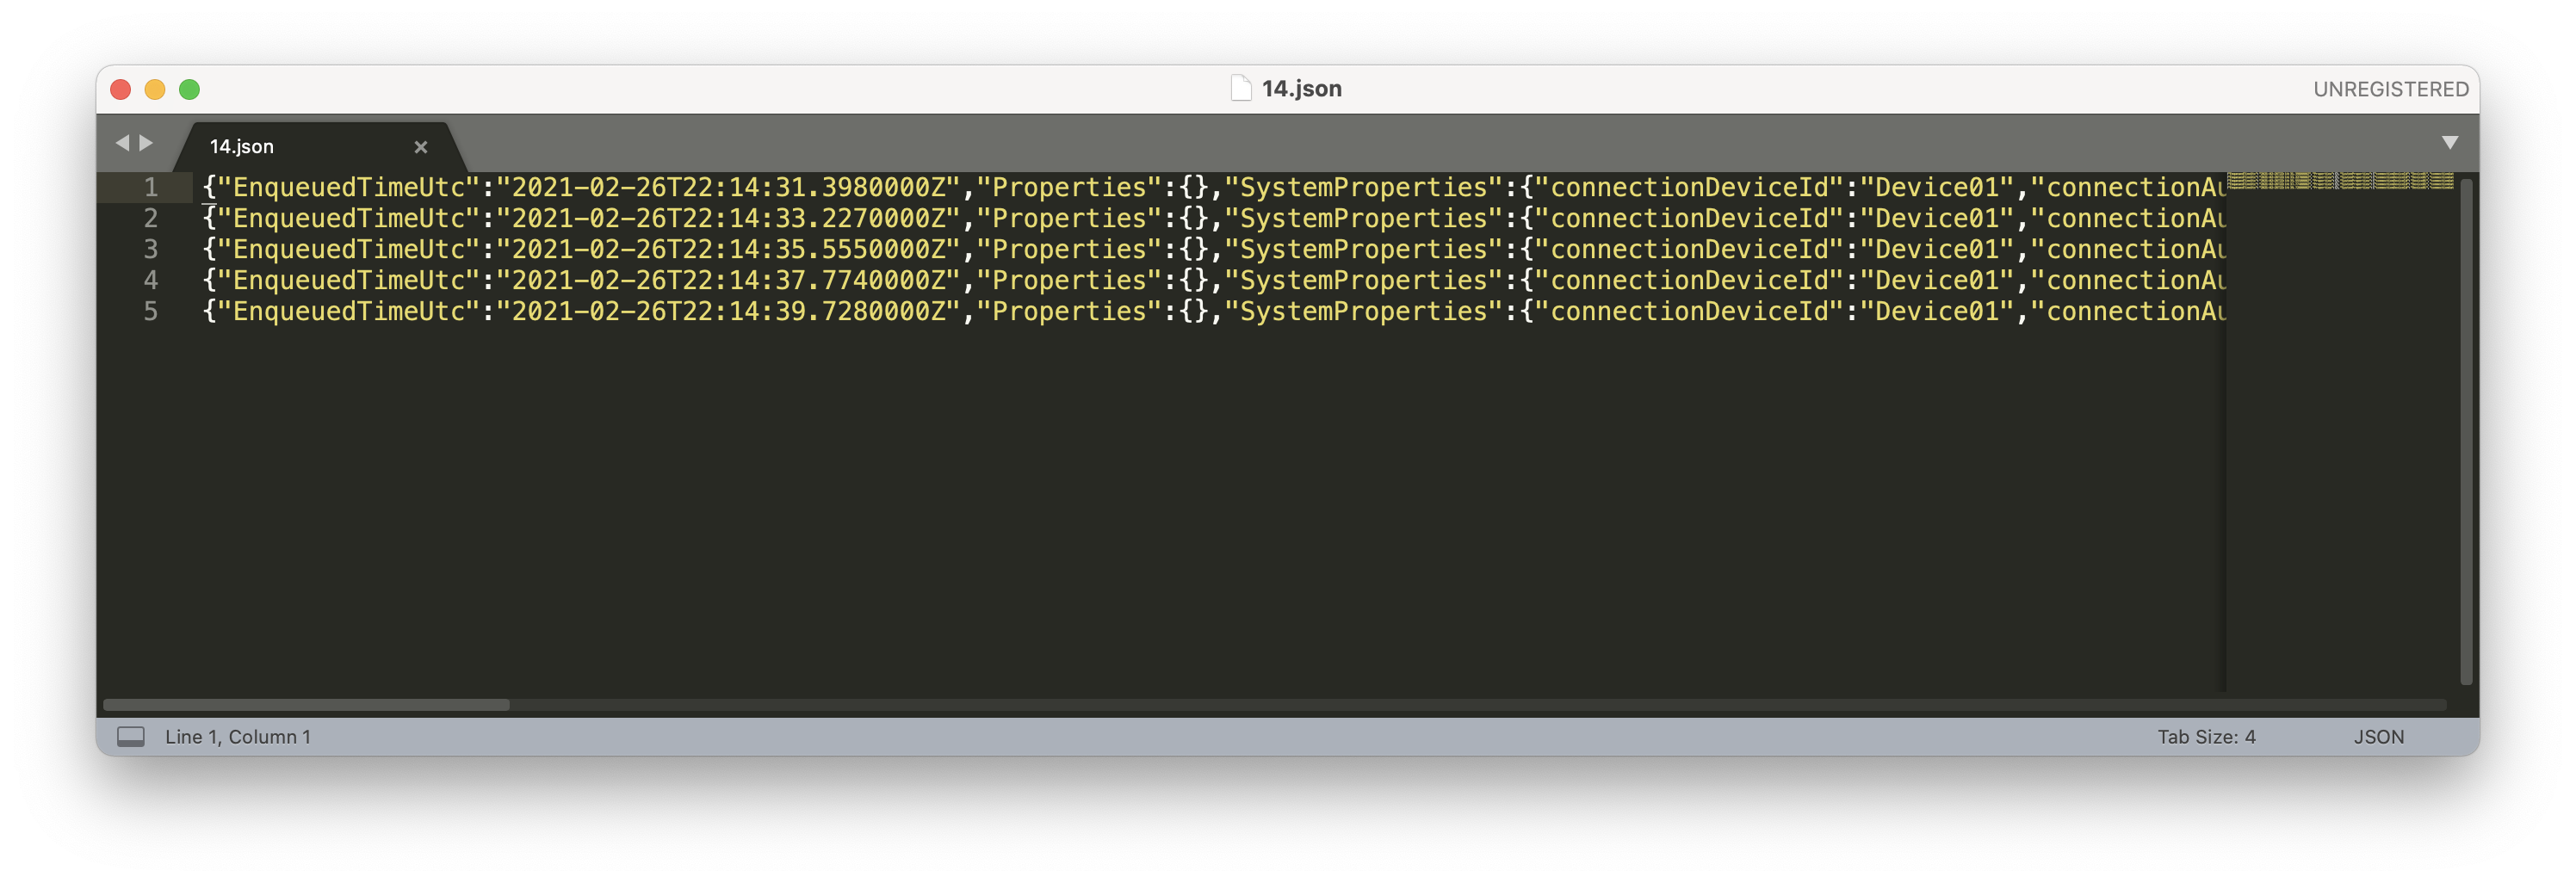
If you scroll to the right, you should ultimately see the 'body' of the message. This is the raw message that was sent to Azure from the Azure Injector module. Each one of these messages represents a message that was sent from Azure Injector to IoT Hub.
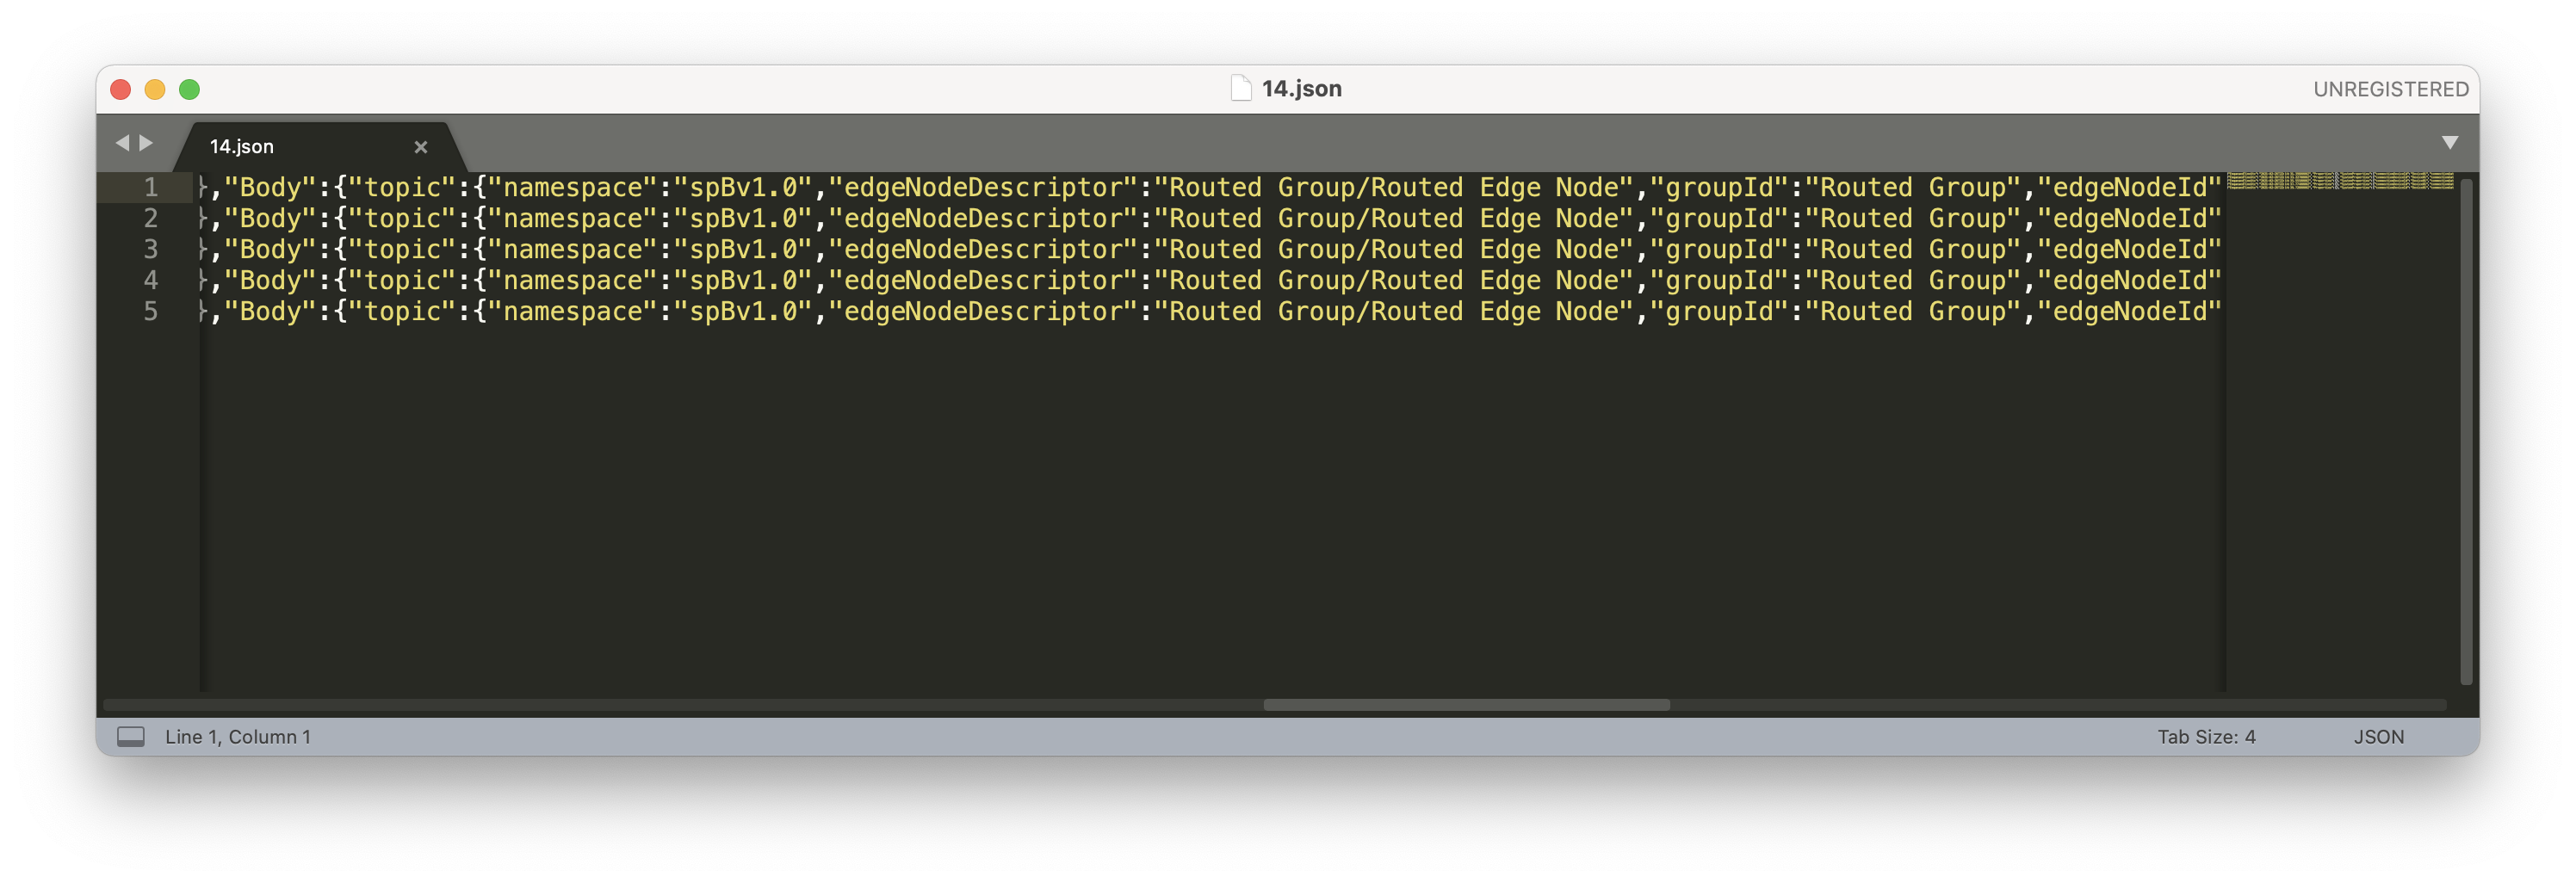 Note that all of the messages shown here are from the 'Routed Group'. This is because of how the Azure IoT Hub message route was configured. The 'routing query' is looking for a 'groupId' of 'Routed Group'. So, all messages from the original 'Tutorial Group' were ignored and not routed to the container.