![]()
Contents
Cirrus Link Resources
Chariot MQTT Server v1 (previous version)![]()
Cirrus Link Modules for Ignition![]()
Contact Us (Sales/Support)![]()
Forum![]()
![]()
Chariot MQTT Server v1 (previous version)![]()
Cirrus Link Modules for Ignition![]()
Contact Us (Sales/Support)![]()
Forum![]()
This document describes how to configure Client based authentication with Client Certificates to create secure connections between Chariot, MQTT Engine and MQTT Transmission.
| Note |
|---|
| Available in Chariot version 2.3.1 and greater |
Table of Contents
| Tip |
|---|
The command line tools openssl and keytool are used. Install the OpenSSL command line tool and add the OpenSSL PATH in the Windows environment variables if necessary. Keytool is part of the standard java distribution and is located in the bin sub-directory of your jdk installation directory. Chariot includes a java distribution under the <chariot_install_dir>/lib/runtime/jdk11.0.12_7/bin folder.Add the keytool PATH in the Windows environment variables if necessary. You will need to restart your any open command window to pick up this configuration change. |
As a first step, we need to generate the certificate hierarchy for Chariot, MQTT Engine and MQTT Transmission.
Create the following folder structure on your local drive to hold the various certificates in the hierarchy that we will be generating:
chariotcerts/
├── ca/
└── certs/
    ├── engine/
    └── transmission/
When creating a certificate hierarchy, the Root CA is the highest level of authority in the certificate hierarchy, and is responsible for issuing signed certificates, such as the MQTT Engine and MQTT Transmission certificates that will be shown below. When the Root CA issues a certificate, it signs the certificate with its private key, which allows the MQTT Server to verify the authenticity of the certificates using the Root CA's public key.
Note this tutorial only covers client based authentication using certificates. It does not cover setting up TLS/SSL on an MQTT Server which is used encyrpt communication between MQTT clients and the MQTT Server. This must also be done and information can be found here on how to set this up.
These are the steps that need to be completed for the certificate hierarchy:
Generate MQTT Engine Client certificate signed with the Root CA’s private key
| Anchor | ||||
|---|---|---|---|---|
|
Generate a private key file (ca.key) for the Root CA using the command below. You may choose to enter a passphrase to be associated with the ca.key file as well.
| Tip |
|---|
Make note of this passphrase if you set one for the Root CA private key file (ca.key) as it will be used multiple times. |
| Code Block | ||
|---|---|---|
| ||
openssl genrsa -des3 -out ca/ca.key 4096 |
Generate a self-signed certificate (ca.crt) for the Root CA using the command below. This command generates a new self-signed X.509 certificate named "ca.crt" valid for 3650 days (10 years) using the RSA private key "ca.key". You will be required to enter the pass phrase associated with the private key file "ca.key".
| Code Block | ||
|---|---|---|
| ||
openssl req -new -x509 -key ca/ca.key -days 3650 -out ca/ca.crt |
| Note |
|---|
There are a number of fields associated with the creation of the certificate. Fill them out with your relevant details. |
| Code Block | ||||
|---|---|---|---|---|
| ||||
$ openssl req -new -x509 -key ca/ca.key -days 3650 -out ca/ca.crt Enter pass phrase for ca/ca.key: You are about to be asked to enter information that will be incorporated into your certificate request. What you are about to enter is what is called a Distinguished Name or a DN. There are quite a few fields but you can leave some blank For some fields there will be a default value, If you enter '.', the field will be left blank. ----- Country Name (2 letter code) [AU]:US State or Province Name (full name) [Some-State]:KS Locality Name (eg, city) []:Stilwell Organization Name (eg, company) [Internet Widgits Pty Ltd]:Cirrus Link Solutions Organizational Unit Name (eg, section) []:Support Common Name (e.g. server FQDN or YOUR name) []:CLS Example Root CA Email Address []: $ |
You should have the following files created:
chariotcerts/
├── ca/
   ├── ca.crt
   ├── ca.key
| Note |
|---|
| Depending on the version of openSSL that you are using, you may see additional .srl files created which contain the signed certificate's unique serial number. These files are not used directly by the modules and not included in the certificate hierachy displayed above. |
| Anchor | ||||
|---|---|---|---|---|
|
Generate private key in PSCK8 format (engine.key) for MQTT Engine using the command below.
| Code Block | ||
|---|---|---|
| ||
openssl genrsa -out certs/engine/engine.key 4096 |
Generate a Certificate Signing Request (CSR) for MQTT Engine using the command below. This command generates a new CSR named "engine.csr’ using the RSA private key "engine.key".
| Code Block | ||
|---|---|---|
| ||
openssl req -new -key certs/engine/engine.key -out certs/engine/engine.csr |
| Note |
|---|
There are a number of fields associated with the creation of the certificate. Fill them out with your relevant details. |
| Code Block | ||||
|---|---|---|---|---|
| ||||
$ openssl req -new -key certs/engine/engine.key -out certs/engine/engine.csr You are about to be asked to enter information that will be incorporated into your certificate request. What you are about to enter is what is called a Distinguished Name or a DN. There are quite a few fields but you can leave some blank For some fields there will be a default value, If you enter '.', the field will be left blank. ----- Country Name (2 letter code) [AU]:US State or Province Name (full name) [Some-State]:KS Locality Name (eg, city) []:Stilwell Organization Name (eg, company) [Internet Widgits Pty Ltd]:Cirrus Link Solutions Organizational Unit Name (eg, section) []:Support Common Name (e.g. server FQDN or YOUR name) []:EngineDevice Email Address []: Please enter the following 'extra' attributes to be sent with your certificate request A challenge password []: An optional company name []: $ |
Sign the MQTT Engine Client CSR with the Engine CA using the command below. This command will sign the CSR "engine.csr" with the Root CA certificate ‘ca.crt’ and Root CA's RSA private key ‘ca.key’, creating a new X.509 certificate named ‘engine.crt’ valid for 365 days (1 year). You will be required to enter the passphrase associated with the private key file "ca.key".
| Code Block | ||
|---|---|---|
| ||
openssl x509 -req -in certs/engine/engine.csr -CA ca/ca.crt -CAkey ca/ca.key -CAcreateserial -out certs/engine/engine.crt -days 365 |
| Anchor | ||||
|---|---|---|---|---|
|
Generate private key in PKCS8 format (transmission.key) for MQTT Transmission using the command below.
| Code Block | ||
|---|---|---|
| ||
openssl genrsa -out certs/transmission/transmission.key 4096 |
Generate a Certificate Signing Request (CSR) for MQTT Transmission using the command below. This command generates a new CSR named "transmission.csr’ using the RSA private key "transmission.key".
| Code Block | ||
|---|---|---|
| ||
openssl req -new -key certs/transmission/transmission.key -out certs/transmission/transmission.csr |
| Note |
|---|
There are a number of fields associated with the creation of the certificate. Fill them out with your relevant details. |
| Code Block | ||||
|---|---|---|---|---|
| ||||
$ openssl req -new -key certs/transmission/transmission.key -out certs/transmission/transmission.csr You are about to be asked to enter information that will be incorporated into your certificate request. What you are about to enter is what is called a Distinguished Name or a DN. There are quite a few fields but you can leave some blank For some fields there will be a default value, If you enter '.', the field will be left blank. ----- Country Name (2 letter code) [AU]:US State or Province Name (full name) [Some-State]:KS Locality Name (eg, city) []:Stilwell Organization Name (eg, company) [Internet Widgits Pty Ltd]:Cirrus Link Solutions Organizational Unit Name (eg, section) []:Support Common Name (e.g. server FQDN or YOUR name) []:TransmissionDevice1 Email Address []: Please enter the following 'extra' attributes to be sent with your certificate request A challenge password []: An optional company name []: $ |
Sign the MQTT Transmission Client CSR with the Transmission CA using the command below. This command will sign the CSR "transmission.csr" with the Root CA certificate ‘ca.crt’ and Root CA's RSA private key ‘ca.key’, creating a new X.509 certificate named ‘transmission.crt’ valid for 365 days (1 year). You will be required to enter the passphrase associated with the private key file "transmission.key".
| Code Block | ||
|---|---|---|
| ||
openssl x509 -req -in certs/transmission/transmission.csr -CA ca/ca.crt -CAkey ca/ca.key -CAcreateserial -out certs/transmission/transmission.crt -days 365 |
We have now generated all the certificates and keys needed to setup MQTT Client certificate based authentication connections between Chariot and the MQTT Engine and MQTT Transmission modules:
chariotcerts/
├── ca/
│   ├── ca.crt
│   ├── ca.key
└── certs/
    ├── engine/
    │   ├── engine.crt
    │   ├── engine.csr
    │   └── engine.key
    └── transmission/
        ├── transmission.crt
        ├── transmission.csr
        └── transmission.key
Now we are ready to setup SSL connections between two clients (MQTT Engine and Transmission) and the Chariot Server.
Here is a summary of what needs to be done:
| Anchor | ||||
|---|---|---|---|---|
|
| Anchor | ||||
|---|---|---|---|---|
|
Navigate to CONFIGURATION > System > Certificates configuration and upload the files as shown below. Once uploaded, select the Setup SSL button. Use the certificate components created in Secure Chariot MQTT Server communication using SSL/TLS.
| File Type | Where to get the file |
|---|---|
| CA Chain | Provided by your Certificate Authority |
| Private Key | The you generated when creating your CSR to submit to your CA |
| Certificate | The server certificate provided by your Certificate Authority after you submitted your CSR to them |


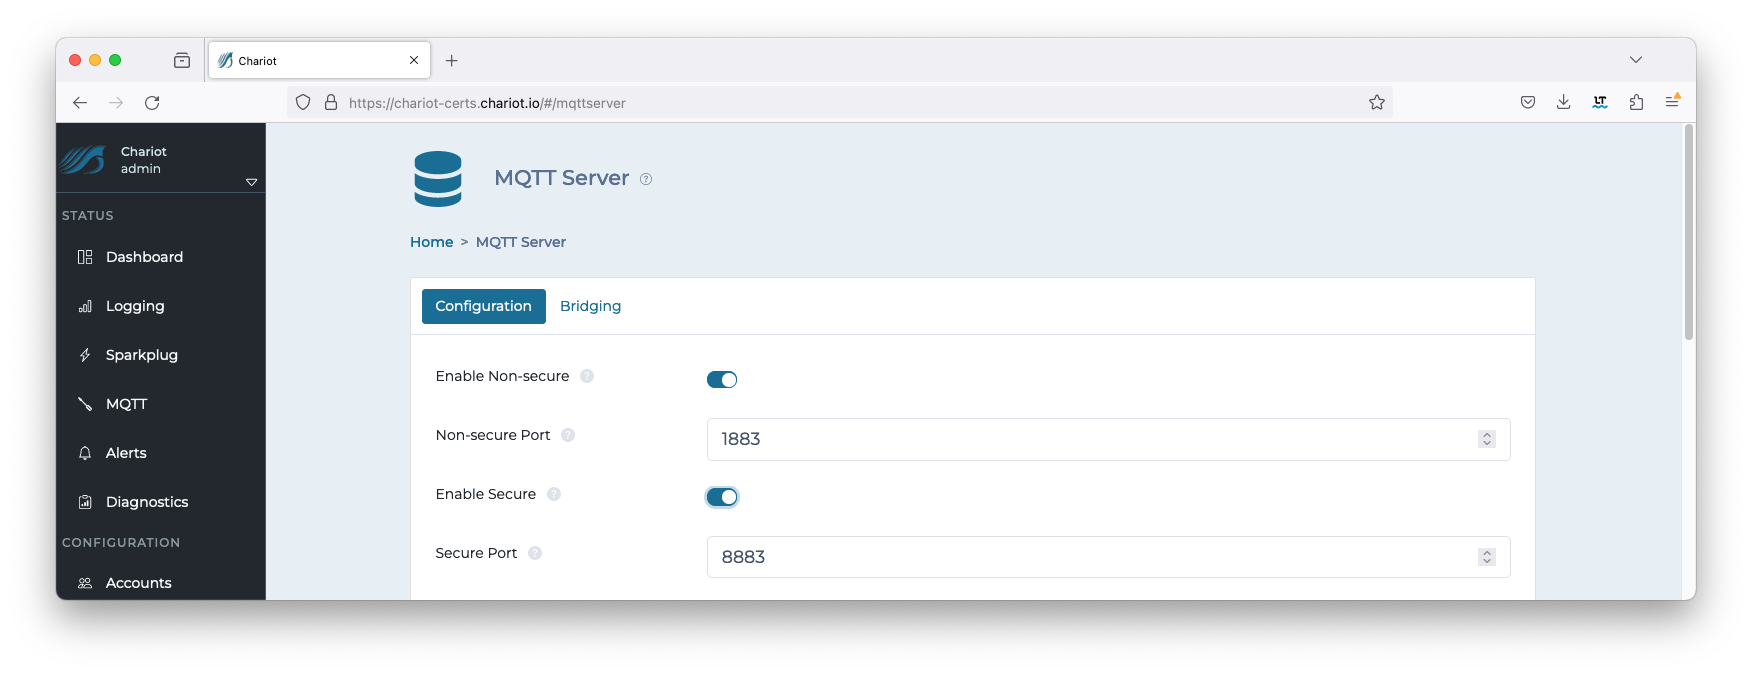
Navigate to CONFIGURATION > MQTT Server configuration and Enable Secure as shown below. Select the Update button to save the configuration.
| Anchor | ||||
|---|---|---|---|---|
|
By default Chariot comes with an empty truststore file clientcerts.jks which is located in the <chariot_install_dir>/security folder.
To view this file, run the command as shown below. You will be required to enter the keystore password and this can be found in the <chariot_install_dir>/conf/com.cirruslink.chariot.system configurationfile as the "trustStorePassword" parameter.
| Code Block | ||
|---|---|---|
| ||
keytool -list -v -keystore <chariot_install_dir>/security/clientcerts.jks |
You will see that the truststore contains no entries.
Use the following command to add the Engine client side certificate to the truststore using the "trustStorePassword" when prompted.
When prompted Trust this certificate? [no]: respond "yes"
| Code Block | ||
|---|---|---|
| ||
keytool -importcert -file ca/engine/engine.crt -keystore <chariot_install_dir>/security/clientcerts.jks -alias EngineDevice |
Use the following command to add the Transmission client side certificate to the truststore using the "trustStorePassword" when prompted.
When prompted Trust this certificate? [no]: respond "yes"
| Code Block | ||
|---|---|---|
| ||
keytool -importcert -file ca/transmission/transmissionCA.crt -keystore <chariot_install_dir>/security/clientcerts.jks -alias TransmissionDevice1 |
Once completed, viewing the file will now show two entries similar to below:
| Code Block | ||
|---|---|---|
| ||
Keystore type: PKCS12 Keystore provider: SUN Your keystore contains 2 entries Alias name: enginedevice Creation date: Feb 7, 2024 Entry type: trustedCertEntry Owner: CN=EngineDevice, OU=Support, O=Cirrus Link Solutions, L=Stilwell, ST=KS, C=US Issuer: CN=CLS Example Root CA, OU=Support, O=Cirrus Link Solutions, L=Stilwell, ST=KS, C=US Serial number: 6f689c58c0f3e7177224c5868b75fcd51bcc2e0f Valid from: Wed Feb 07 19:43:45 UTC 2024 until: Sat Feb 04 19:43:45 UTC 2034 Certificate fingerprints: SHA1: 15:BC:A7:28:BE:15:D9:7F:E7:B0:1E:51:4E:A0:0F:57:58:C7:A3:2E SHA256: 7A:1E:A0:D8:B5:4E:CB:BF:2D:A9:8D:E2:7F:E6:20:3C:B8:2C:11:4F:14:FF:AD:F6:A1:01:58:C0:37:B3:04:A7 Signature algorithm name: SHA256withRSA Subject Public Key Algorithm: 4096-bit RSA key Version: 3 ******************************************* ******************************************* Alias name: transmissiondevice1 Creation date: Feb 7, 2024 Entry type: trustedCertEntry Owner: CN=TransmissionDevice1, OU=Support, O=Cirrus Link Solutions, L=Stilwell, ST=KS, C=US Issuer: CN=CLS Example Root CA, OU=Support, O=Cirrus Link Solutions, L=Stilwell, ST=KS, C=US Serial number: 6f689c58c0f3e7177224c5868b75fcd51bcc2e11 Valid from: Wed Feb 07 19:52:48 UTC 2024 until: Thu Feb 06 19:52:48 UTC 2025 Certificate fingerprints: SHA1: 60:7E:A5:6E:47:09:79:FB:A9:FE:24:DB:05:1E:09:54:24:48:19:BD SHA256: 8A:C8:39:E1:50:8B:BF:35:25:43:C7:B4:66:60:02:1E:AF:4F:C4:11:32:B0:6D:FC:6D:6E:5D:A8:BE:FA:00:0B Signature algorithm name: SHA256withRSA Subject Public Key Algorithm: 4096-bit RSA key Version: 3 ******************************************* ******************************************* |
| Anchor | ||||
|---|---|---|---|---|
|
Using a text editor, set the "clientAuthPolicy" to "required" in the <chariot_install_dir>/conf/com.cirruslink.chariot.server configurationfile.
| Code Block | ||
|---|---|---|
| ||
clientAuthPolicy="required" |
| Warning |
|---|
| You will now need to restart the Chariot service to pickup up the configuration changes |
| Anchor | ||||
|---|---|---|---|---|
|
| Anchor | ||||
|---|---|---|---|---|
|
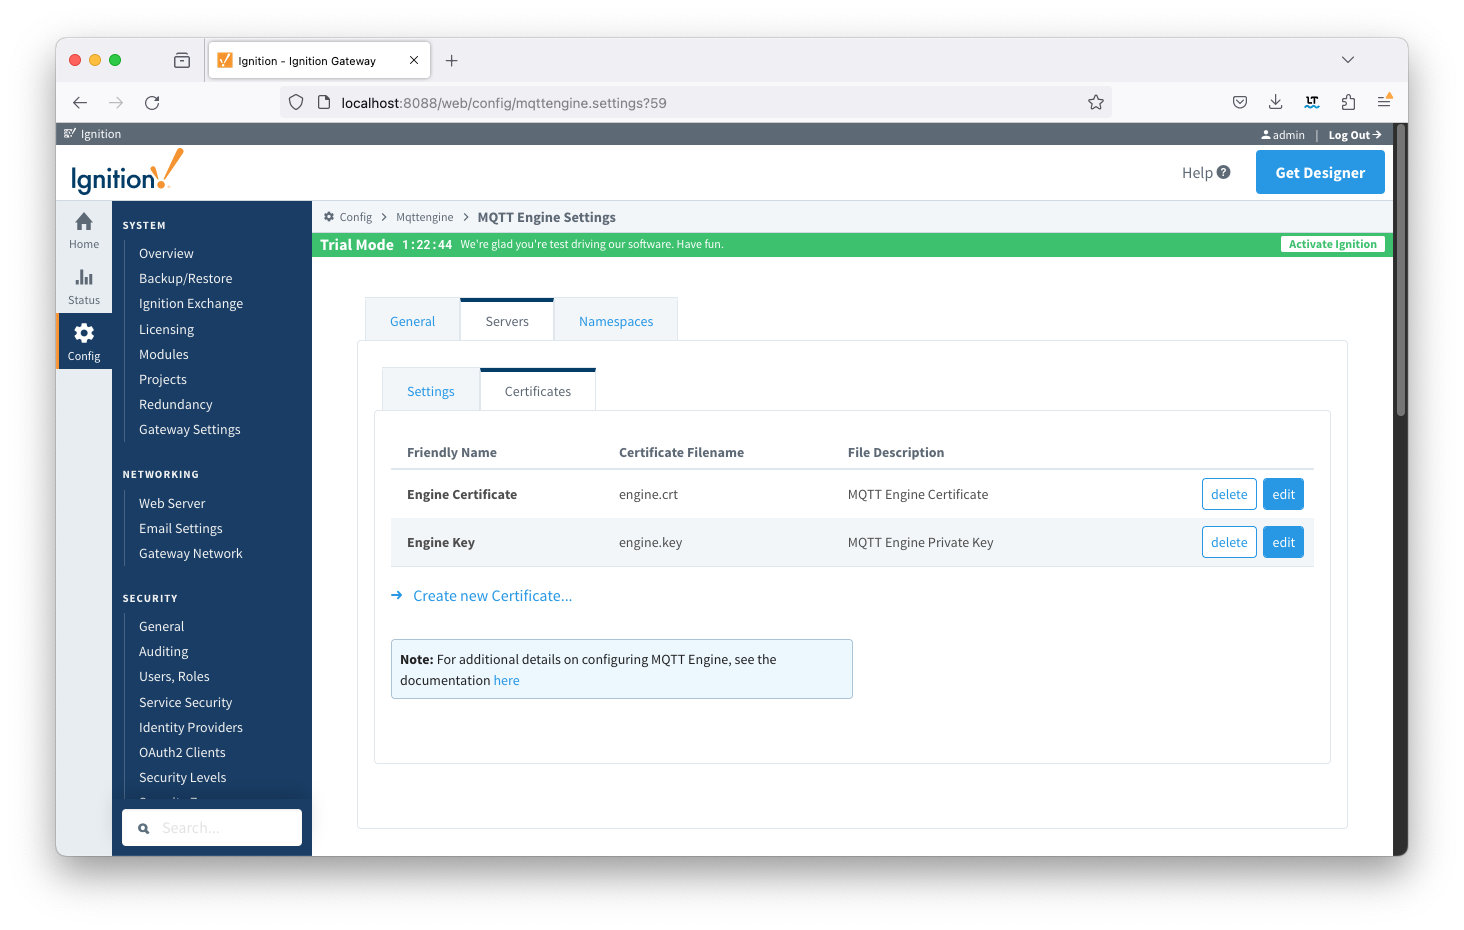
Add the certificates to the MQTT Engine > Servers > Certificates configuration as shown below:
Friendly Name | Certificate Filename | File Description | File Location |
EngineCertificate | engine.crt | MQTT Engine Certificate | chariotcerts/certs/engine |
EngineKey | engine.key | MQTT Engine Private Key | chariotcarts/certs/engine |
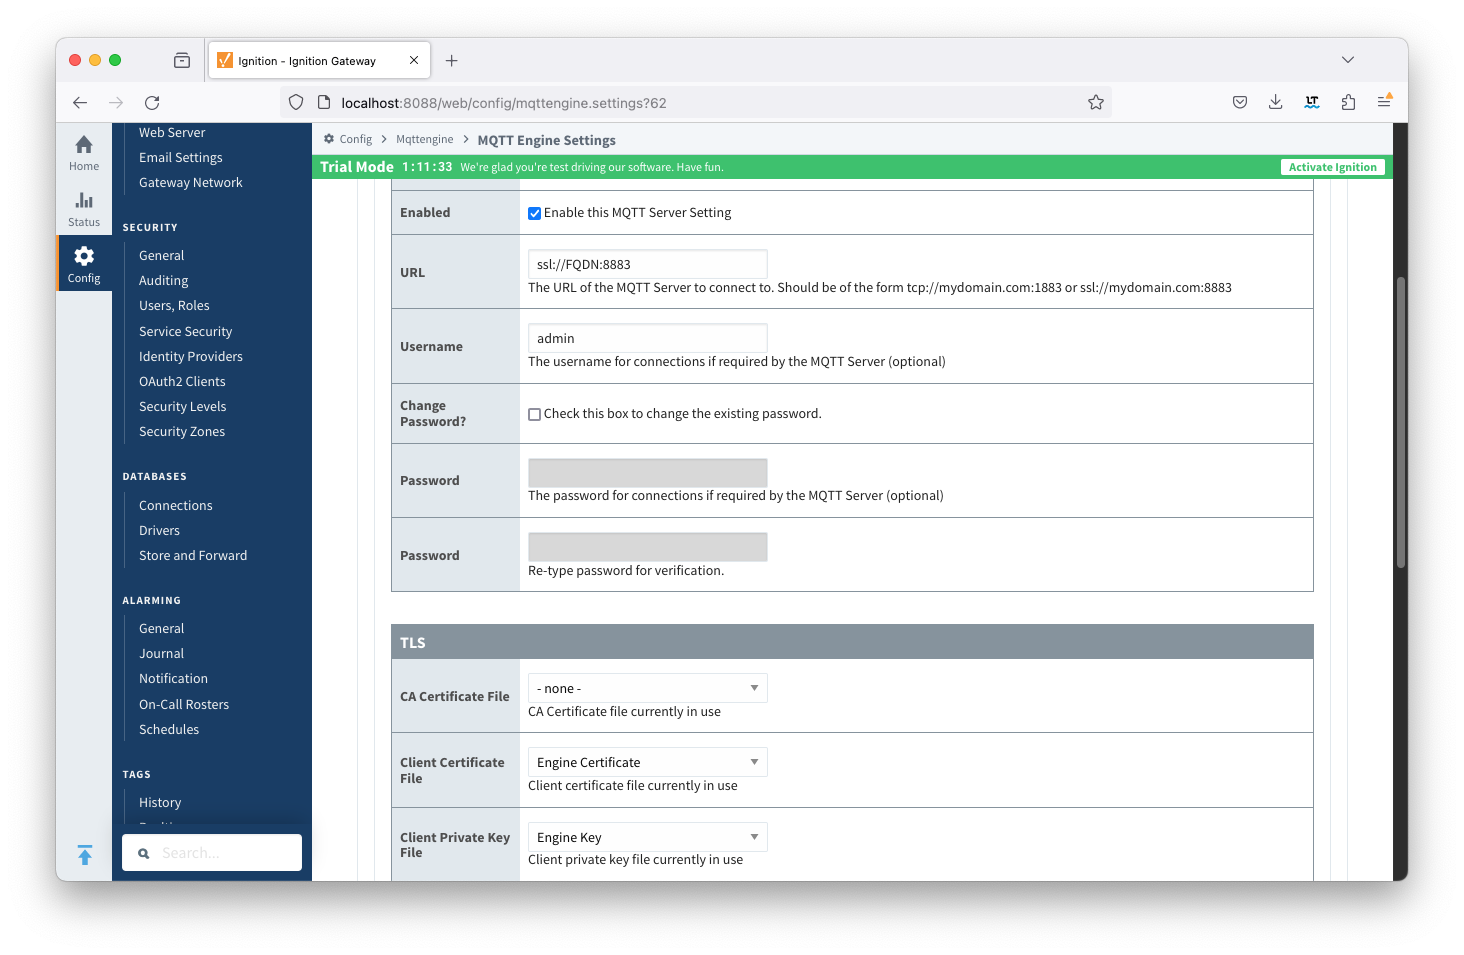
Update the MQTT Engine > Servers > Settings configuration to use the certificates as shown below and setting the URL to be ssl://FQDN:8883 with the FQDN of the Chariot Server. Click the Save Changes button to save the configuration. Note the URL must use SSL. If a non-secure connection is specified here, the connection will not succeed.
| Anchor | ||||
|---|---|---|---|---|
|
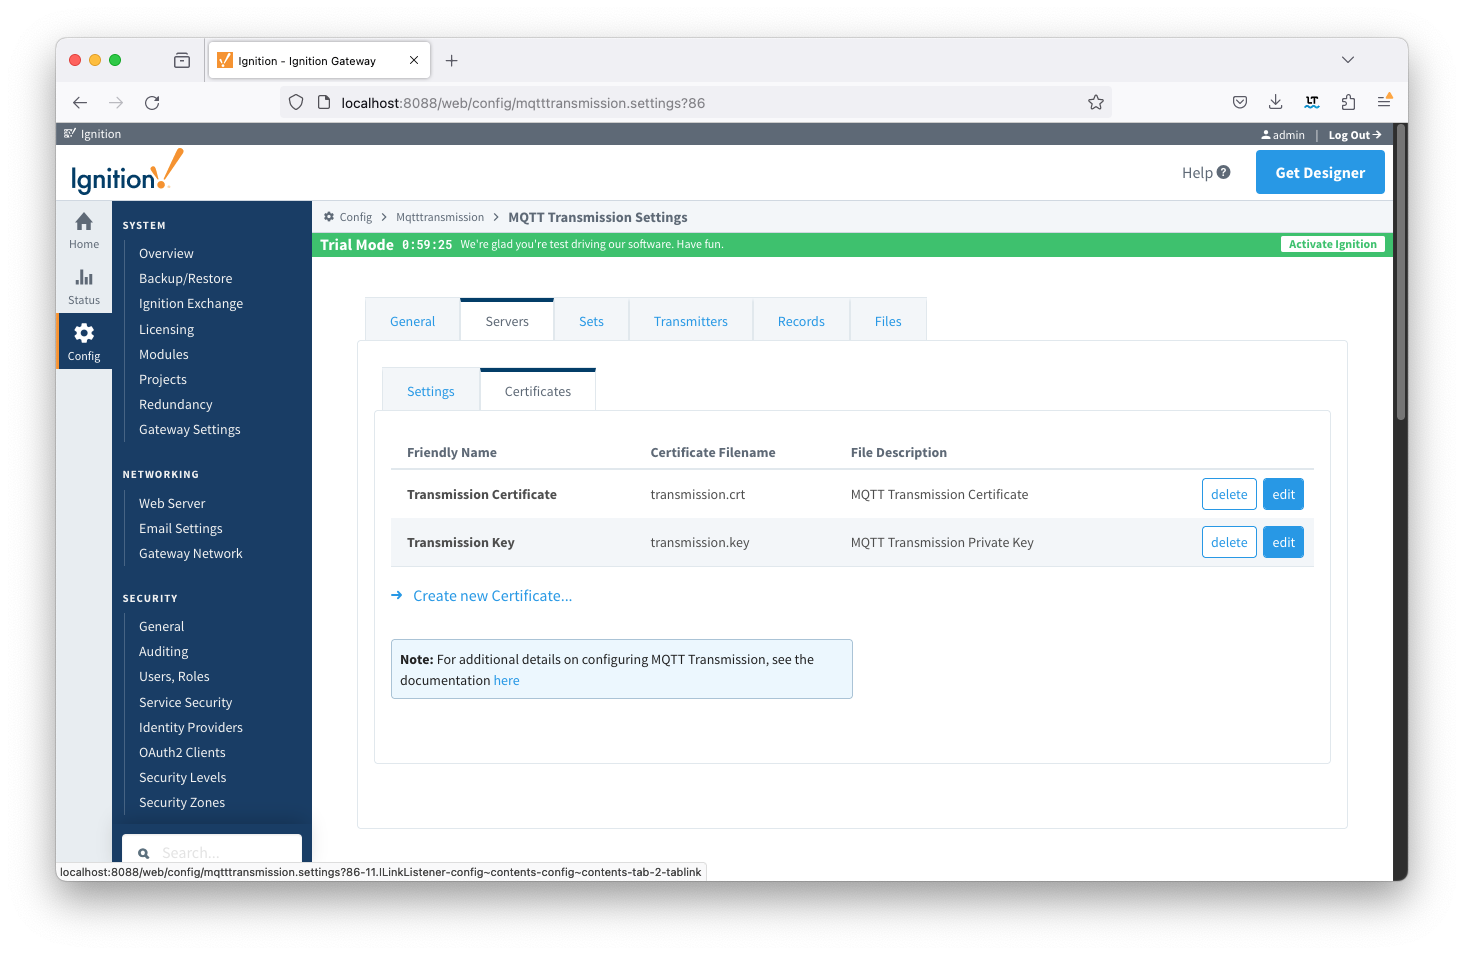
Add certificates to the MQTT Transmission > Servers > Certificates configuration as shown below:
| Friendly Name | Certificate Filename | File Description | File Location |
|---|---|---|---|
| TransmissionCertificate | transmission.crt | MQTT Transmission Certificate | chariotcerts/certs/transmisson |
| TransmissionKey | transmission.key | MQTT Transmission Private Key | chariotcerts/certs/transmission |
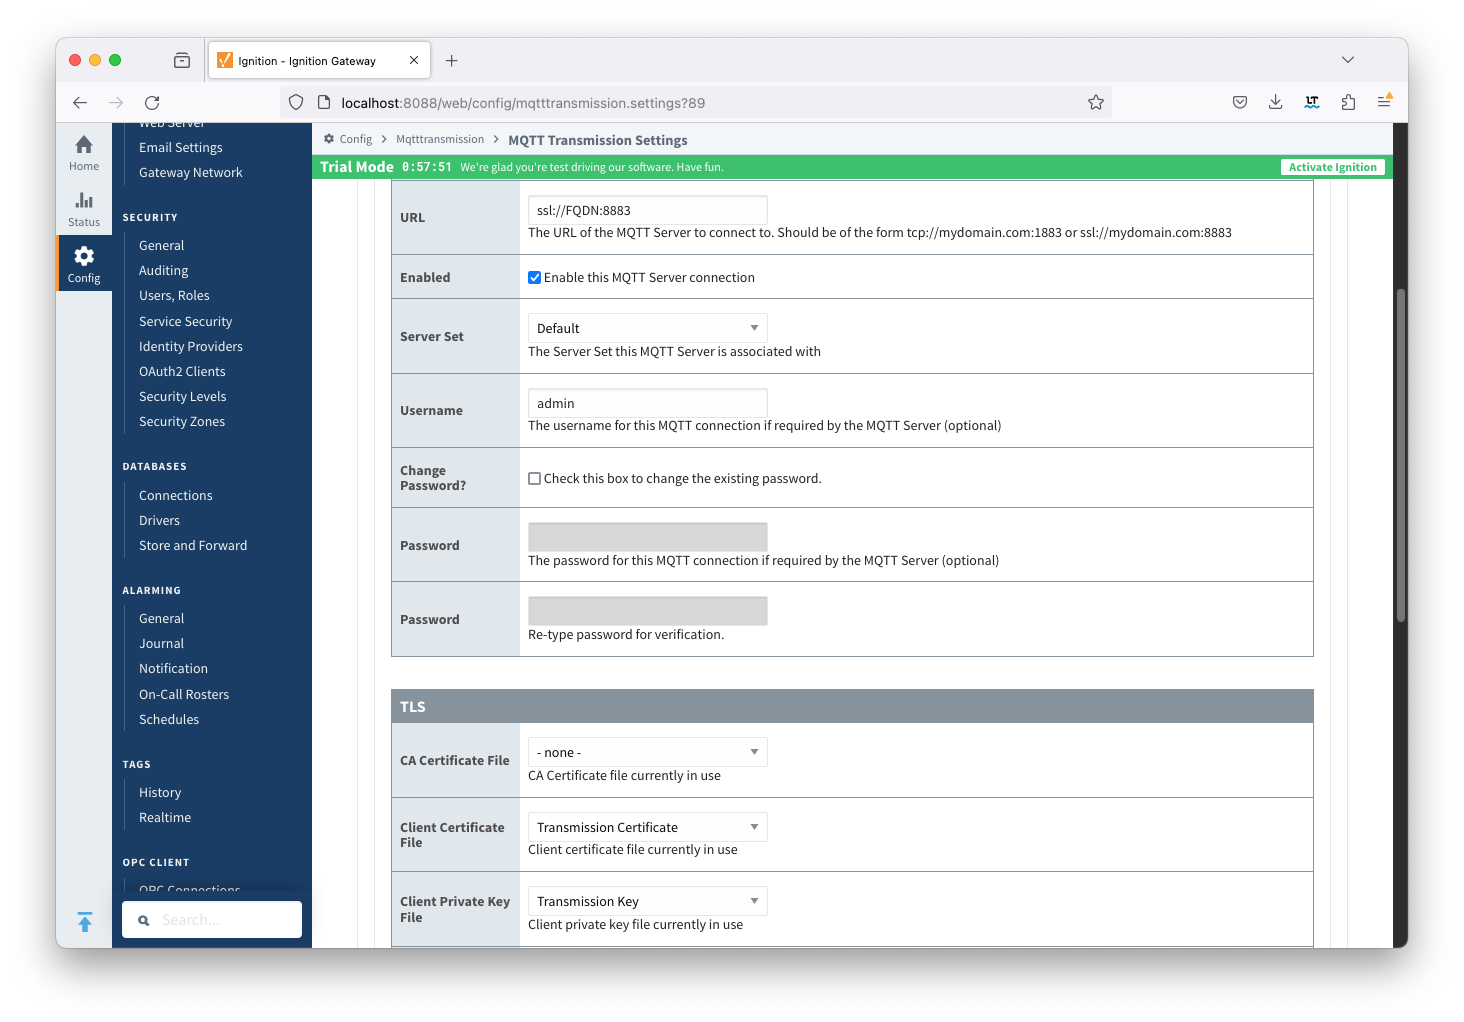
Update the MQTT Transmission > Servers > Settings configuration to use the certificates as shown below. Click the Save Changes button to save the configuration. Note the URL must use SSL. If a non-secure connection is specified here, the connection will not succeed.
| Anchor | ||||
|---|---|---|---|---|
|
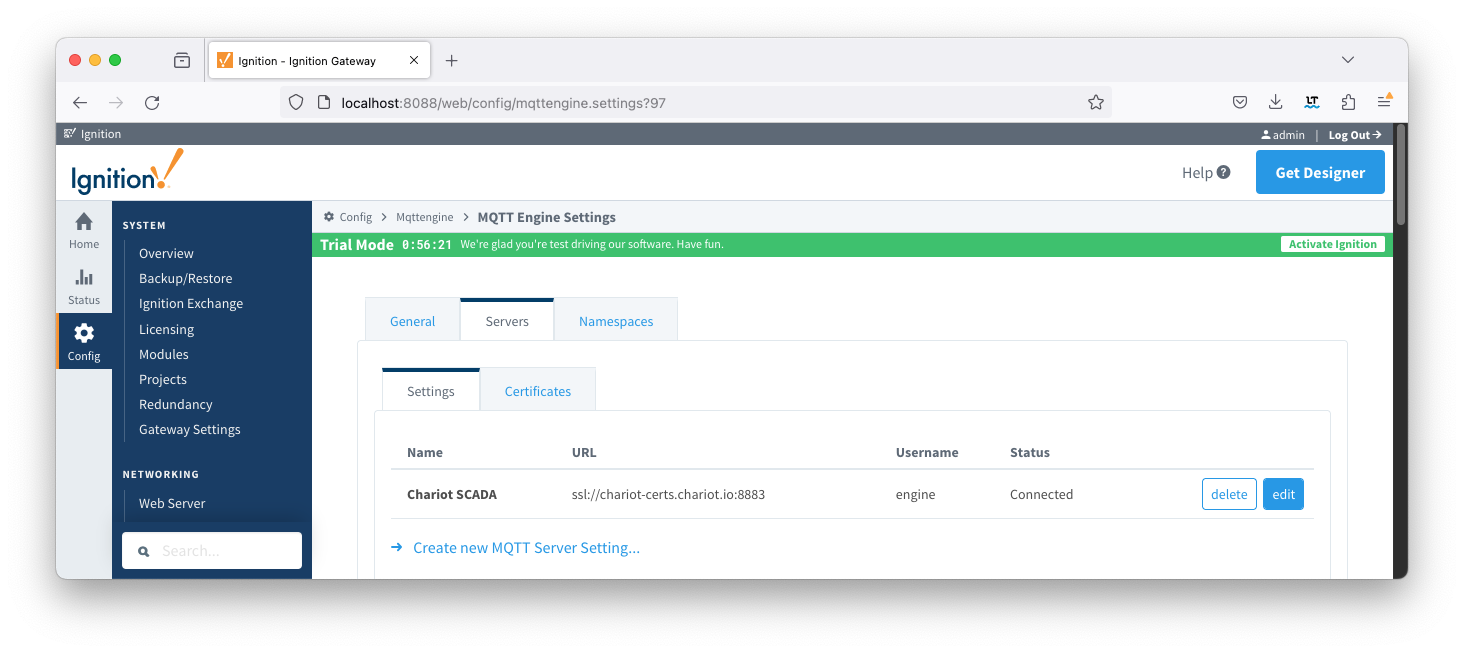
From the left hand menu bar, navigate to Config > MQTT Engine > Servers and note the Status as Connected.
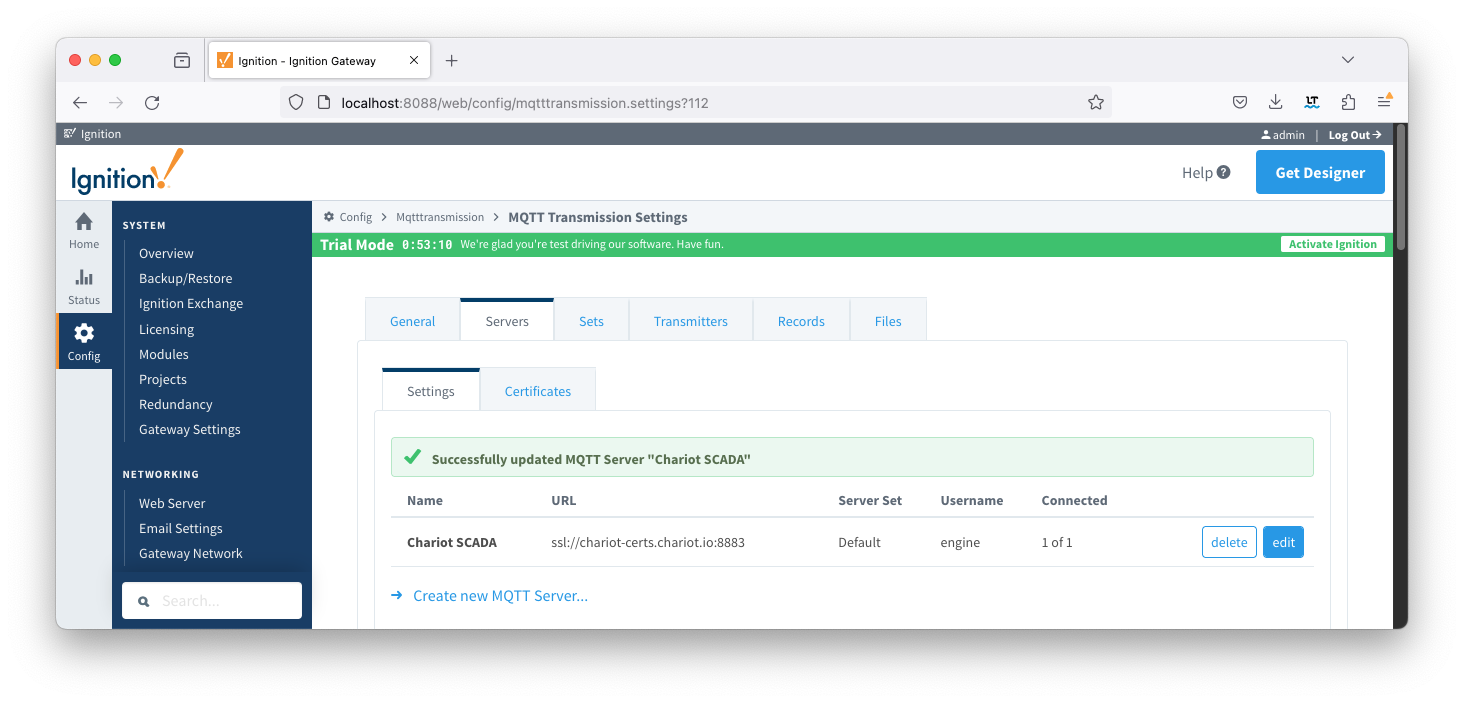
From the left hand menu bar, navigate to Config > MQTT Transmission > Servers and note the Status as "x of x". This denotes the number of configured transmitters that are connected.
If you do not see a transmitter connected, verify that you have a transmitter with a valid Sparkplug ID either through setting the Group and Edge ID or through the TagPath. Review our troubleshooting guide for assistance.
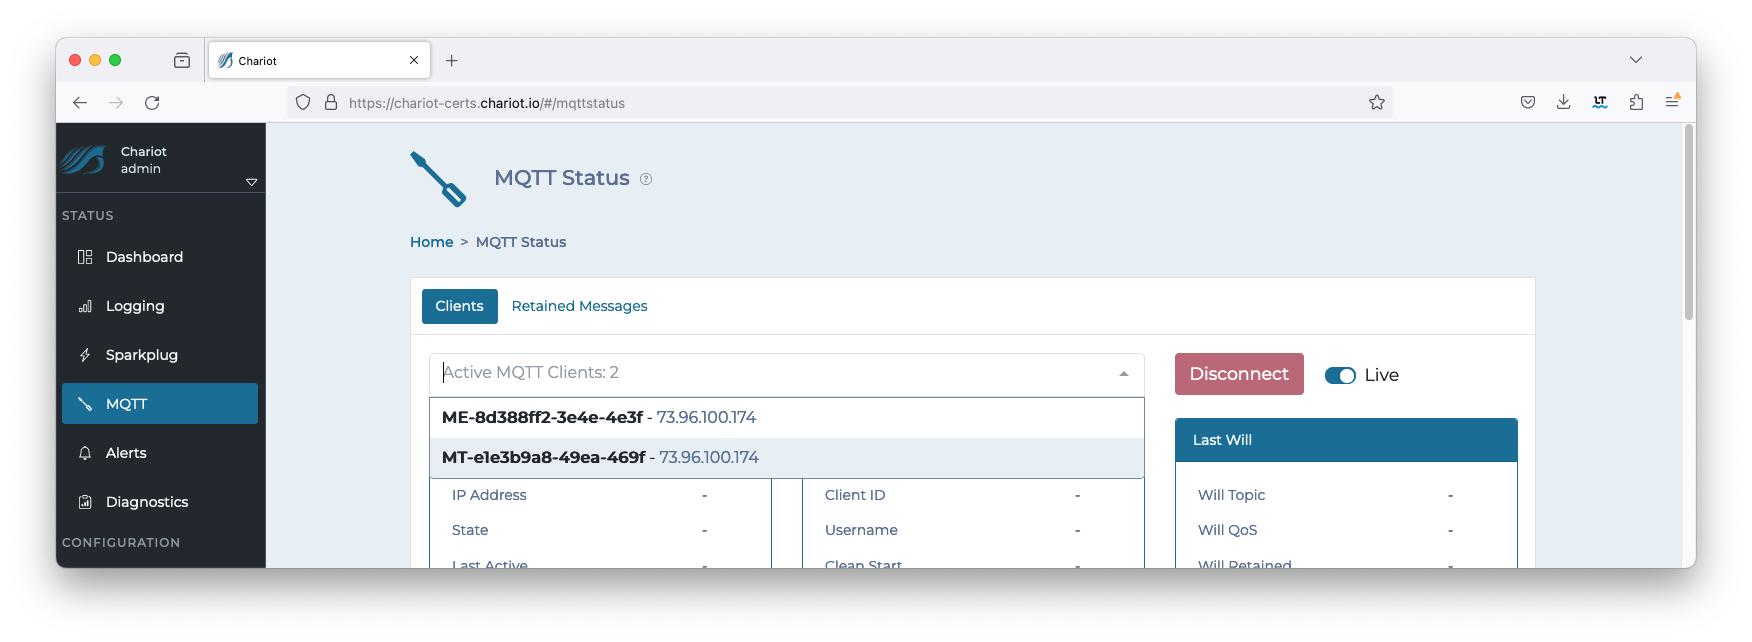
On the Chariot MQTT server, navigate to STATUS > MQTT where the number of active MQTT Clients will be displayed. This will be a count of 2 or 3 depending on your MQTT Transmission RPC Client configuration.
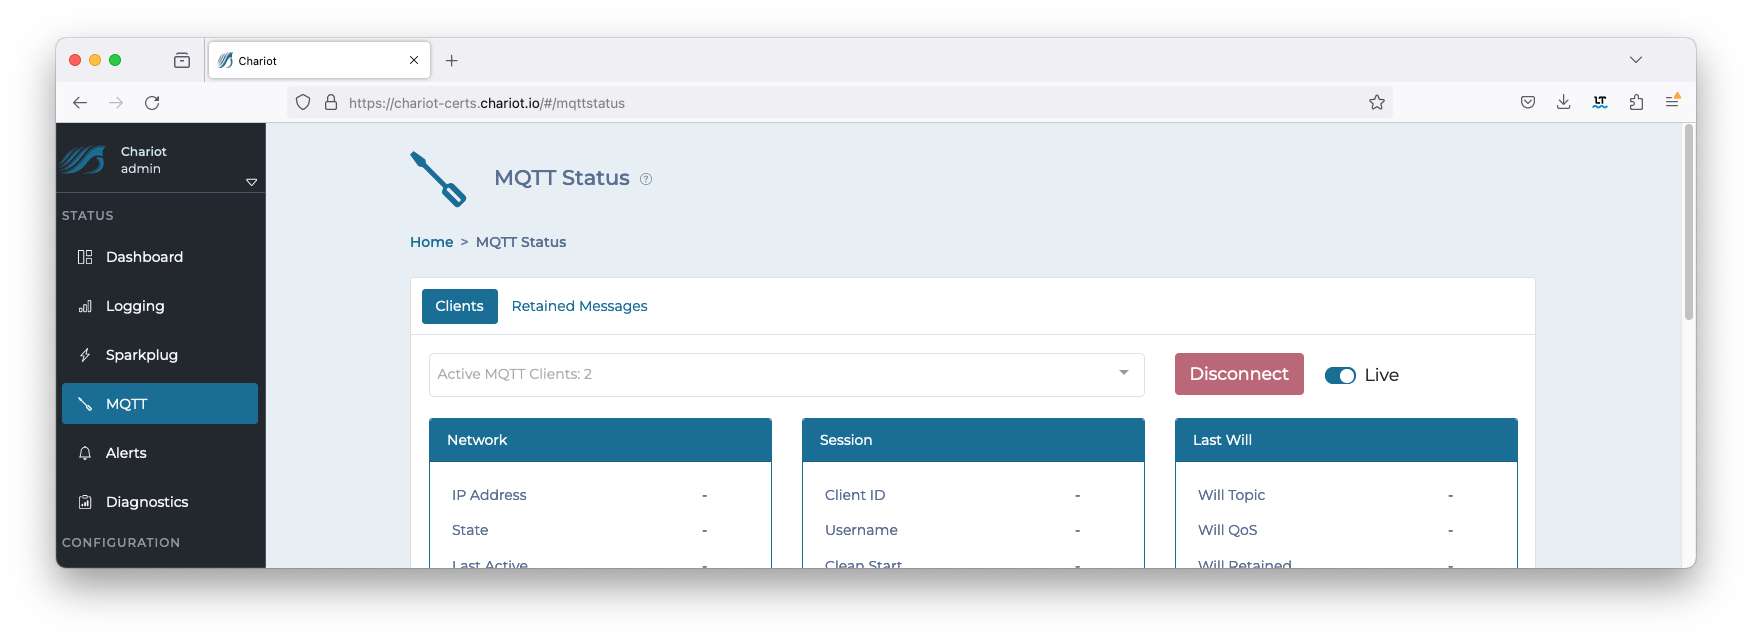
Clicking on the drop down will show the IDs of each client along with additional details: