![]()
Page History
The following guide will walk through the process of upgrading from a Chariot MQTT Server version 2.0.0 to version 2.
...
2.
...
*.
...
Due to the updated method of system backup/restore released in 2.1.0, the process will first need to upgrade from 2.0.0 to 2.1.0 and then
...
to 2.2.
...
Prerequisites
- Have an existing Chariot MQTT Server version 2.0.0
- Have a new installed Chariot MQTT Server version 2.1.0
- Installed, but not running
- Not configured
- Not licensed
...
*.
The following upgrade instructions
...
for each of the supported platforms Linux and Windows requires the user has superuser/admin privileges and can execute any scripts at the command line in the directories where these servers are installed.
...
During this upgrade process your MQTT broker will be offline. Typical update time is less than 10 minutes.
Linux - Upgrading Chariot MQTT Server
- Following the Licensing Procedure, deactivate your existing license on the v2.0.0 Chariot MQTT Server.
Stop the v2.0.0 Chariot service. From a command prompt, run the Chariot service stop script in the v2.0.0 directory.
sudo /etc/init.d/chariot stopInstall v2.1.0 following the Chariot MQTT Server Installation instructions. This instance should be installed ONLY and should not be started.
Do not overwrite the old version of Chariot when extracting the Chariot ZIP package, but instead create a new Chariot directory and extract the new Chariot package into that new directory. For example:- Old version of Chariot is installed in /opt/chariotv2.0.0
- New version of Chariot should be installed in /opt/chariotv2.1.0
- Run the export script on the old install to create an upgrade file
- Run the import script on the new install to import the upgrade file
The scripts come packaged with the Chariot MQTT Server version 2.1.0 and can be found in the install directory.
WARNING: This upgrade procedure DOES NOT transfer the Chariot license. You must first deactivate the Chariot License on the old server before installing and activating on the new server.
Upgrading on Linux
...
Copy the upgradeExport.sh
...
file from the v2.1.0
...
directory to the
...
v2.0.0
...
directory. For example:
sudo cp ./chariotv2.1.0/upgradeExport.sh ./chariotv2.0.0/upgradeExport.shFrom a command prompt, run the upgradeExport script in the v2.0.0 directory to create the upgrade zip file containing the data from the old installation
...
. The file naming convention will be chariot_upgrade_YYMMDD_HHMM.tgz.
sudo ./upgradeExport.shCopy the
...
upgrade.tgz file from the v2.0.0
...
directory to the
...
v2.1.0 directory. For example:
sudo mv ./chariotv2.0.0/chariot_upgrade_20220113_1612.tgz ./chariotv2.1.0/chariot_upgrade_20220113_1612.tgzFrom a command prompt, run the upgradeImport script in the v2.1.0
...
directory referencing the upgrade.tgz file
sudo ./upgradeImport.sh chariot_upgrade_20220113_1612.tgzStart the v2.1.0 Chariot service. From a command prompt, run the Chariot service start script in the v2.1.0
...
directory
sudo /etc/init.d/chariot start- Clear your web browser cache after upgrading Chariot to pick up the latest Chariot UI features and updates.
- Verify the Chariot Version. Navigate to the server URL accessing the Chariot portal on port 8080 and viewing the Version under the Chariot Systems Status. For example: http://localhost:8080/ or http://18.206.192.214:8080/
Backup your Chariot configuration using the Backup/Restore feature. To do this navigate to System in the left menu bar of the Chariot MQTT UI, select Backup/Restore and Export Backup
- Save the backup.tgz file created in a safe, known location as you will need to restore it after the upgrade.
Stop the v2.1.0 Chariot service. From a command prompt, run the Chariot service stop script in the v2.1.0 directory
sudo /etc/init.d/chariot stopInstall v2.2.* following the Chariot MQTT Server Installation instructions in a new Chariot directory.
Do not overwrite the old version of Chariot when extracting the Chariot ZIP package, but instead create a new Chariot directory and extract the new Chariot package into that new directory. For example:- Old version of Chariot is installed in /opt/chariotv2.1.0
- New version of Chariot should be installed in /opt/chariotv2.2.1
Start the v2.2.* Chariot service. From a command prompt, run the Chariot service start script in the v2.2.* directory.
sudo /etc/init.d/chariot start- Clear your web browser cache after upgrading Chariot to pick up the latest Chariot UI features and updates.
- Verify the Chariot Version. Navigate to the server URL accessing the Chariot portal on port 8080 and viewing the Version under the Chariot Systems Status. For example: http://localhost:8080/ or http://18.206.192.214:8080/
Restore your Chariot configuration using the Backup/Restore feature. To do this navigate to System in the left menu bar of the Chariot MQTT UI, select Backup/Restore and Restore from Backup. When prompted, navigate to the backup.tgz file created earlier and import.
Confirm that any configuration items have been imported correctly.
If configured for SSL, reload any SSL certificates.
Following the Licensing Procedure, activate your existing license on the v2.2.* Chariot MQTT Server to complete the upgrade.
Windows - Upgrading Chariot MQTT Server
- Following the Licensing Procedure, deactivate your existing license on the v2.0.0 Chariot MQTT Server.
Stop the v2.0.0 Chariot service. From a command prompt, run the Chariot service stop script in the v2.0.0 directory.
serviceStop.batInstall v2.1.0 following the Chariot MQTT Server Installation instructions. This instance should be installed ONLY and should not be started.
Do not overwrite the old version of Chariot when extracting the Chariot ZIP package, but instead create a new Chariot directory and extract the new Chariot package into that new directory. For example:- Old version of Chariot is installed in D:\chariotv2.0.0
- New version of Chariot should be installed in D:\chariotv2.1.0
Copy the upgradeExport.vbs file
...
The new Chariot MQTT Server should be loaded with the Users, Roles, MQTT Credentials, and System & Server configurations from the old installation. However, the new Chariot MQTT Server will still need to be licensed and any SSL certificates/keys will need to be uploaded again.
Upgrading on Windows
The following instructions can be used with upgrading the Chariot MQTT Server on Windows.
...
from the v2.1.0
...
directory to the
...
v2.0.0 directory. For example:
copy D:\chariotv2.1.0\upgradeExport.vbs D:\chariotv2.0.0
...
\upgradeExport.
...
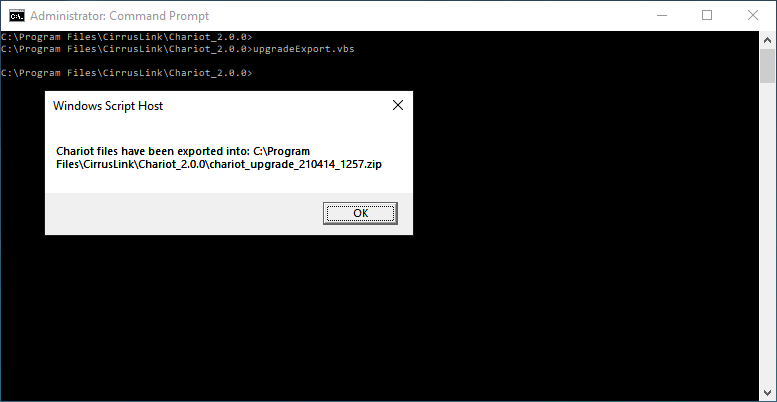
vbsFrom a command prompt, run the upgradeExport.vbs
...
script in the v2.0.0 directory to create the upgrade zip file containing the data from the old installation. The file naming convention will be chariot_upgrade_YYMMDD_HHMM.zip
upgradeExport.
...
vbsCopy the upgrade.zip file from the v2.0.0 directory
...
to the v2.1.0
...
directory. For example:
copy D:\chariotv2.0.0\chariot_upgrade_20220113_1612.zip D:\chariotv2.1.0\chariot_upgrade_20220113_1612.zipFrom a command prompt, run the upgradeImport script in the v2.1.0 directory
ugradeImport.vbsStart the v2.1.0 Chariot service. From a command prompt, run the Chariot service start script in
...
the v2.1.0
...
directory
...
.
serviceStart.bat- Clear your web browser cache after upgrading Chariot to pick up the latest Chariot UI features and updates.
- Verify the Chariot Version. Navigate to the server URL accessing the Chariot portal on port 8080 and viewing the Version under the Chariot Systems Status. For example: http://localhost:8080/ or http://18.206.192.214:8080/
Backup your Chariot configuration using the Backup/Restore feature. To do this navigate to System in the left menu bar of the Chariot MQTT UI, select Backup/Restore and Export Backup.
- Save the backup.zip file downloaded in a safe, known location as you will need to restore it after the upgrade.
Stop the v2.1.0 Chariot service. From a command prompt, run the Chariot service stop script in the v2.1.0 directory.
serviceStop.batInstall v2.2.* following the Chariot MQTT Server Installation instructions in a new Chariot directory.
Do not overwrite the old version of Chariot when extracting the Chariot ZIP package, but instead create a new Chariot directory and extract the new Chariot package into that new directory. For example:- Old version of Chariot is installed in C:\Program Files\Chariotv2.1.0
- New version of Chariot should be installed in C:\Program Files\Chariotv2.2.1
Start the v2.2.* Chariot service. From a command prompt, run the Chariot service start script in the v2.2.* directory.
serviceStart.bat- Clear
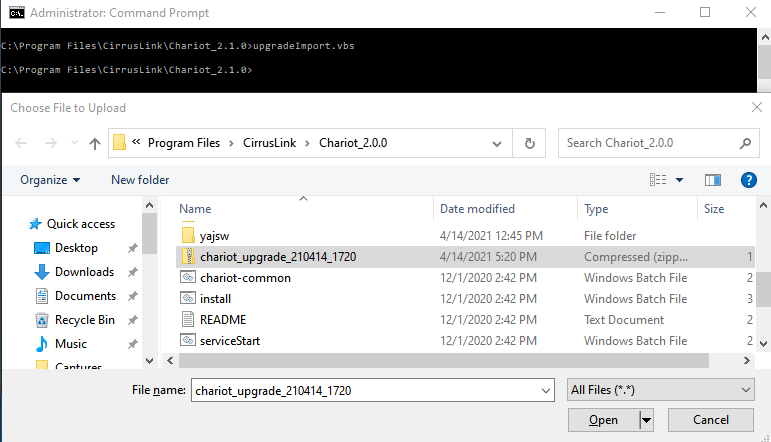
6. Navigate to the Chariot 2.0.0 directory and select the 'chariot_upgrade' ZIP archive created earlier.
7. Click the 'Open' button to import from selected ZIP archive.
8. Make sure Chariot files are imported as shown below:
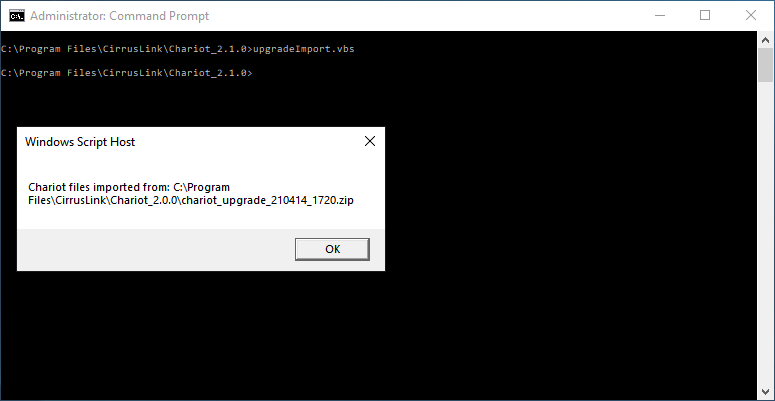
8. Start the new v2.1.0 Chariot MQTT Server.
The new Chariot MQTT Server should be loaded with the Users, Roles, MQTT Credentials, and System & Server configurations from the old installation. However, the new Chariot MQTT Server will still need to be licensed and any SSL certificates/keys will need to be uploaded again.
...
- your web browser cache after upgrading Chariot to pick up the latest Chariot UI features and updates.
- Verify the Chariot Version. Navigate to the server URL accessing the Chariot portal on port 8080 and viewing the Version under the Chariot Systems Status. For example: http://localhost:8080/ or http://18.206.192.214:8080/
Restore your Chariot configuration using the Backup/Restore feature. To do this navigate to System in the left menu bar of the Chariot MQTT UI, select Backup/Restore and Restore from Backup. When prompted, navigate to the backup.zip file created earlier and import.
- Confirm that any configuration items have been imported correctly.
- If configured for SSL, reload any SSL certificates.
- Following the Licensing Procedure, activate your existing license on the v2.2.* Chariot MQTT Server to complete the upgrade.
Overview
Content Tools