Prerequisites
Abstract
This tutorial describes how to connect MQTT Engine or MQTT Transmission to Amazon Web Services (AWS) IoT Core.
The document comprises these sections:
Provisioning the 'Thing'
Before configuring MQTT Engine or MQTT Transmission, you must register a 'thing' connection in AWS IoT Core. Begin by browsing to AWS IoT Core in your AWS account. Make sure you are in the same AWS region that you intend to connect the MQTT Module to. Begin by expanding 'Secure' and click 'Policies' as shown below.
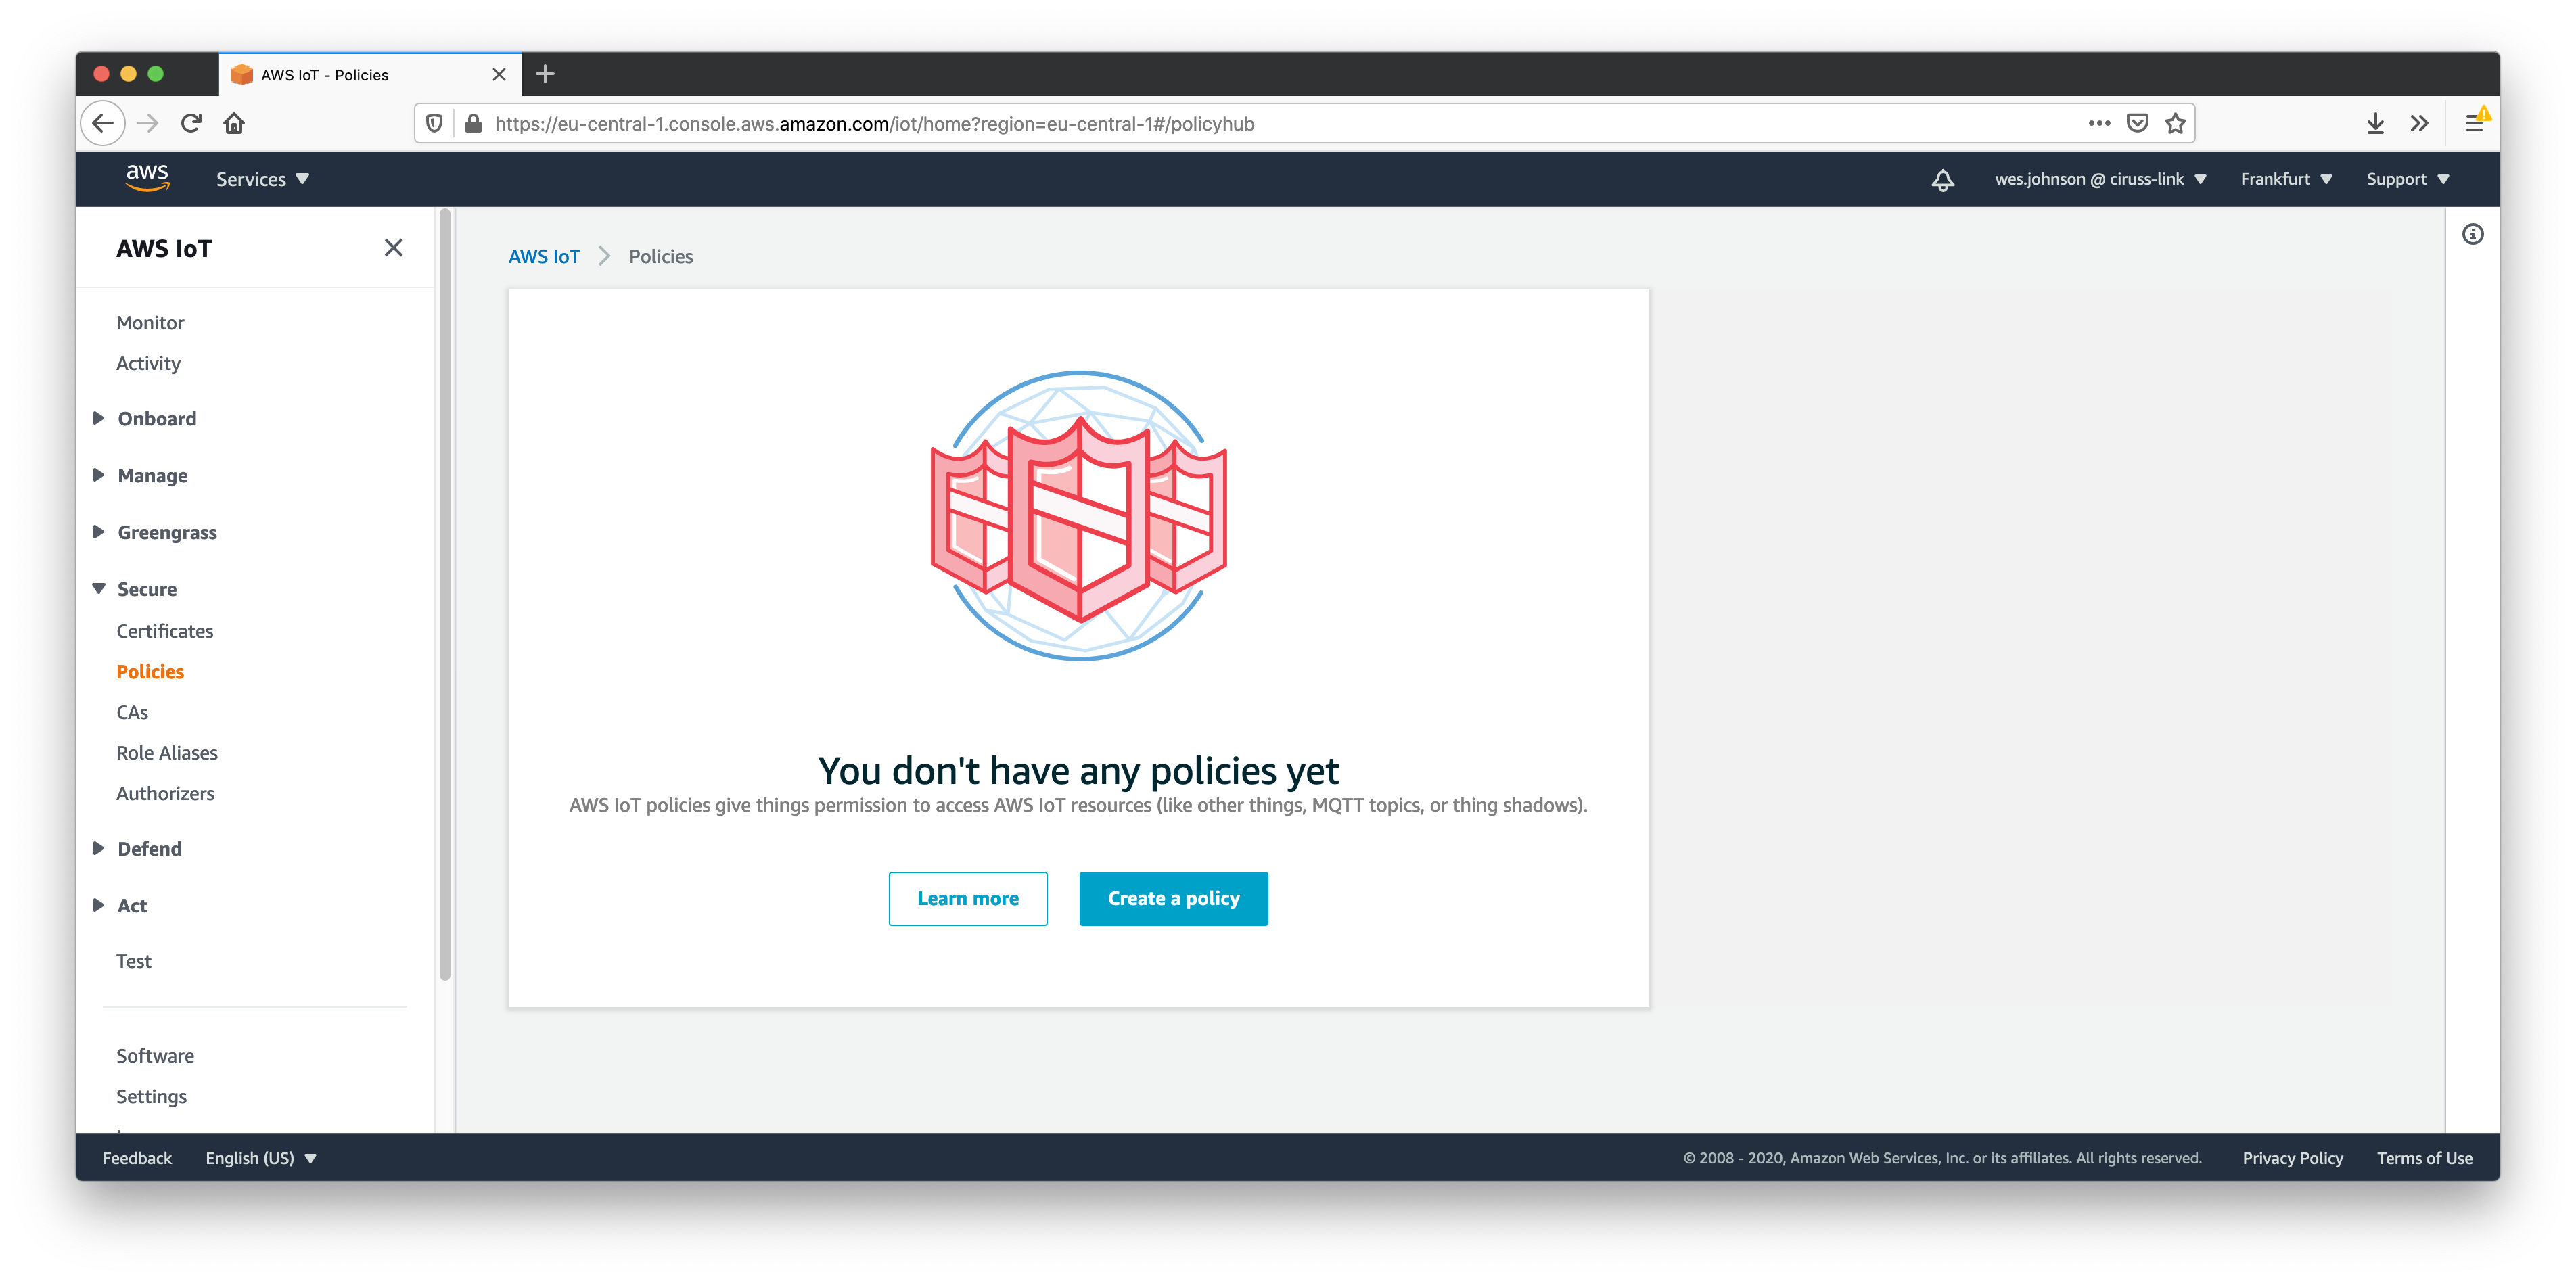
Now click the 'Create a policy' button. This will bring up the following page.
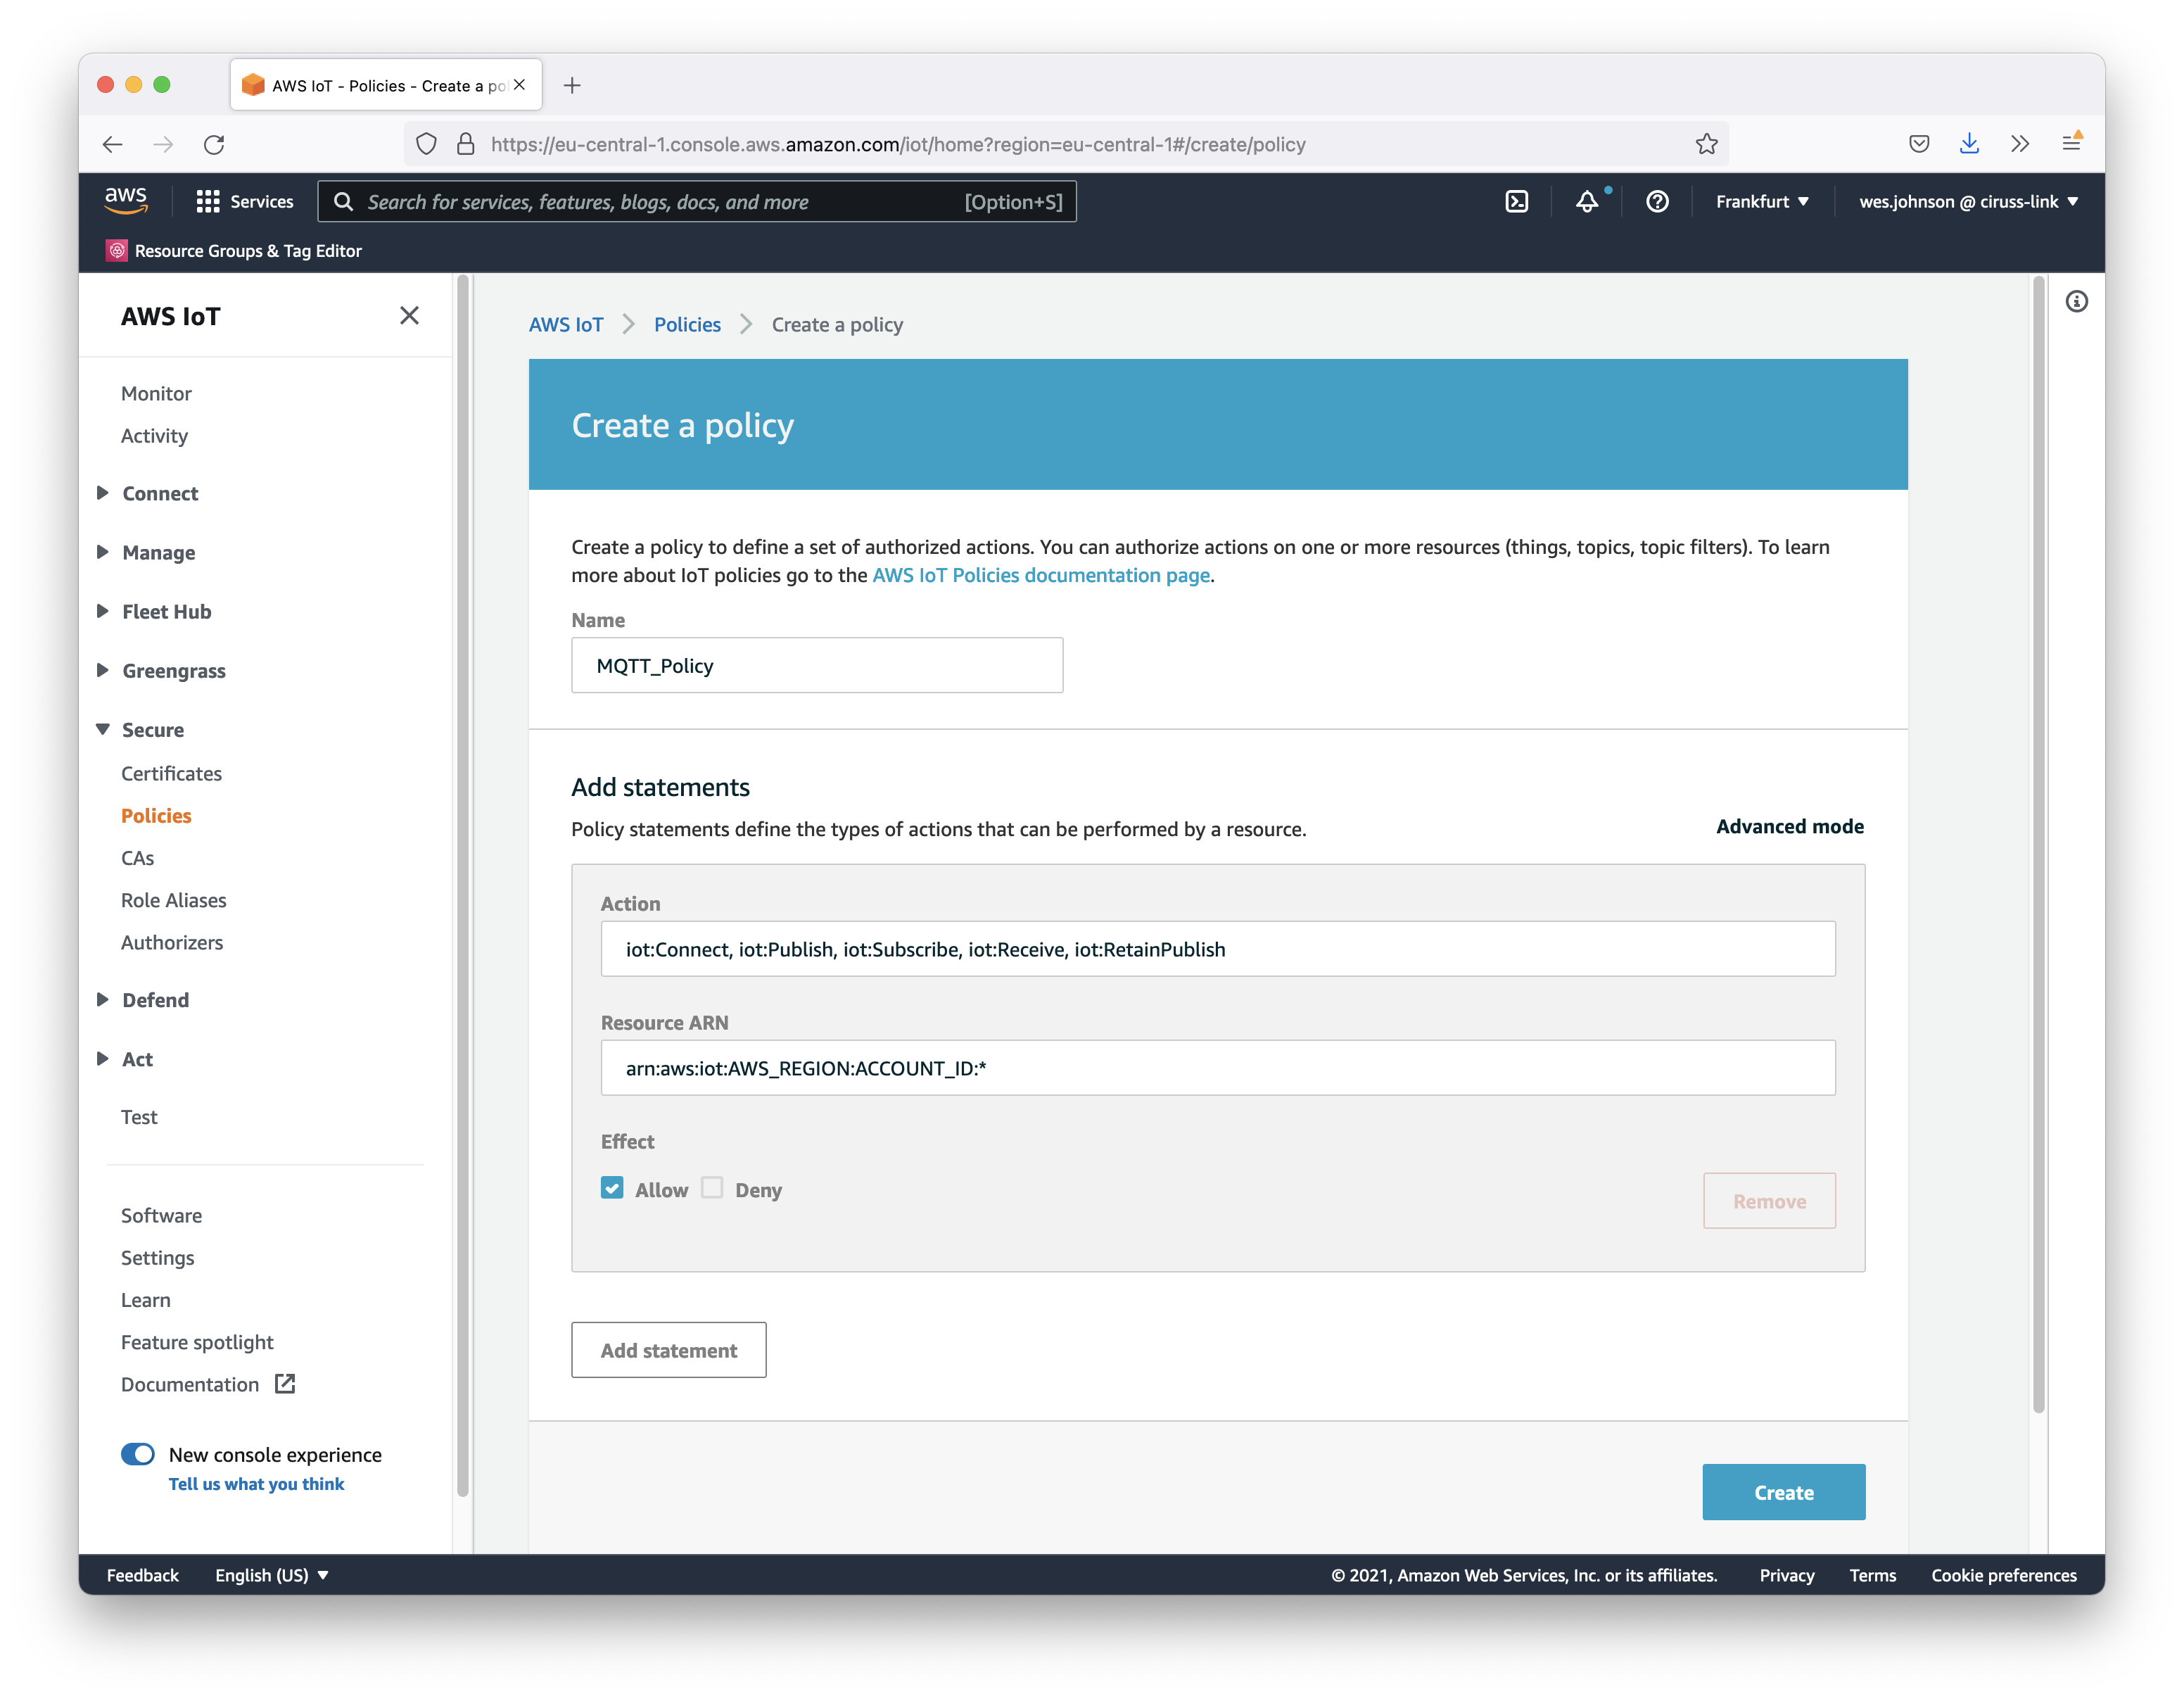
Set the following parameters for the policy.
- Name
- Some friendly name you will remember
- Actions
- Set to: iot:Connect,iot:Publish,iot:Subscribe,iot:Receive,iot:RetainPublish
- Note this will be used for both a publisher connection (Ignition) and a subscriber (MQTT Engine and/or MQTT Transmission)
- Resource ARN
- Set to: arn:aws:iot:AWS_REGION:ACCOUNT_ID:*
- In the above, replace the following.
- AWS_REGION: The region MQTT Engine and/or MQTT Transmission will connect to like us-east-1, us-west-1, etc
- ACCOUNT_ID: Your AWS Account ID
- Effect
Finally click 'Create' in the lower right. This will show the newly created policy.

At this point a 'thing' can be created. We'll use the policy a bit later in the procedure. To create the thing, expand 'Manage' on the left navigation panel and click 'Things' as shown below.
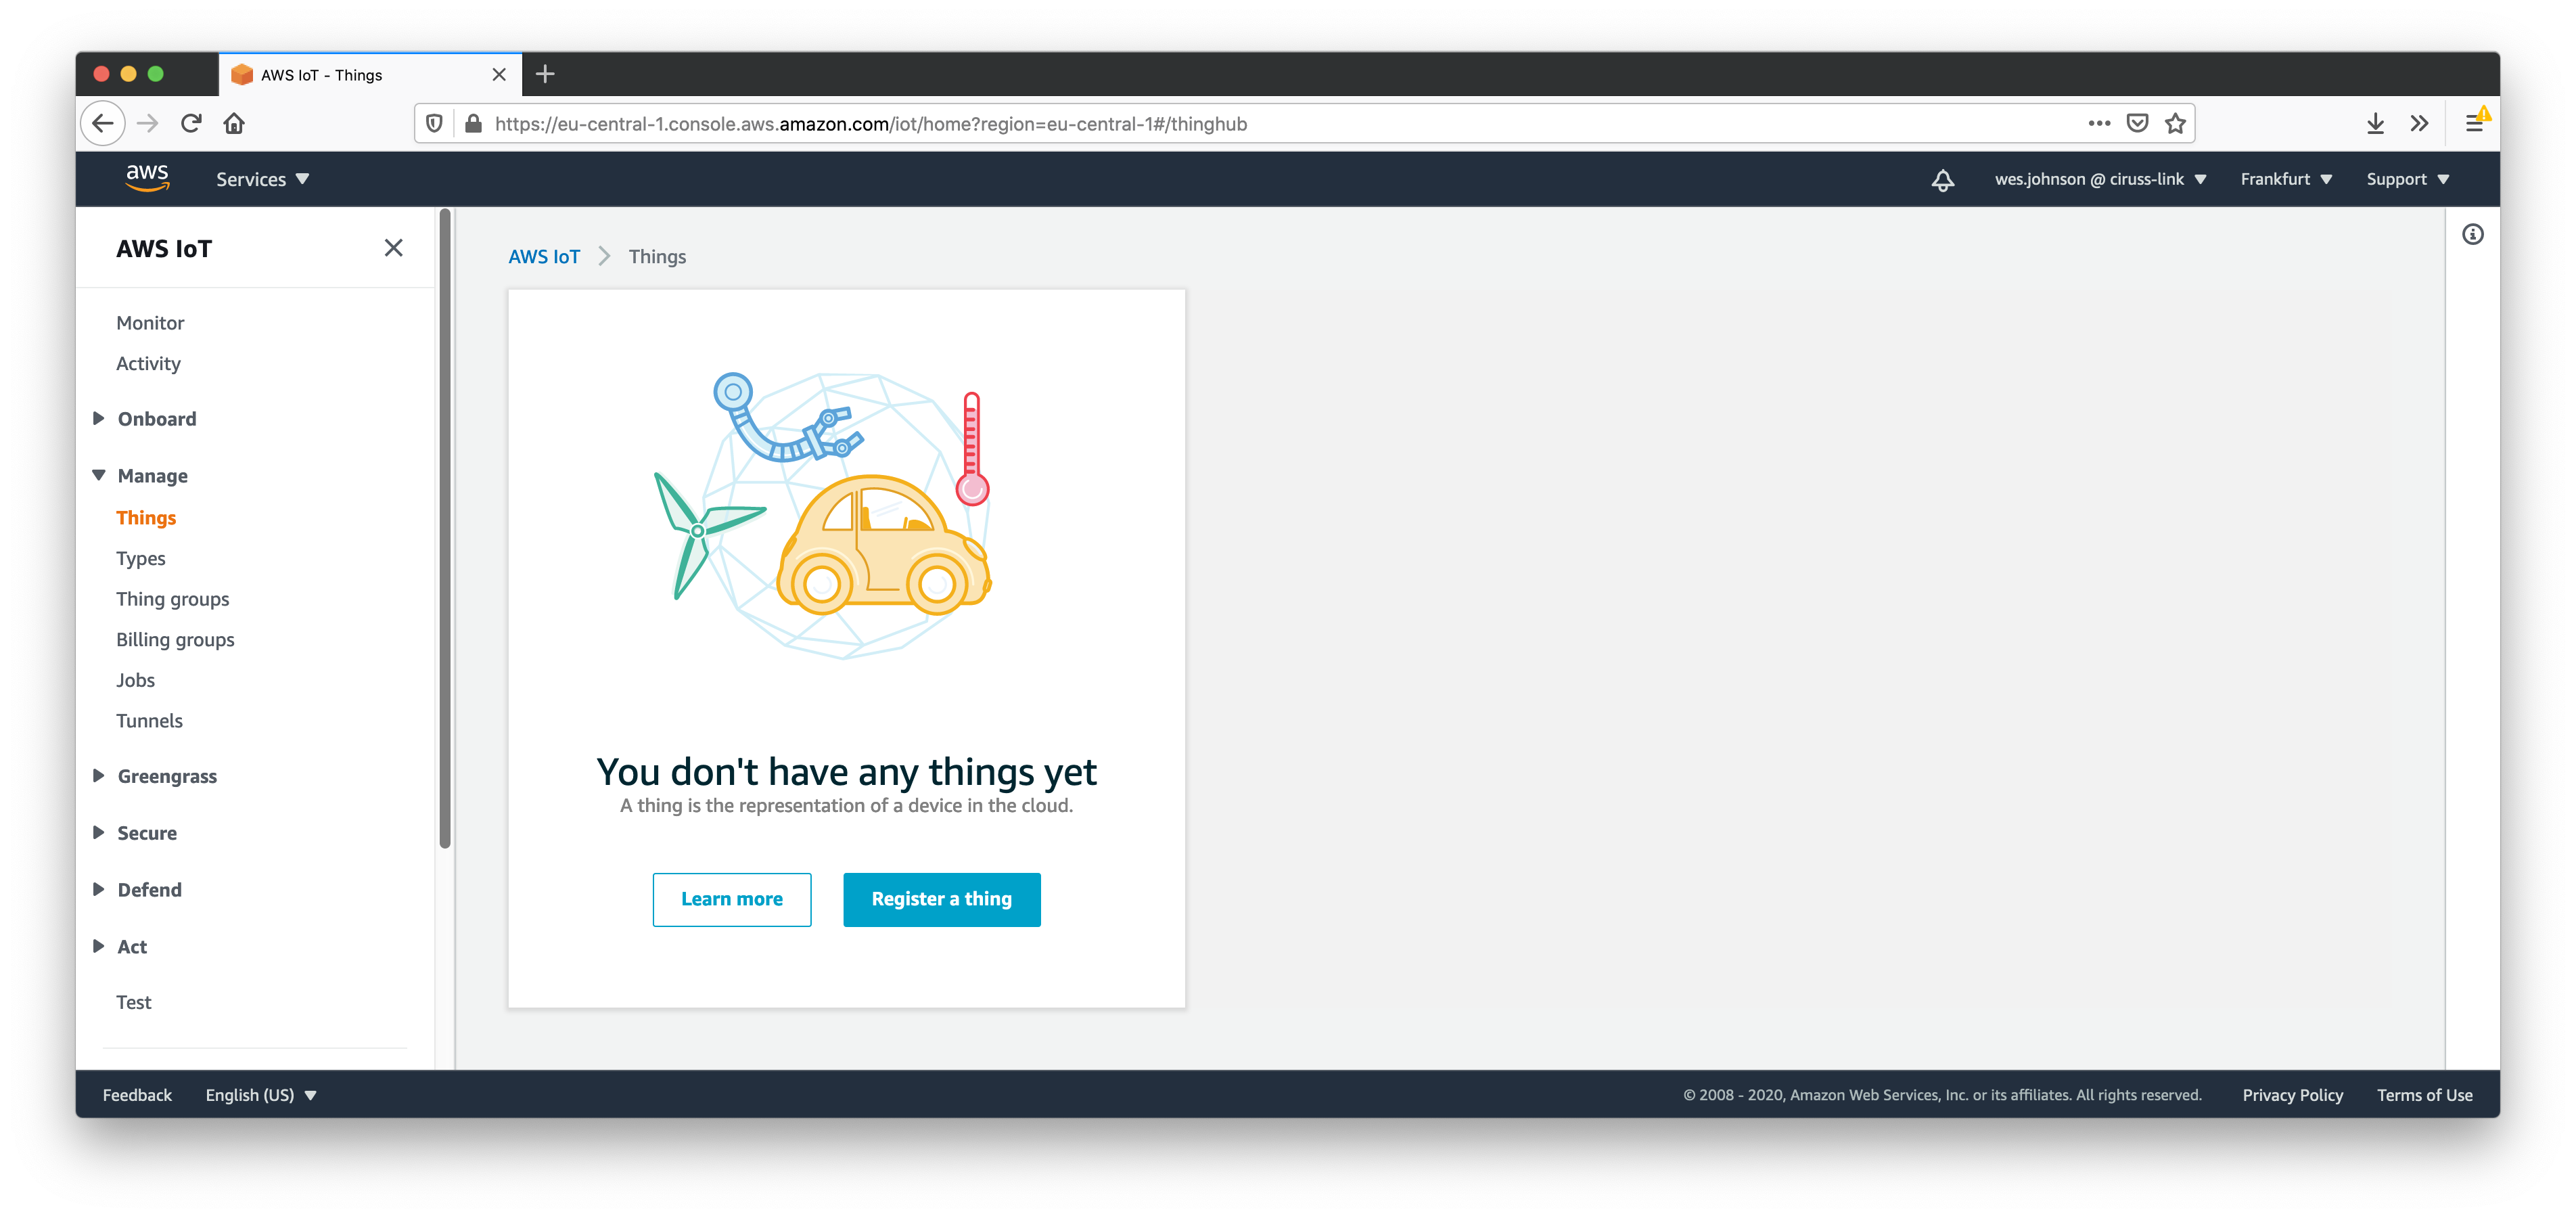
Click 'Register a thing'. This will bring up the page below.
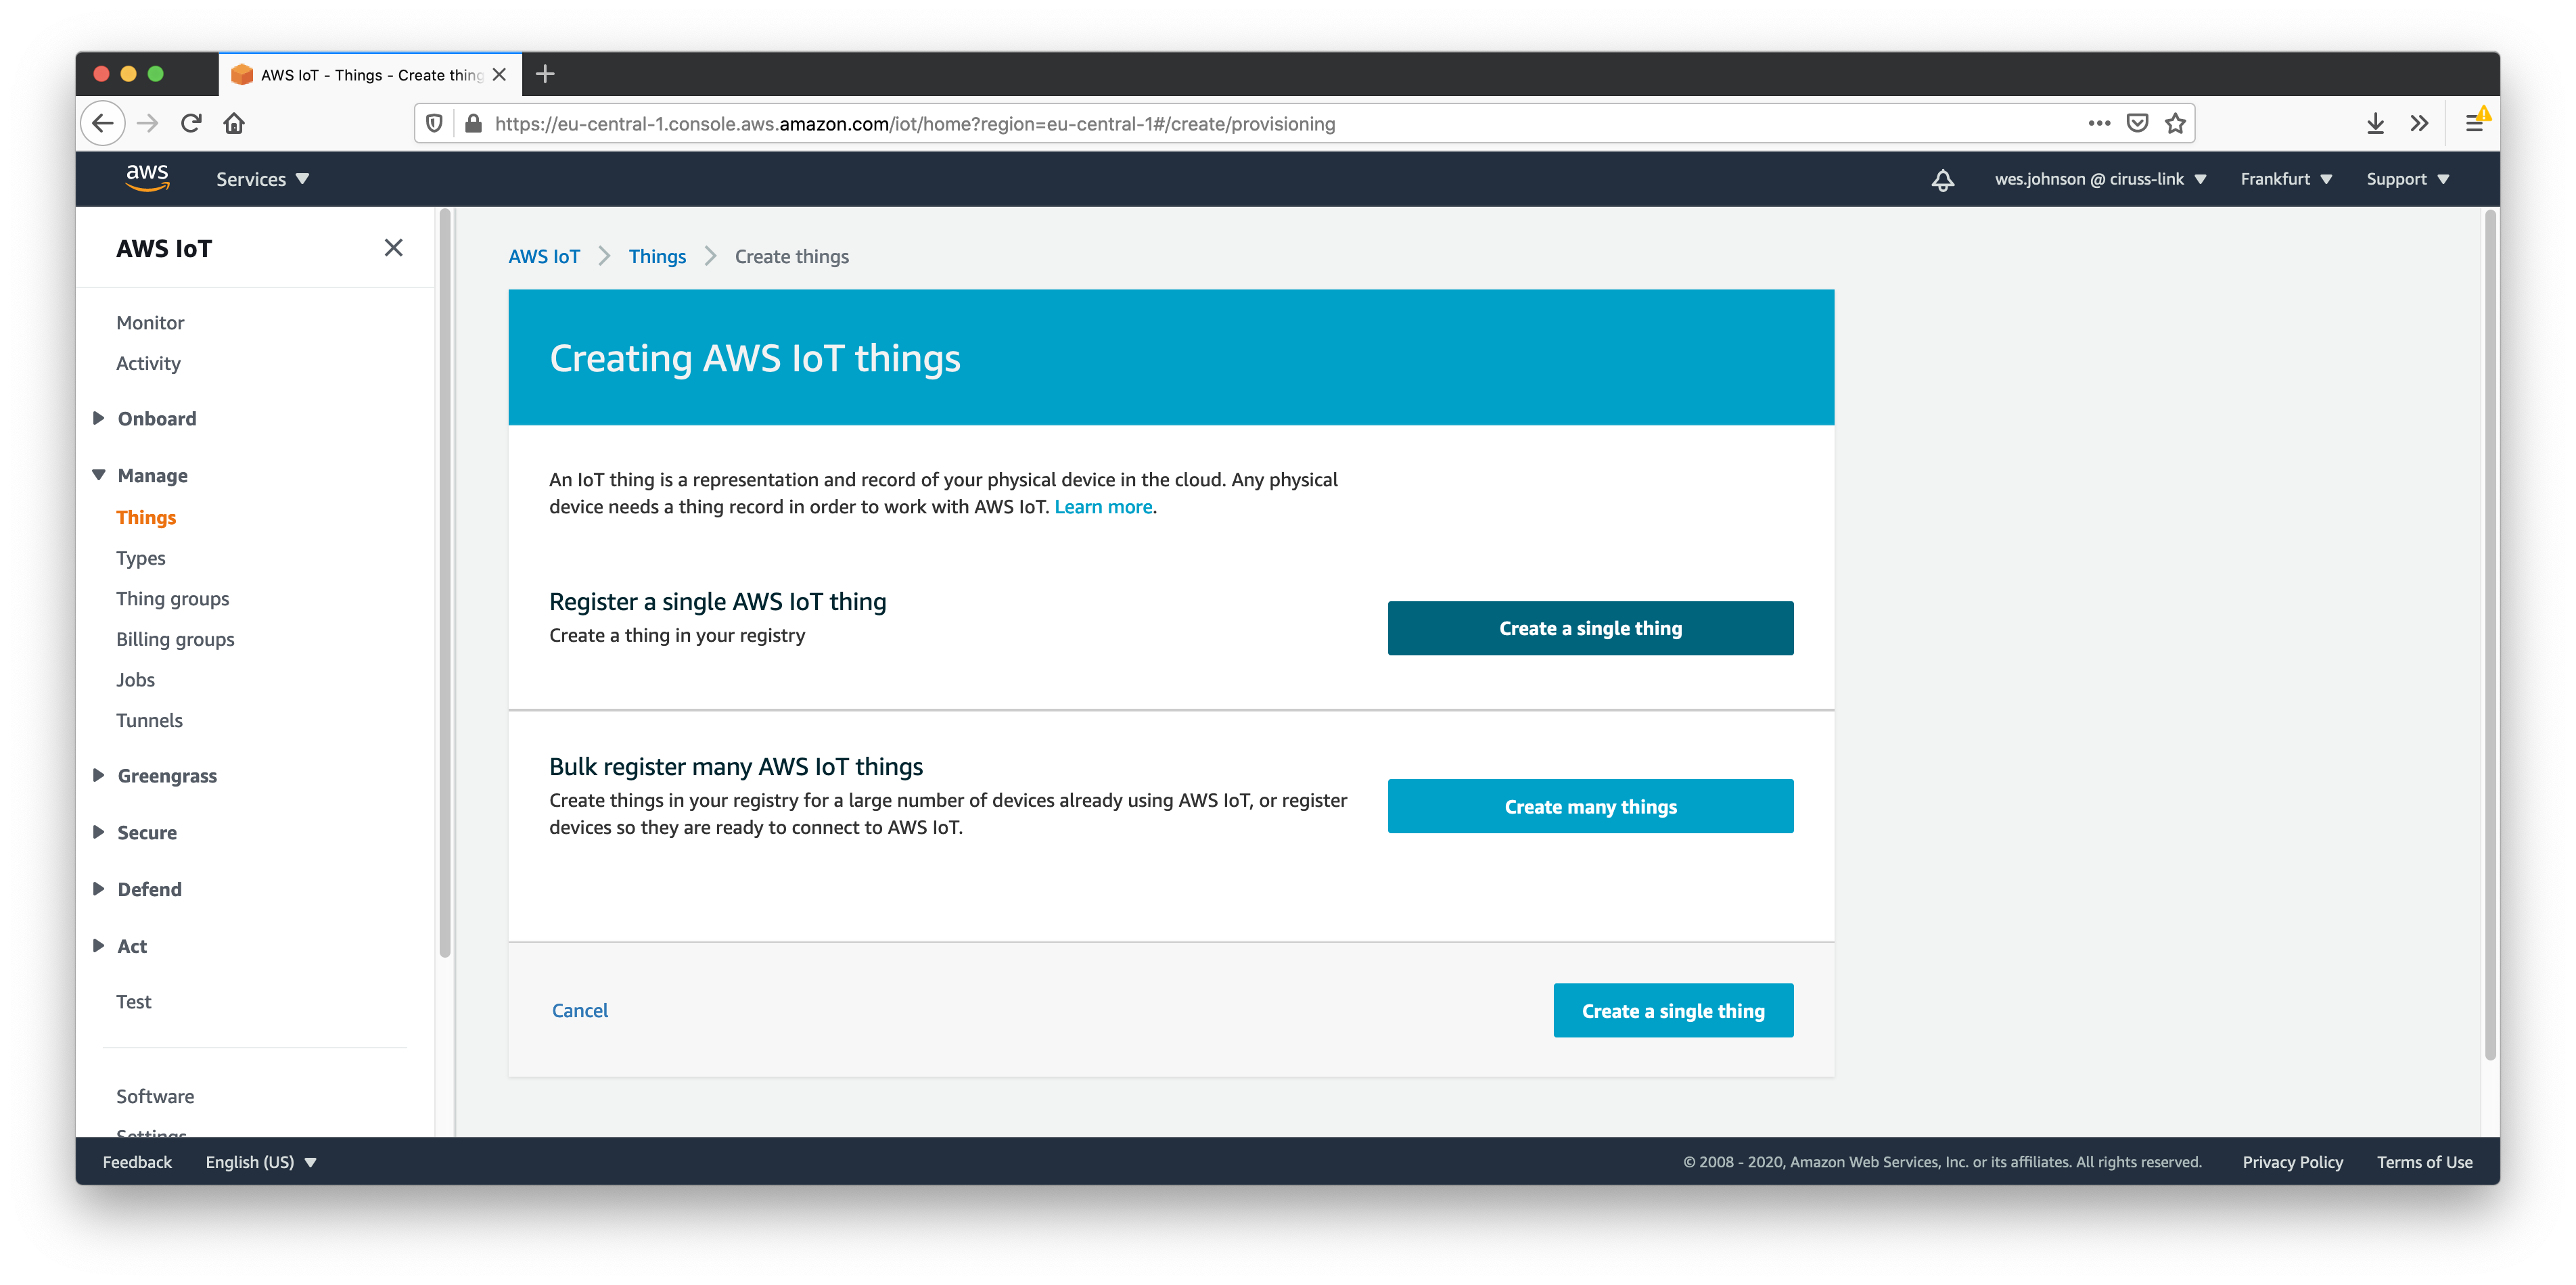
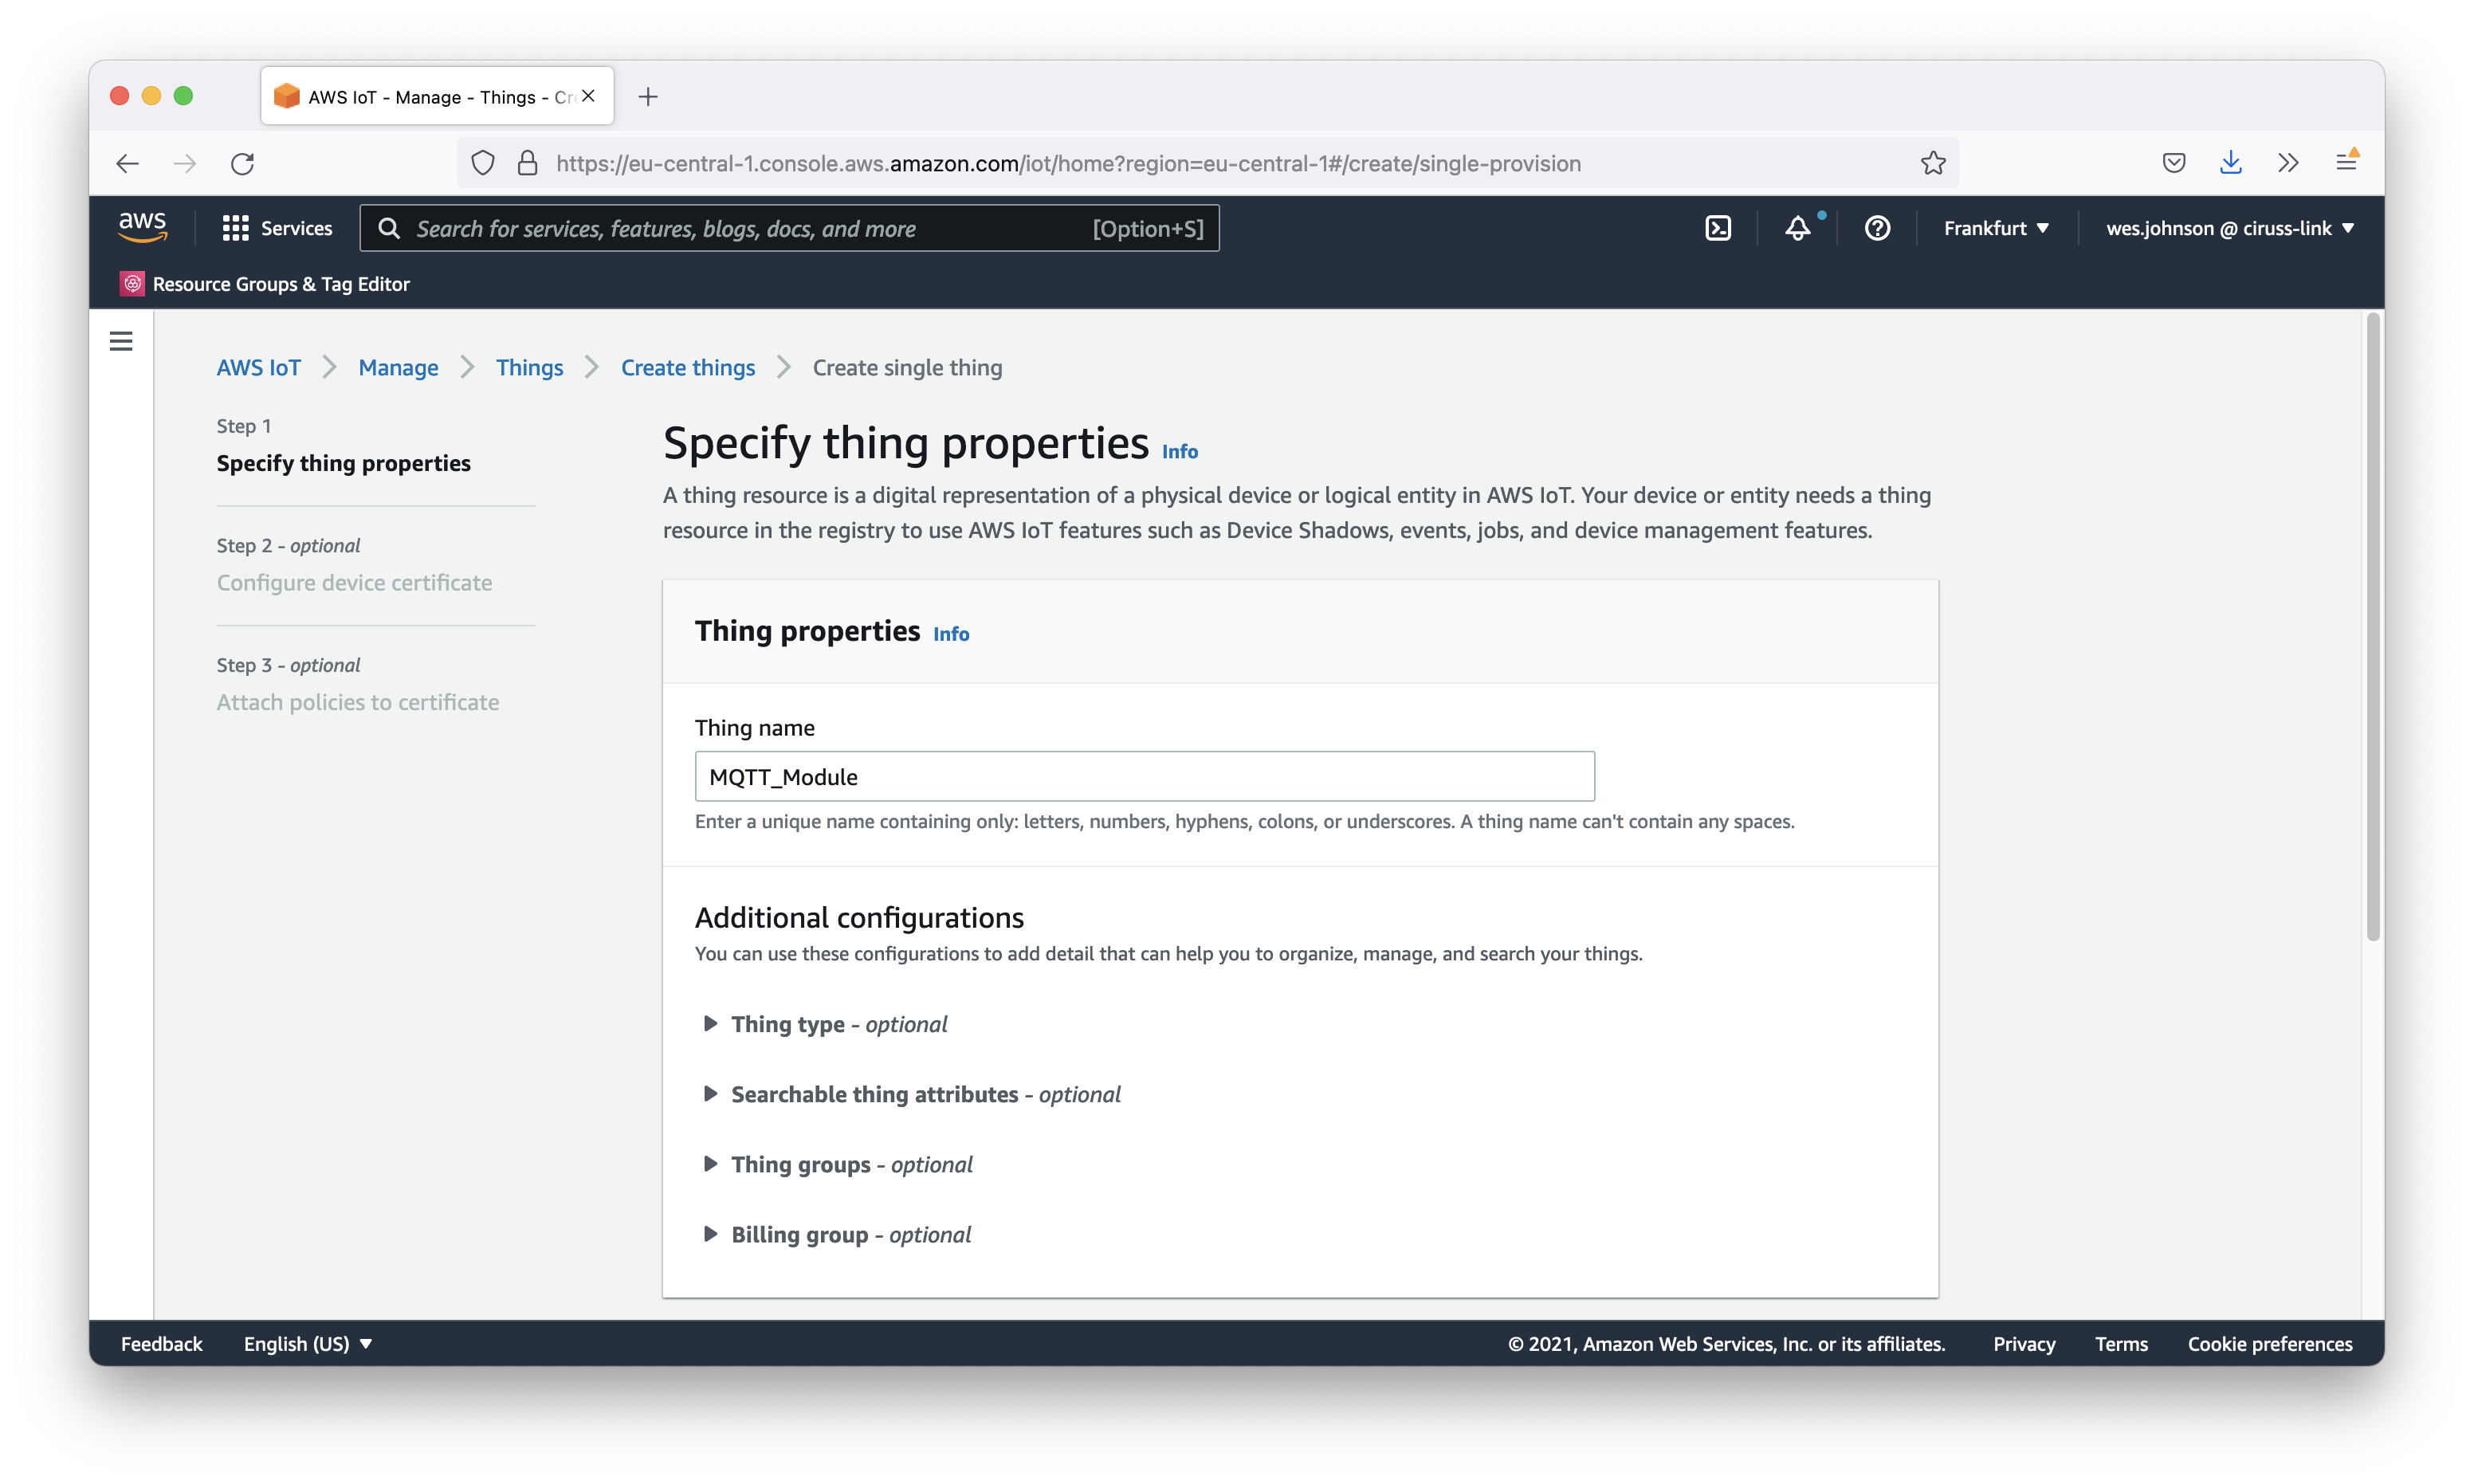
Now click 'Create a single thing'. This will open the following page. Give your thing a name (such as MQTT_Module) and then click 'Next'.
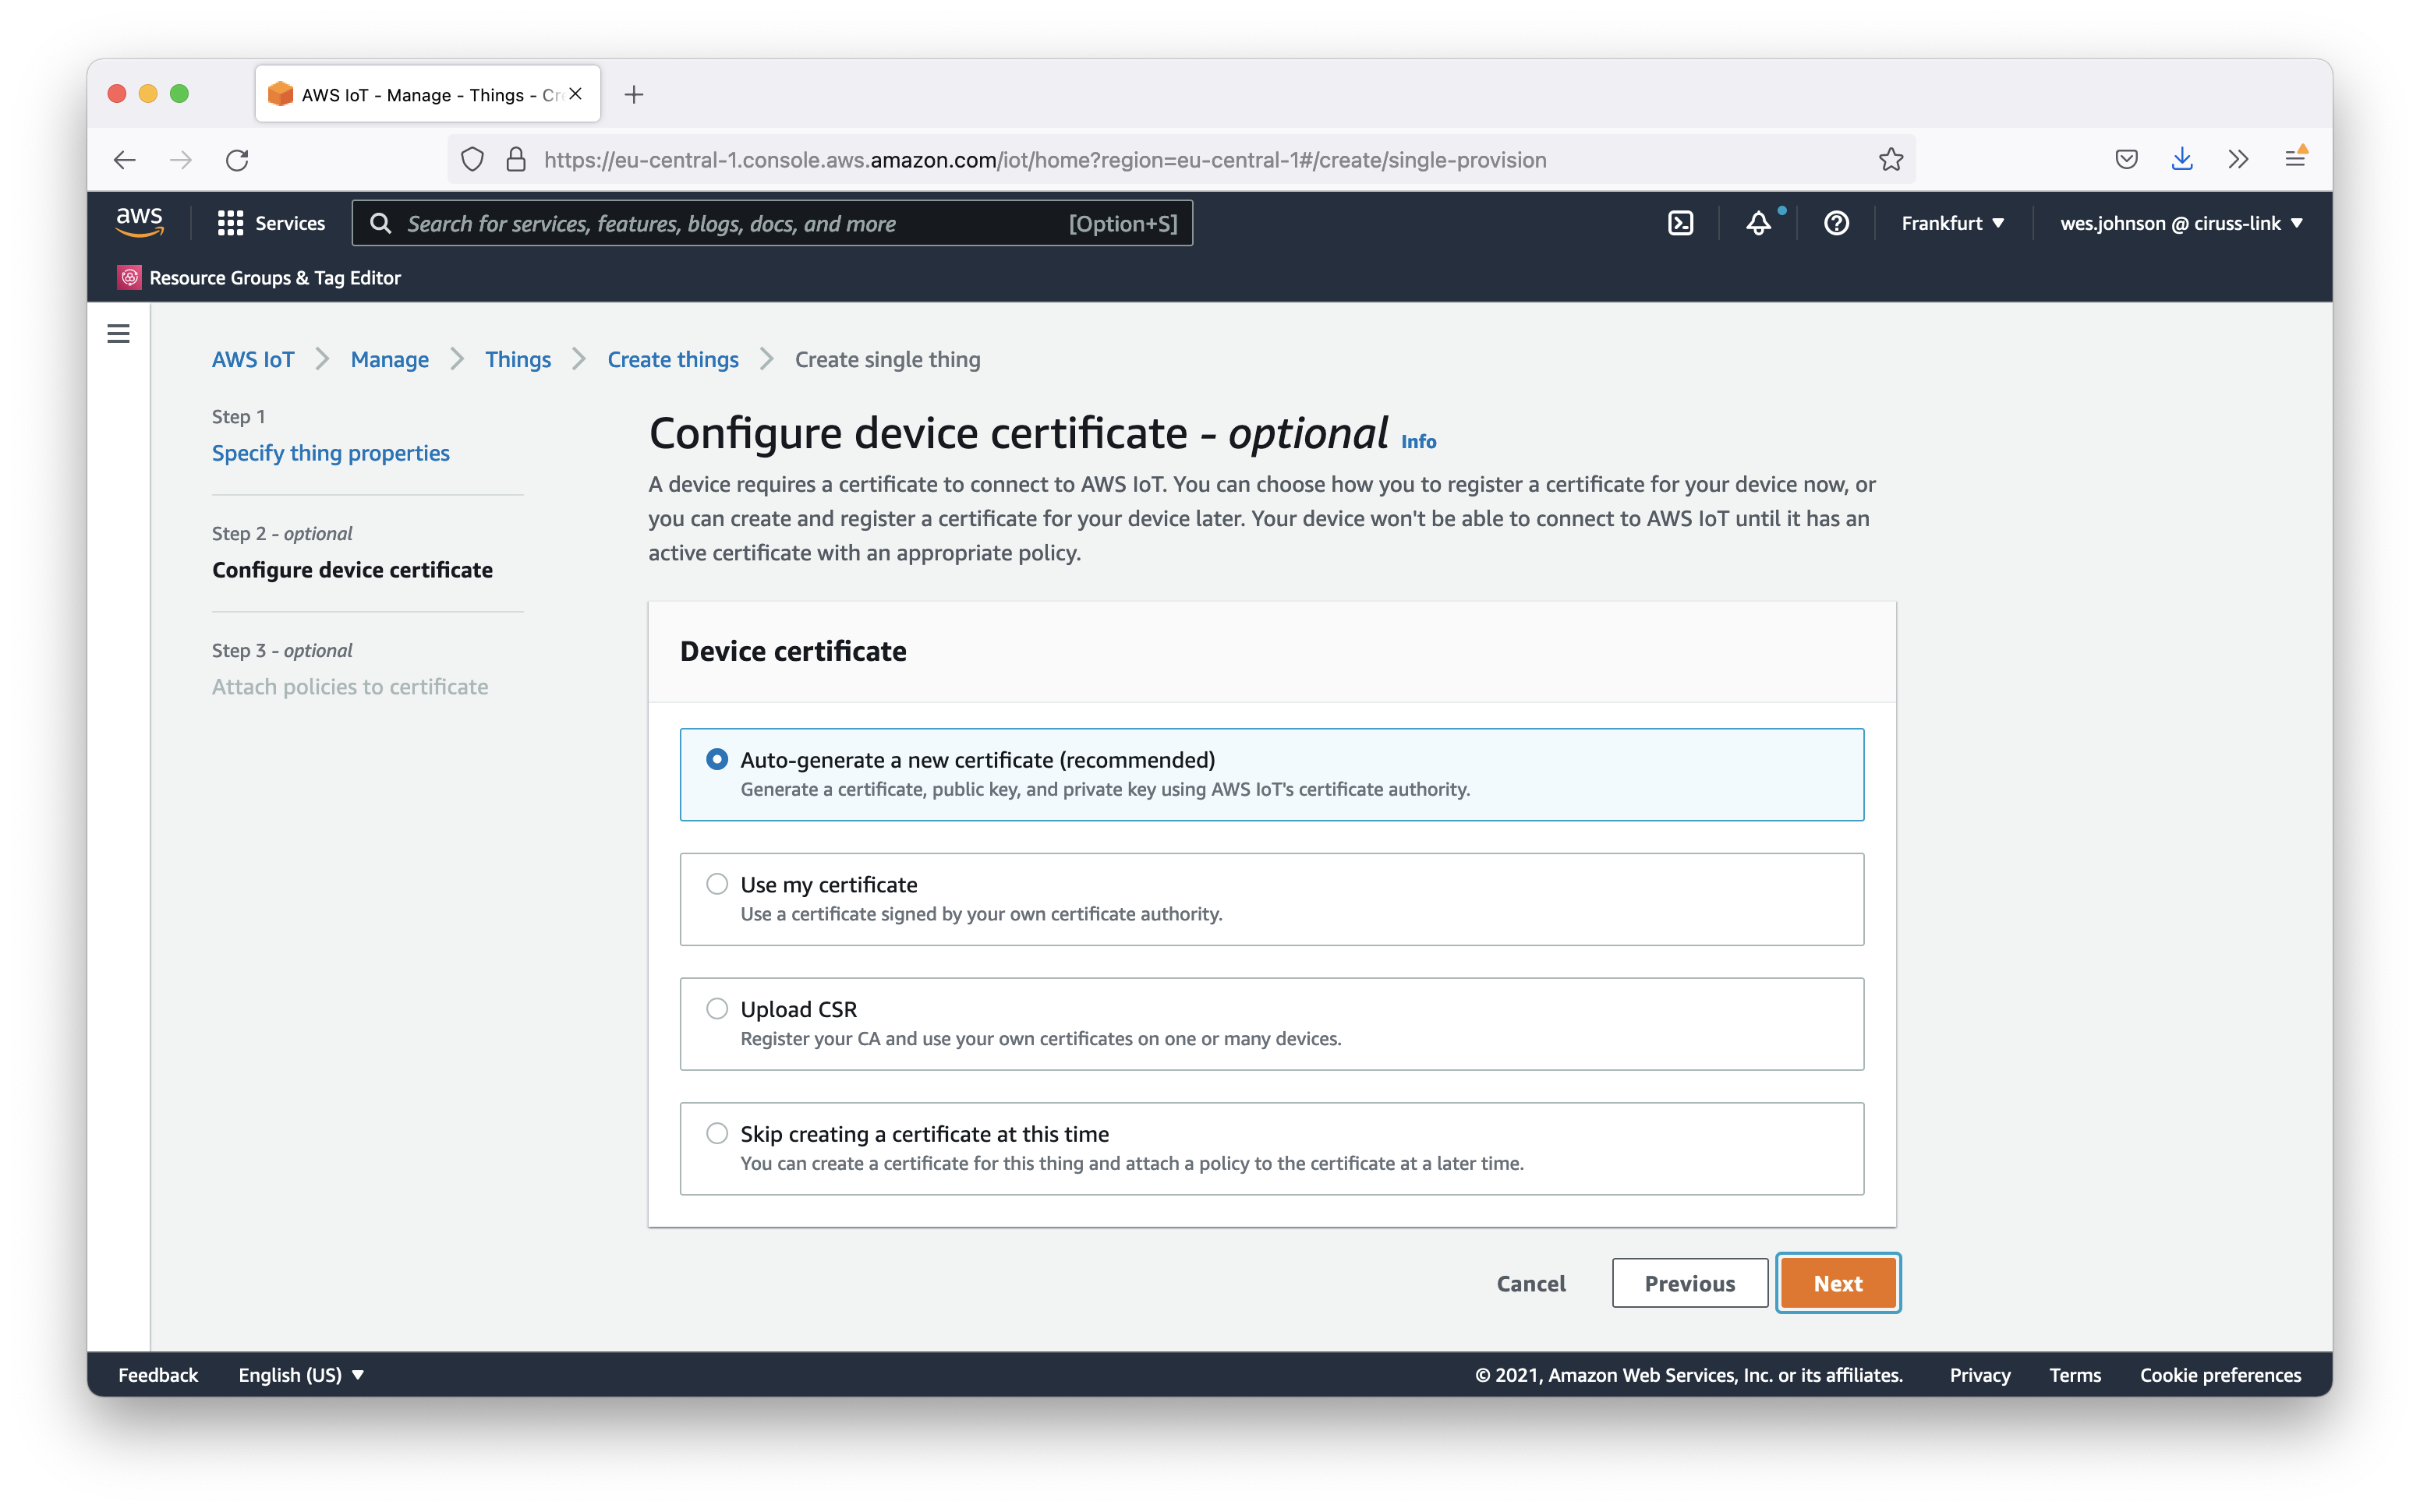
This will bring up the following page. Click the 'One-click certificate creation' option shown below.
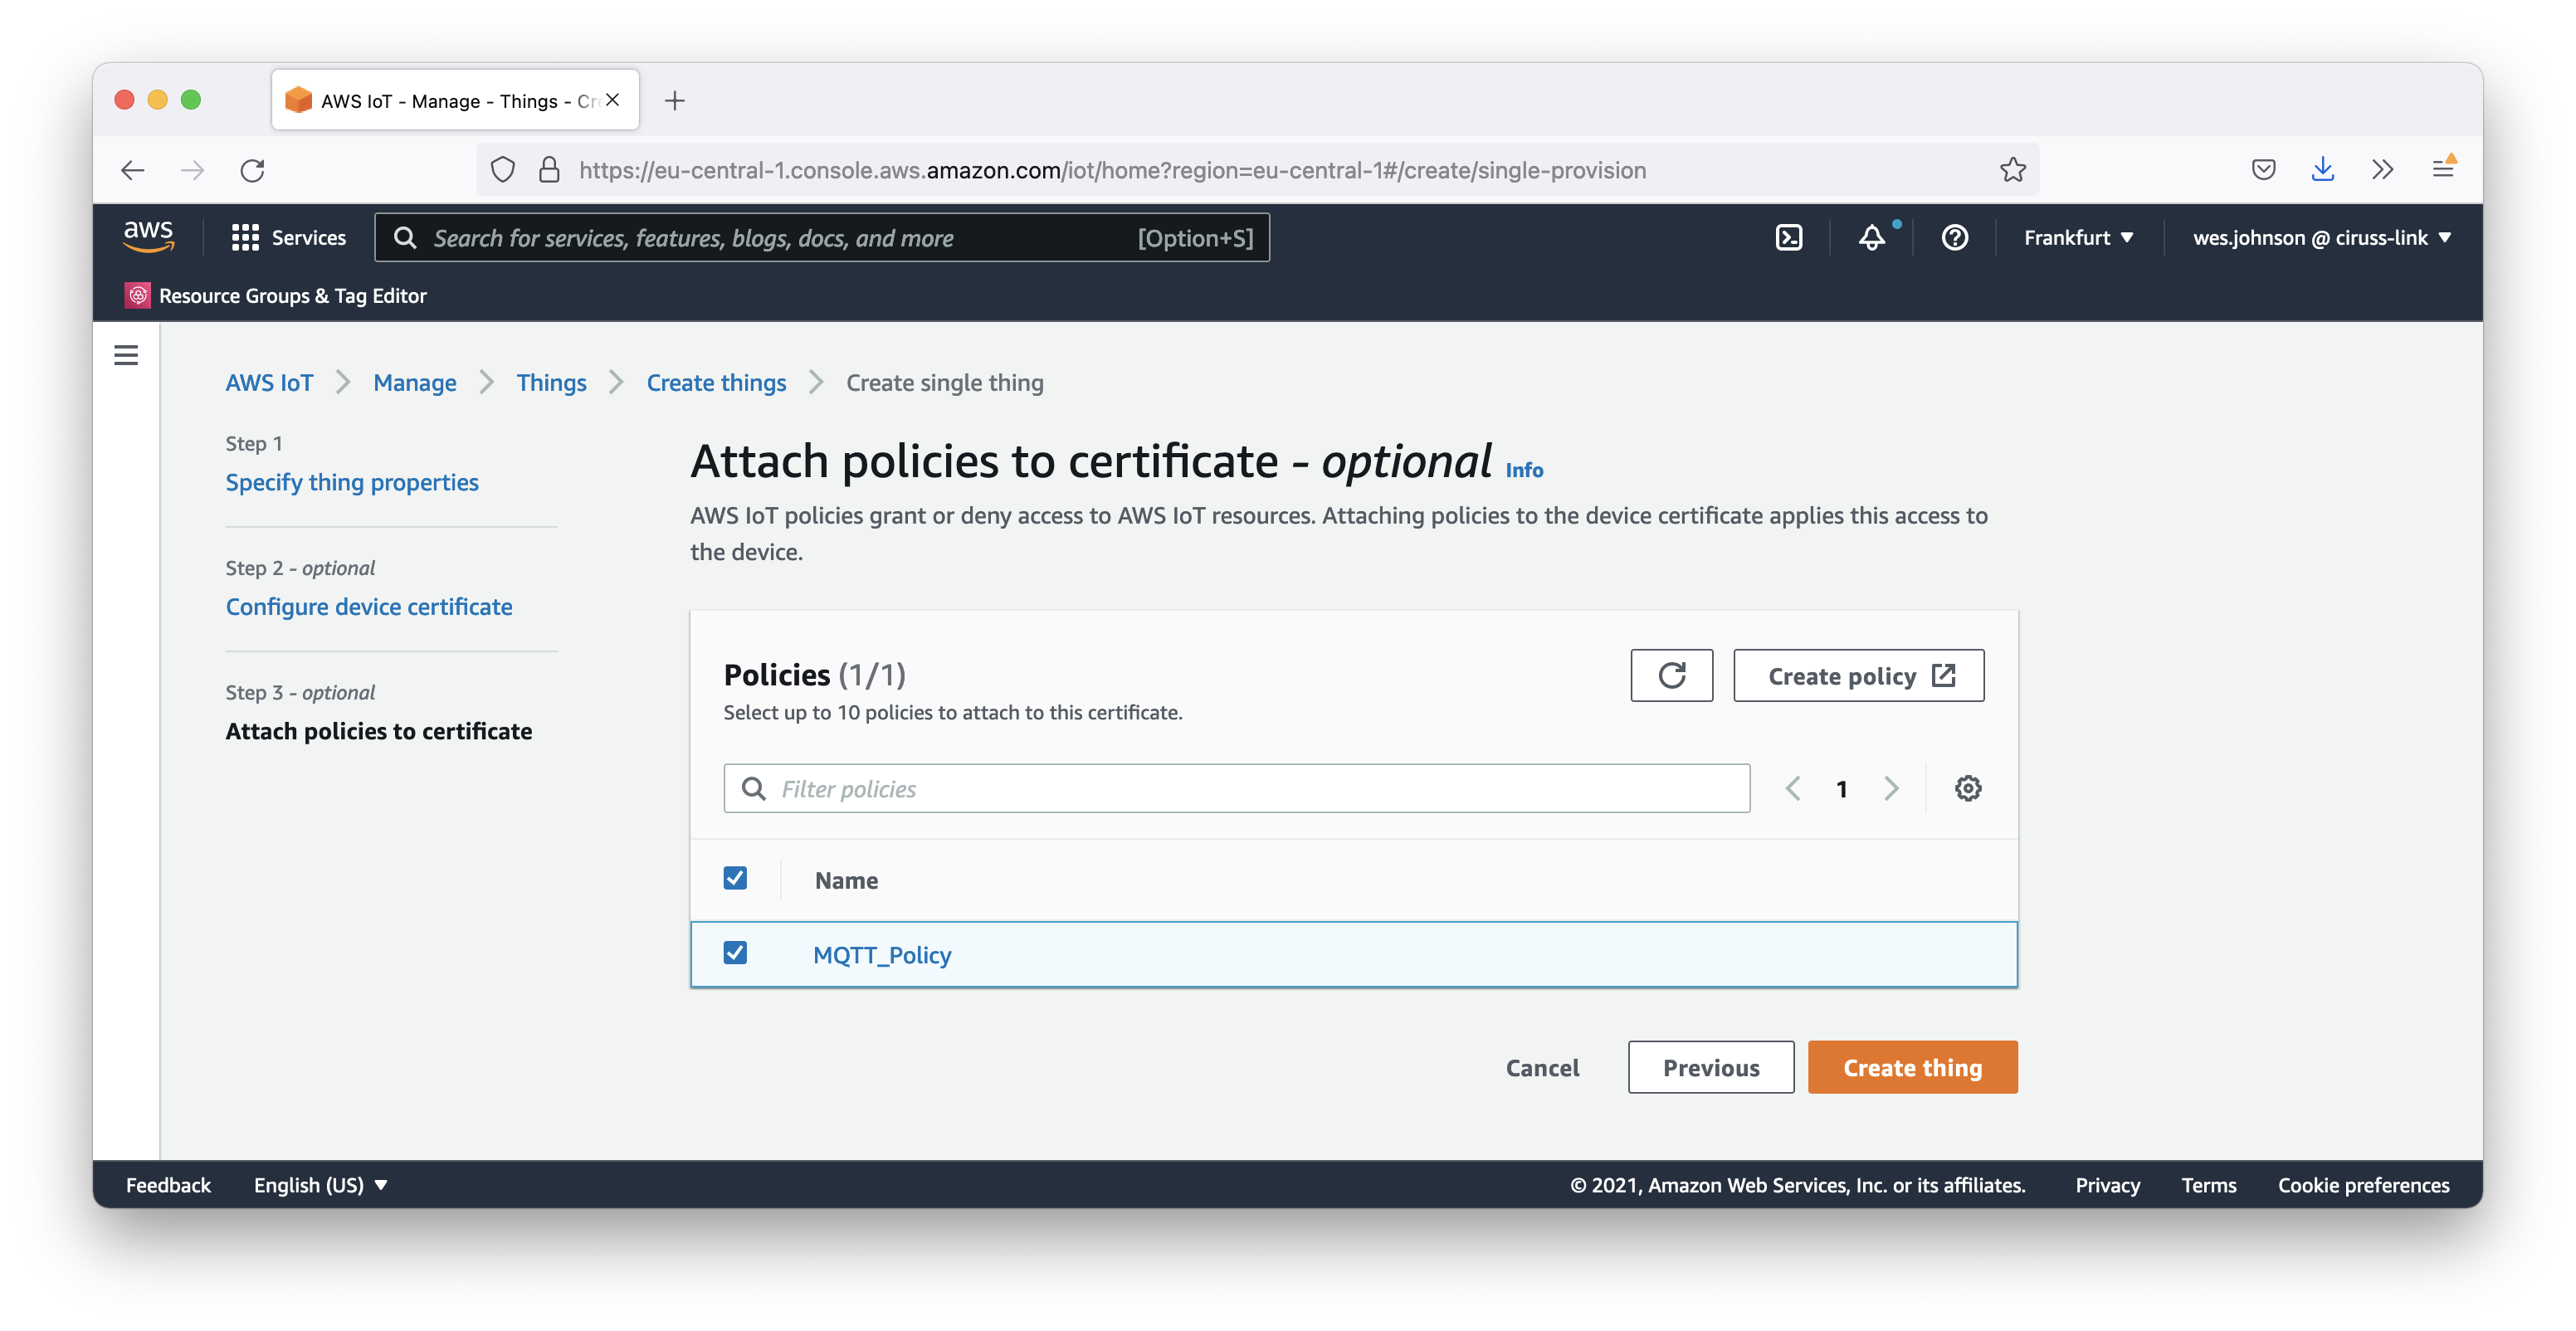
This will bring up the policy attachment page, select the previously created policy so it will be attached to the 'thing' being created as shown below.
This will bring up the page similar to what is shown below. At this point, you must download the 'Device certificate' and 'Private key file' files. These will both be used in the MQTT Module configuration to connect to AWS IoT later. These files will not be accessible later and must be downloaded now. In addition, there is a link to download the root CA for AWS IoT. Make sure to download this as well. The 'RSA 2048 bit key: Amazon Root CA 1' is the preferred root certificate to download.
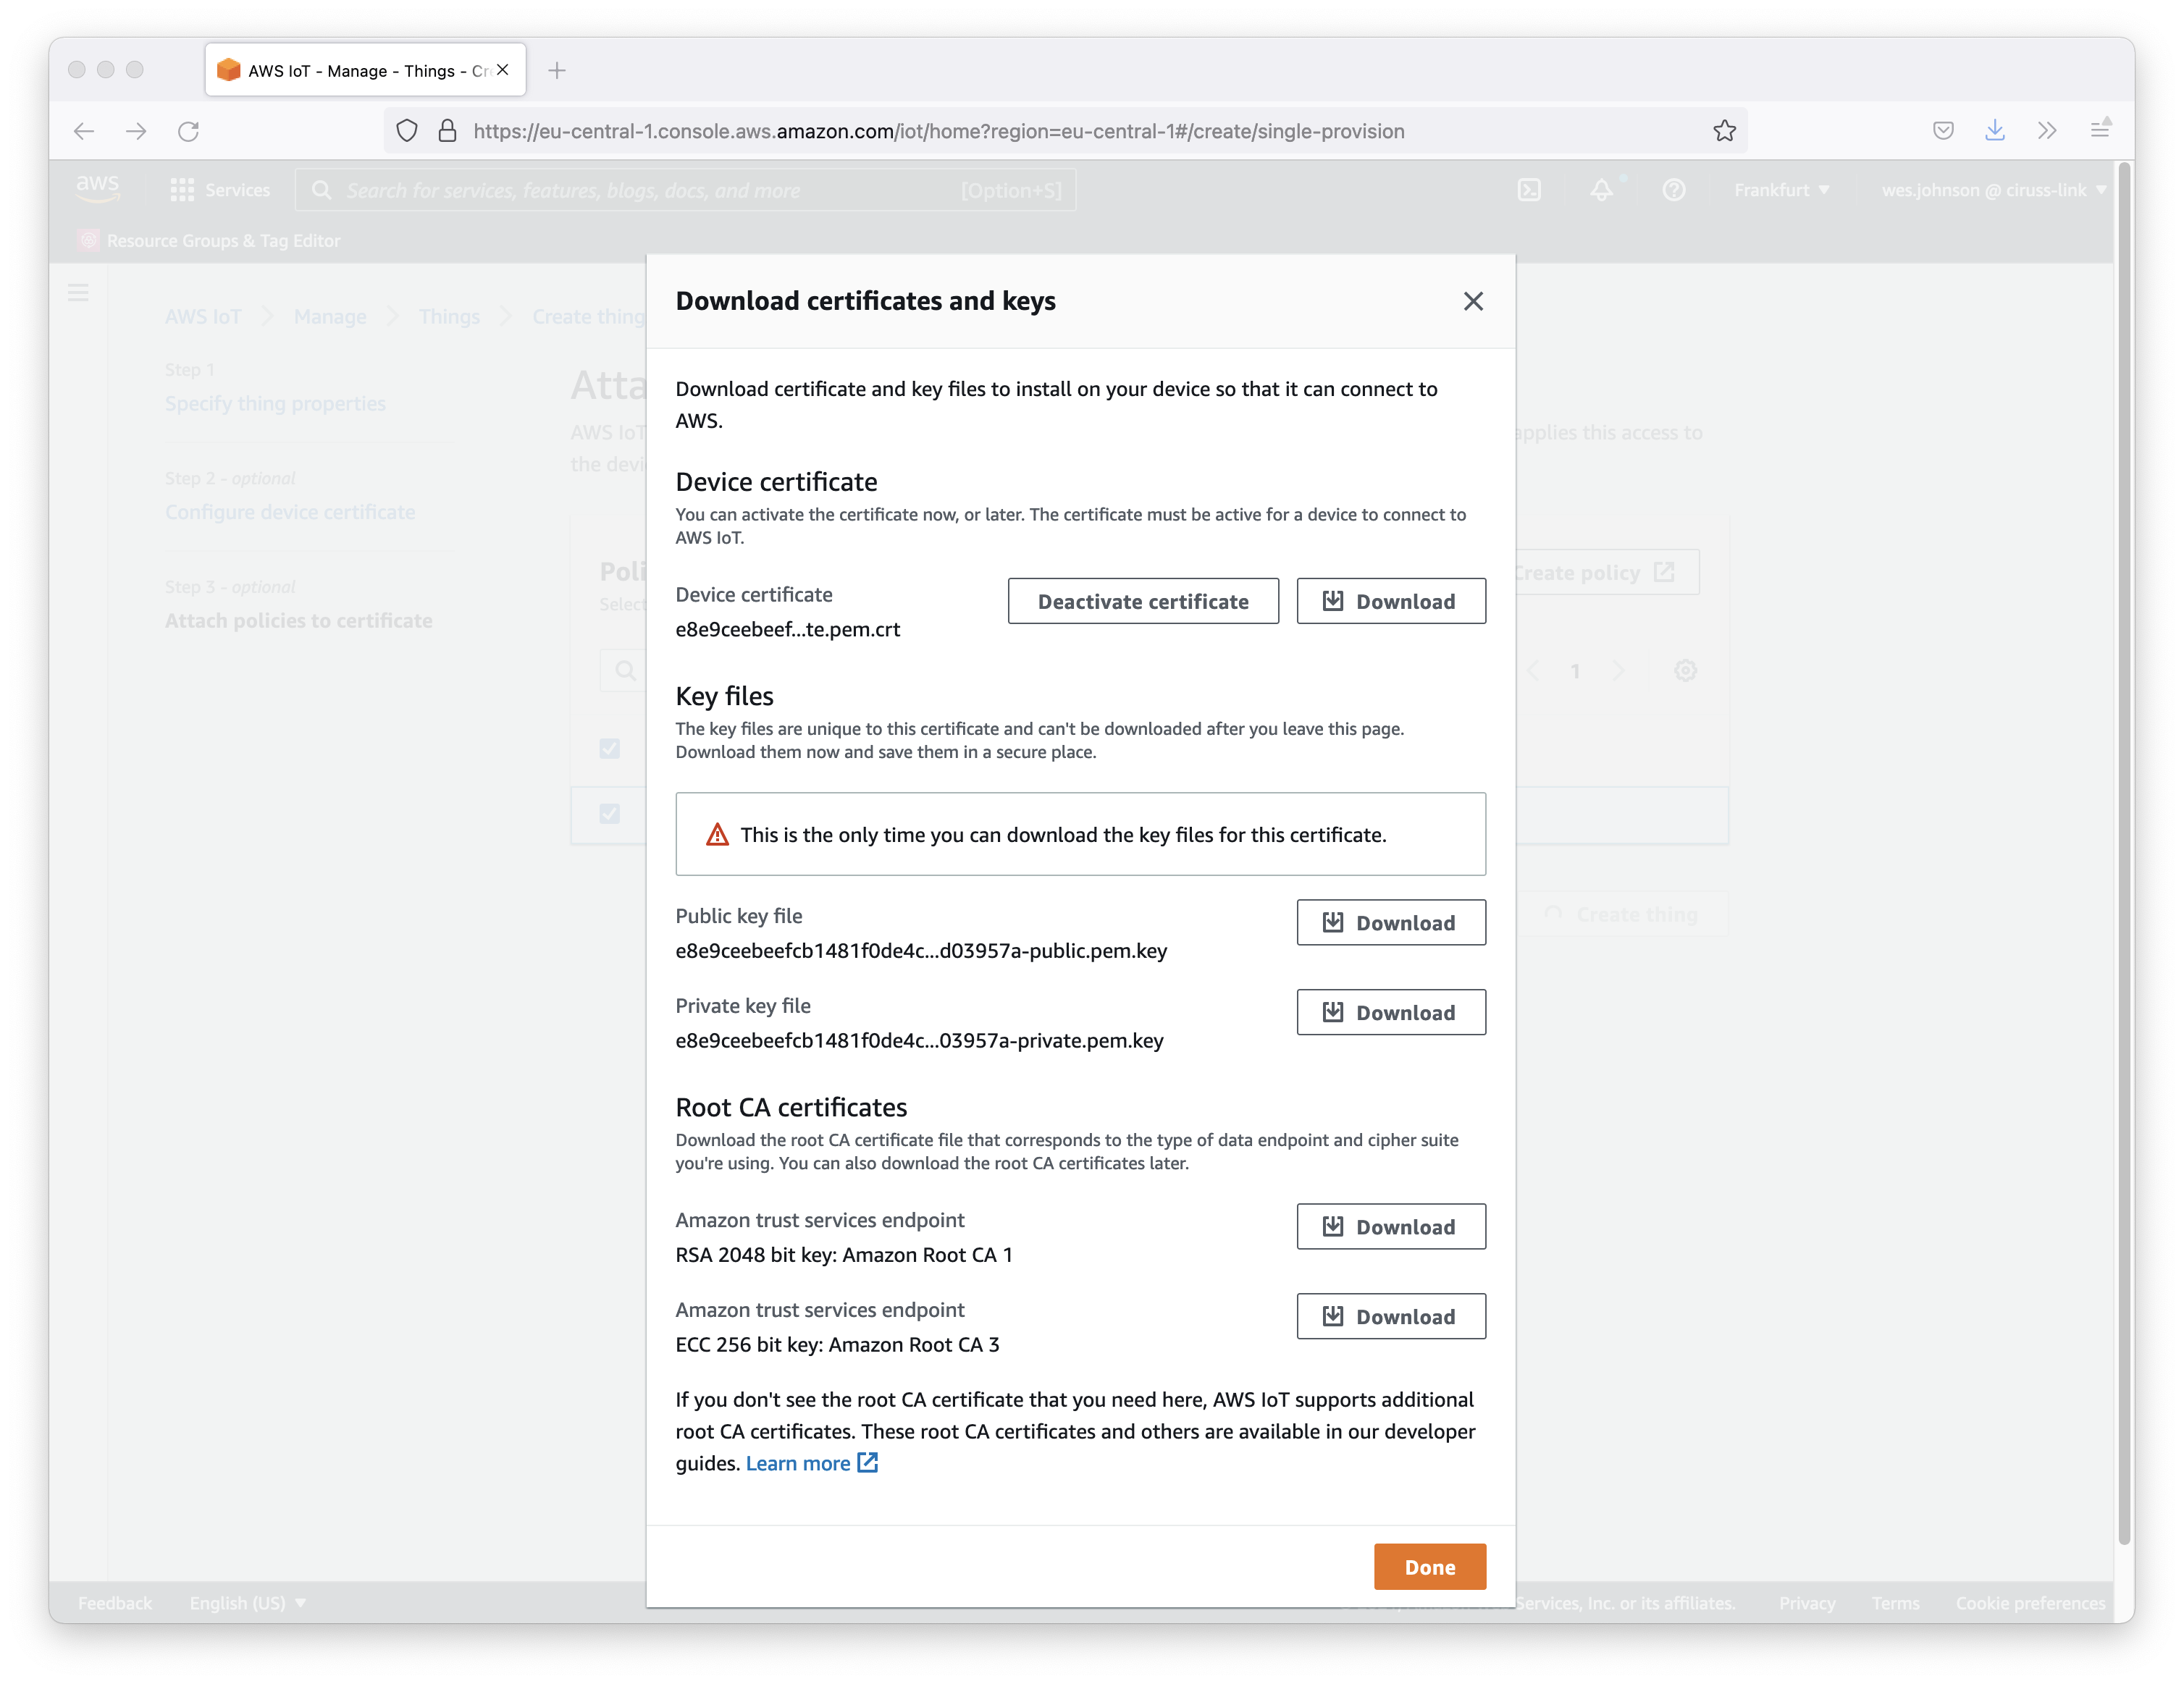
At this point you should have three files where 'UUID' will be some UUID specific to your thing. Do not proceed until you have all three files.
- UUID.certificate.pem.crt
- UUID.private.pem.key
- AmazonRootCA1.pem
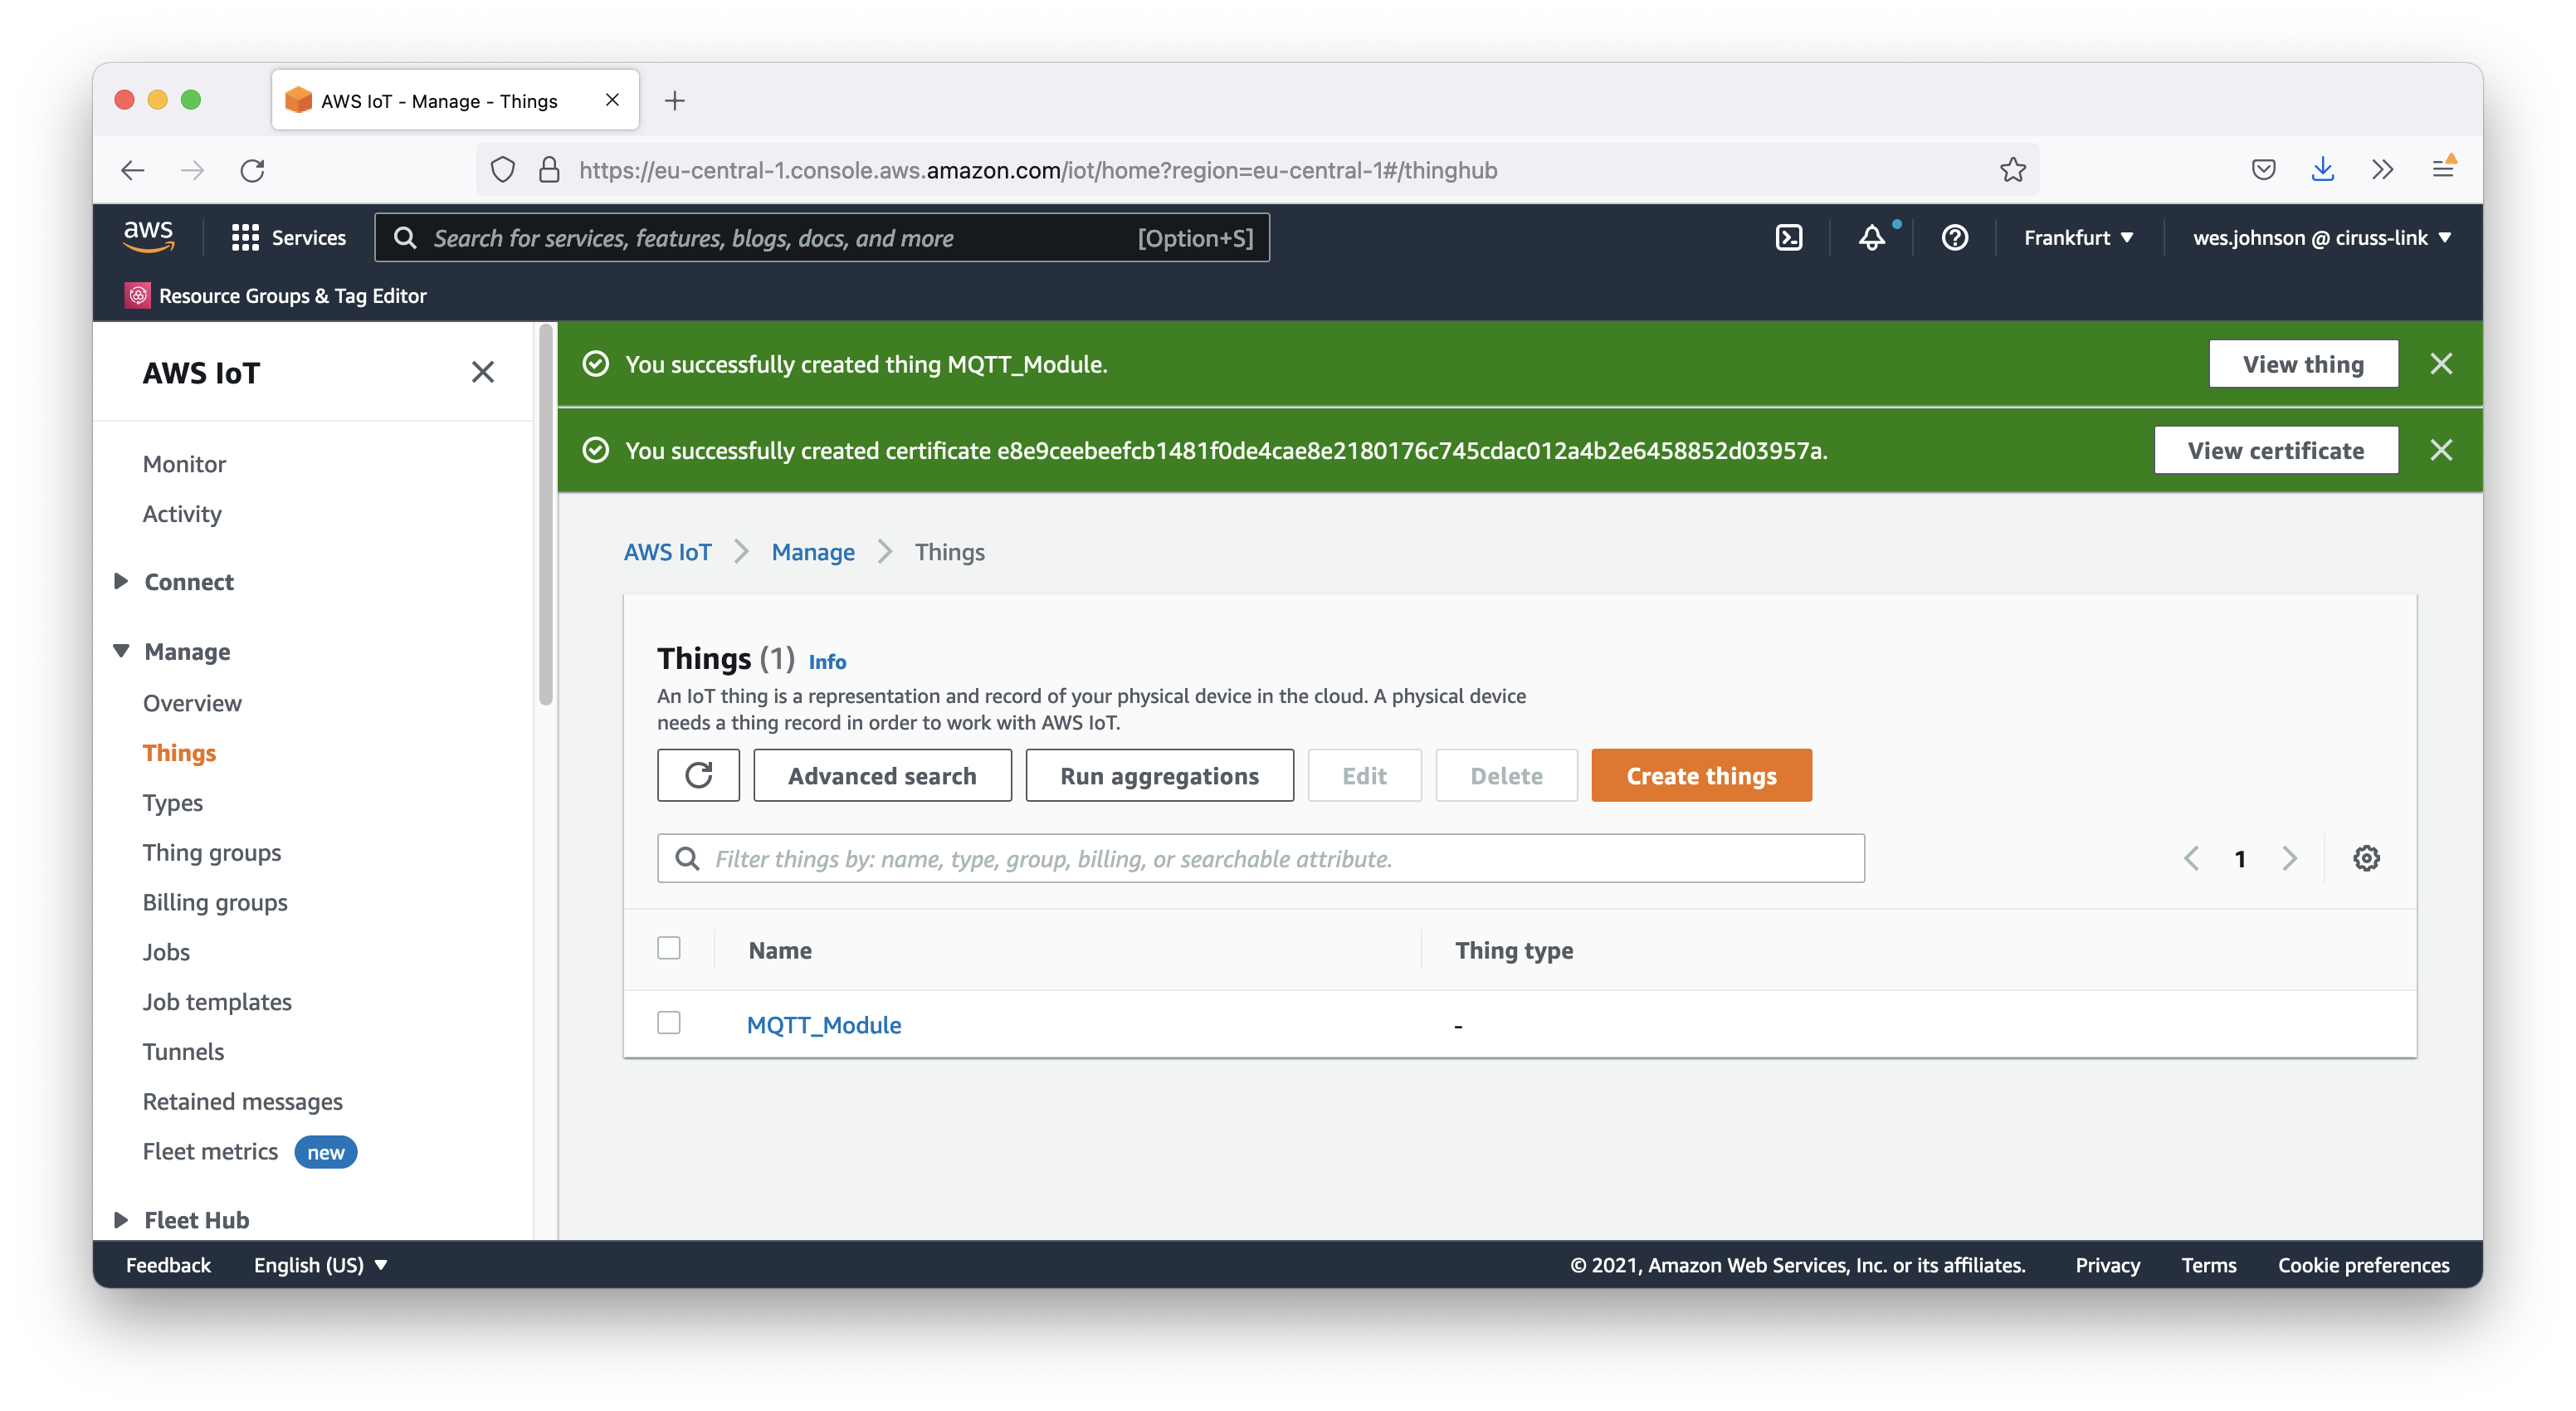
Once you have these, click the 'Create' button. This will bring up the following page showing the created 'Thing'.
Now we need to get the AWS IoT Core Endpoint. Do so by selecting 'Settings' from the left navigation panel as shown below.
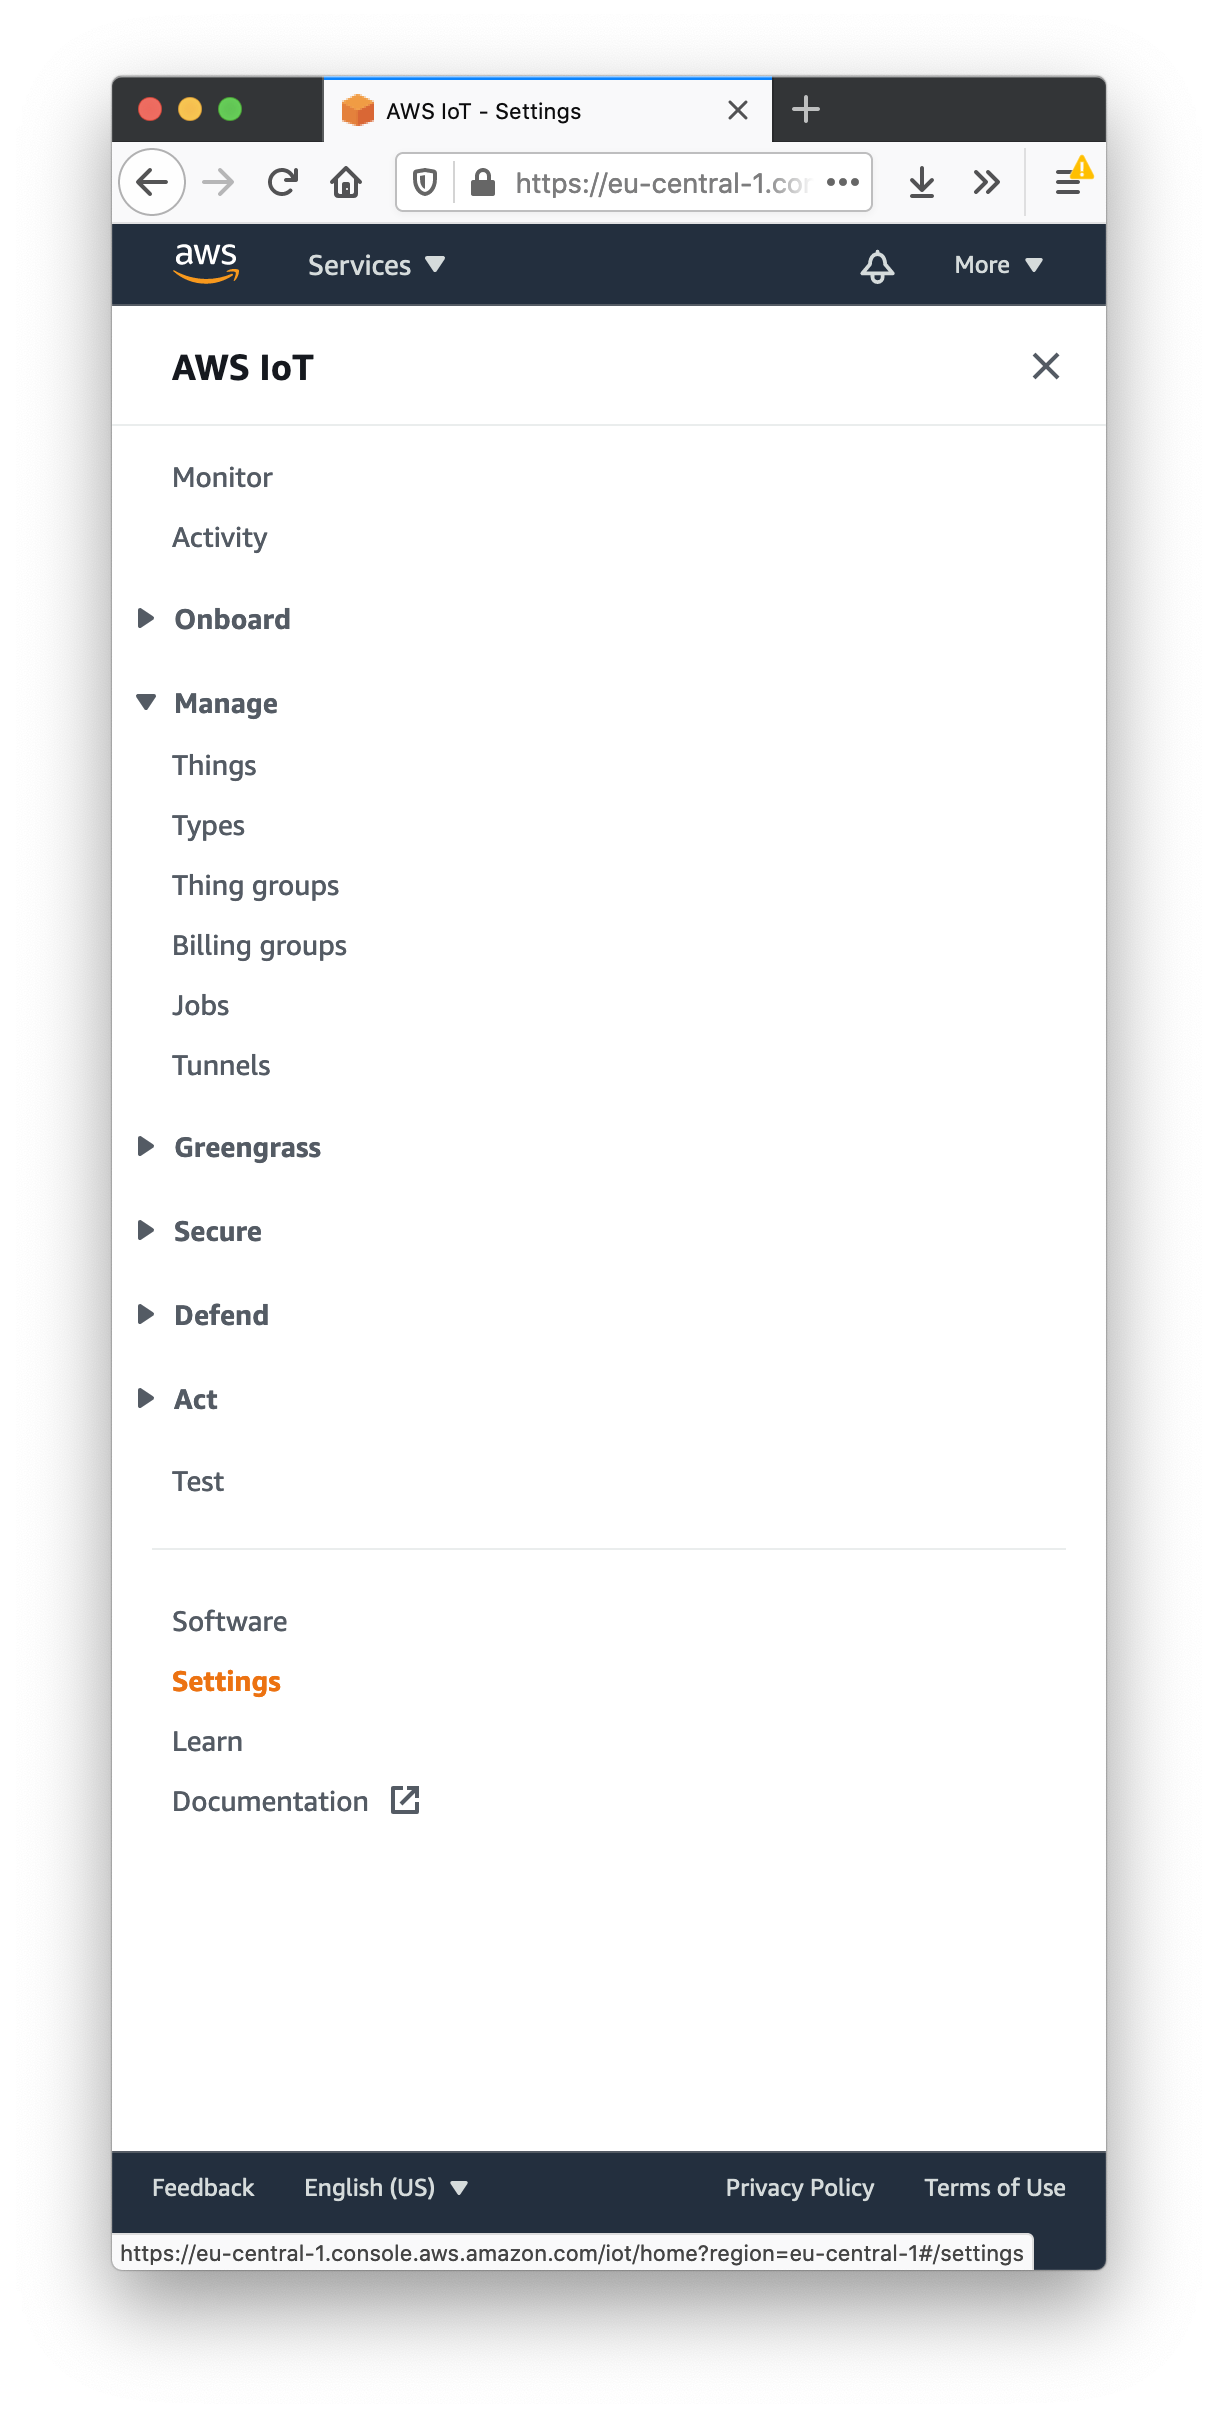
When selected, your AWS IoT Endpoint will be displayed. Note it for future use when configuring the MQTT Module.
With AWS IoT now properly provisioned and the MQTT Module installed, the module can be configured. The three certificate files that were captured when provisioning the AWS IoT Core thing will be required. Again, these files are:
- UUID.certificate.pem.crt
- UUID.private.pem.key
- AmazonRootCA1.pem
Configuring MQTT Engine
Using the Ignition Gateway Web UI, browse to the Ignition 'Config > MQTT Engine Settings > Servers' page. Now click the 'Certificates' tab as shown below:
Now click the 'Create new Certificate' link. Then upload one of the three files previously downloaded when creating the IoT Core 'Thing'. Once completed, your Certificates page should look similar to the following with all three files.
Now, click the 'Servers' tab as shown below.
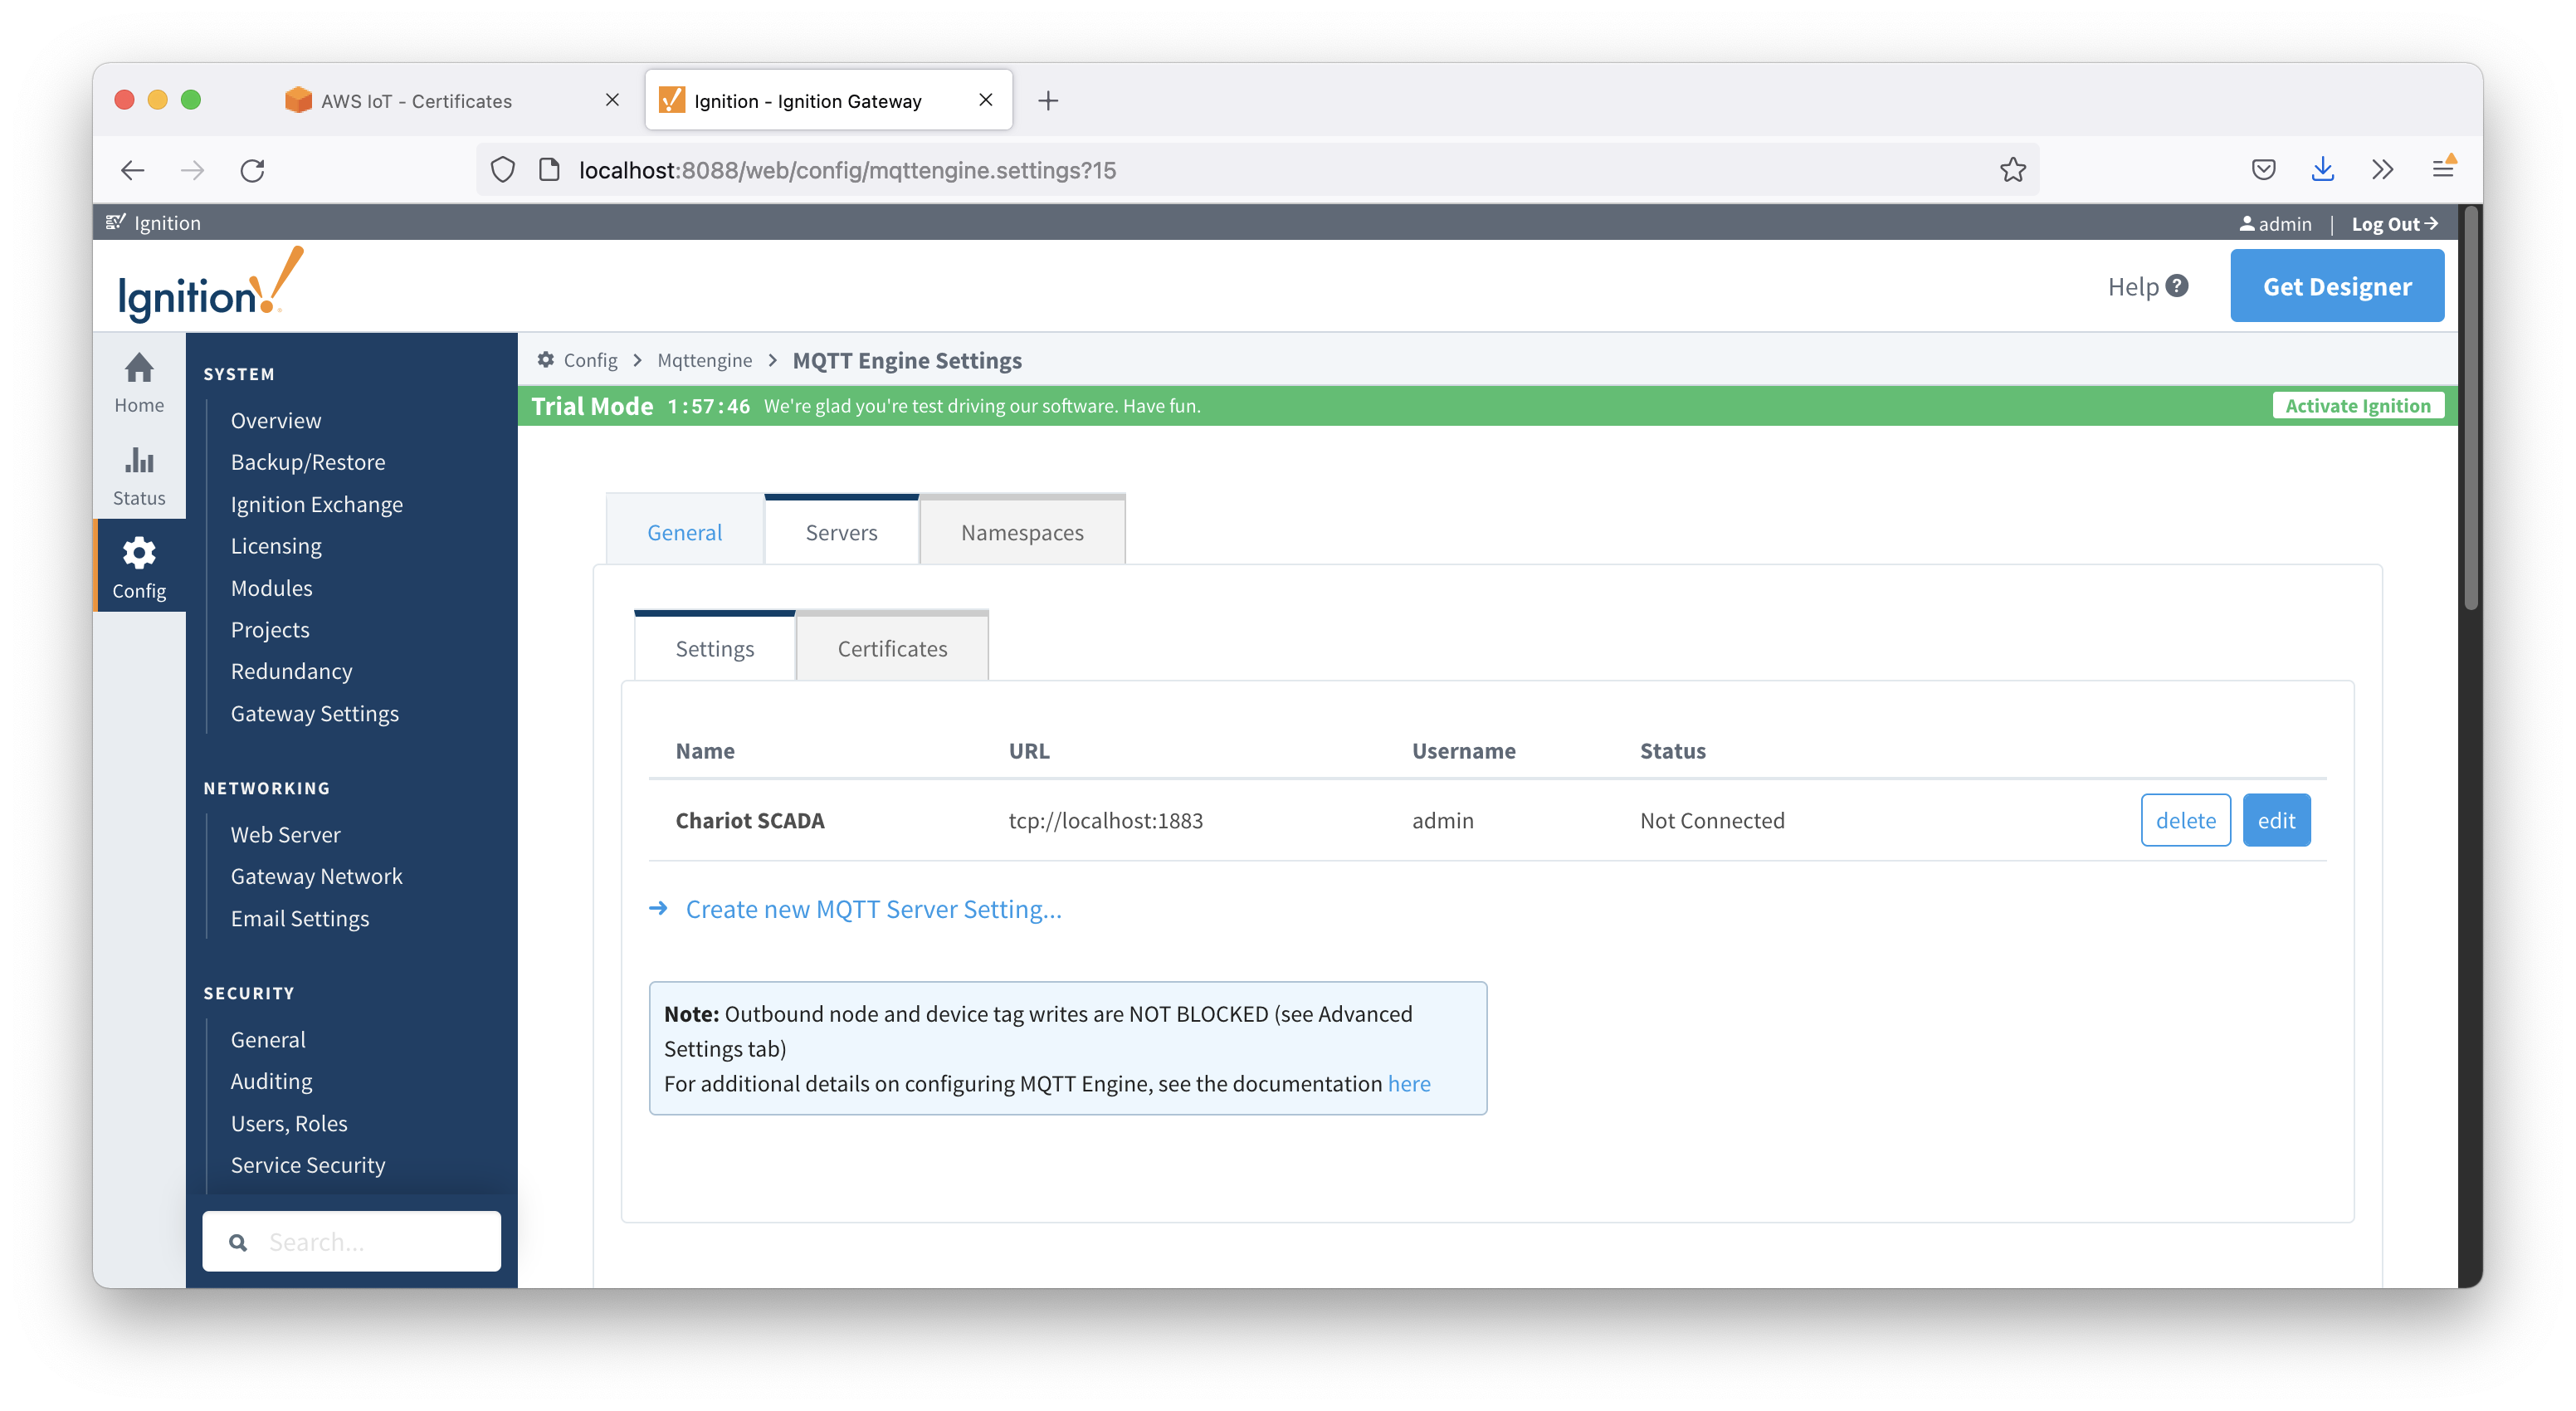
If you are only going to be connecting to AWS IoT Core, edit the existing 'Chariot SCADA' setting. Otherwise, create a new MQTT Server Setting. This should bring up the following page.
Set the following.
- Name
- URL
- Server Set
- Username
- Password
- Blank
- Note if a password was previously set, make sure to click the 'Change Password' checkbox and ensure the password fields are empty
- CA Certificate File
- The 'Root CA' that was downloaded from AWS IoT Core
- Client Certificate File
- The 'Client Cert' that was downloaded from AWS IoT Core
- Client Private Key File
- The 'Client Private Key' that was downloaded from AWS IoT Core.
Leave all other fields blank and submit the configuration. If everything was set up properly, the 'Status' should show 'Connected' when complete.
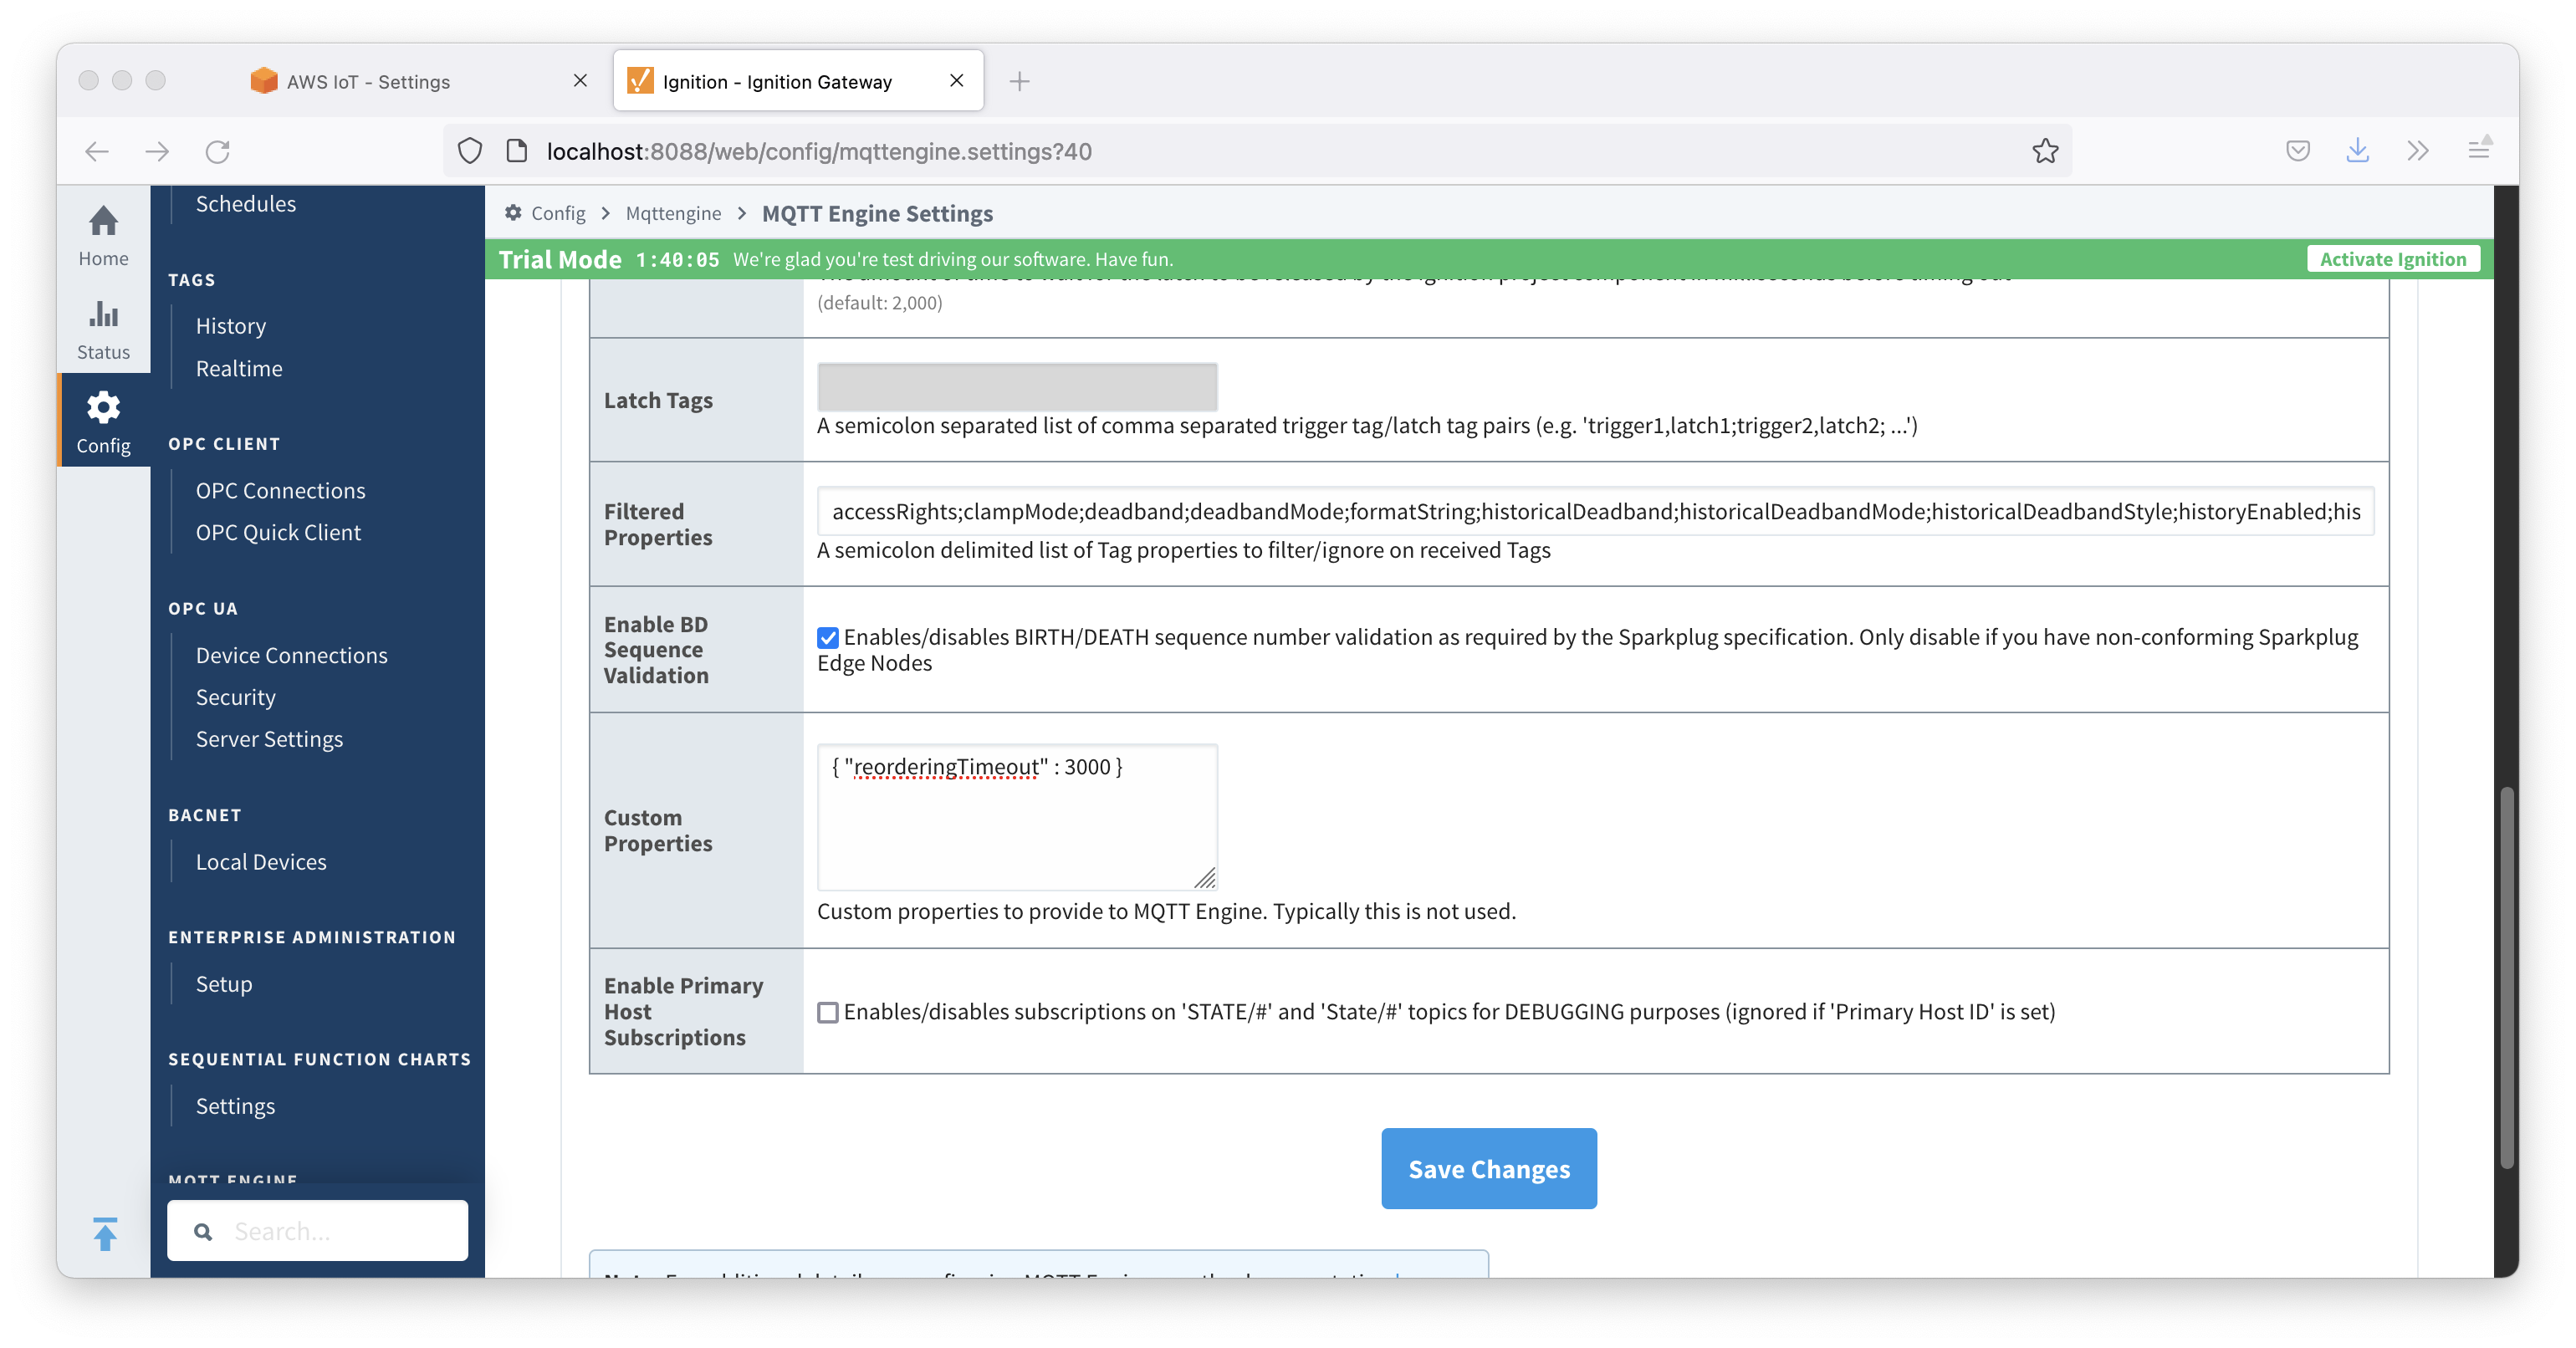
For MQTT Engine, you must also set the 'reordering timeout' due to timing issues related to IoT Core message delivery. To do this, set the Custom Properties on the MQTT Engine General tab to: { "reorderingTimeout" : 3000 } as shown below and save the changes.
This will allow MQTT Engine to buffer messages and reorder them should they be delivered out of order within a 3 second window. Generally 3 seconds seems to be plenty of time for the reordering with AWS IoT Core.
Configuring MQTT Transmission
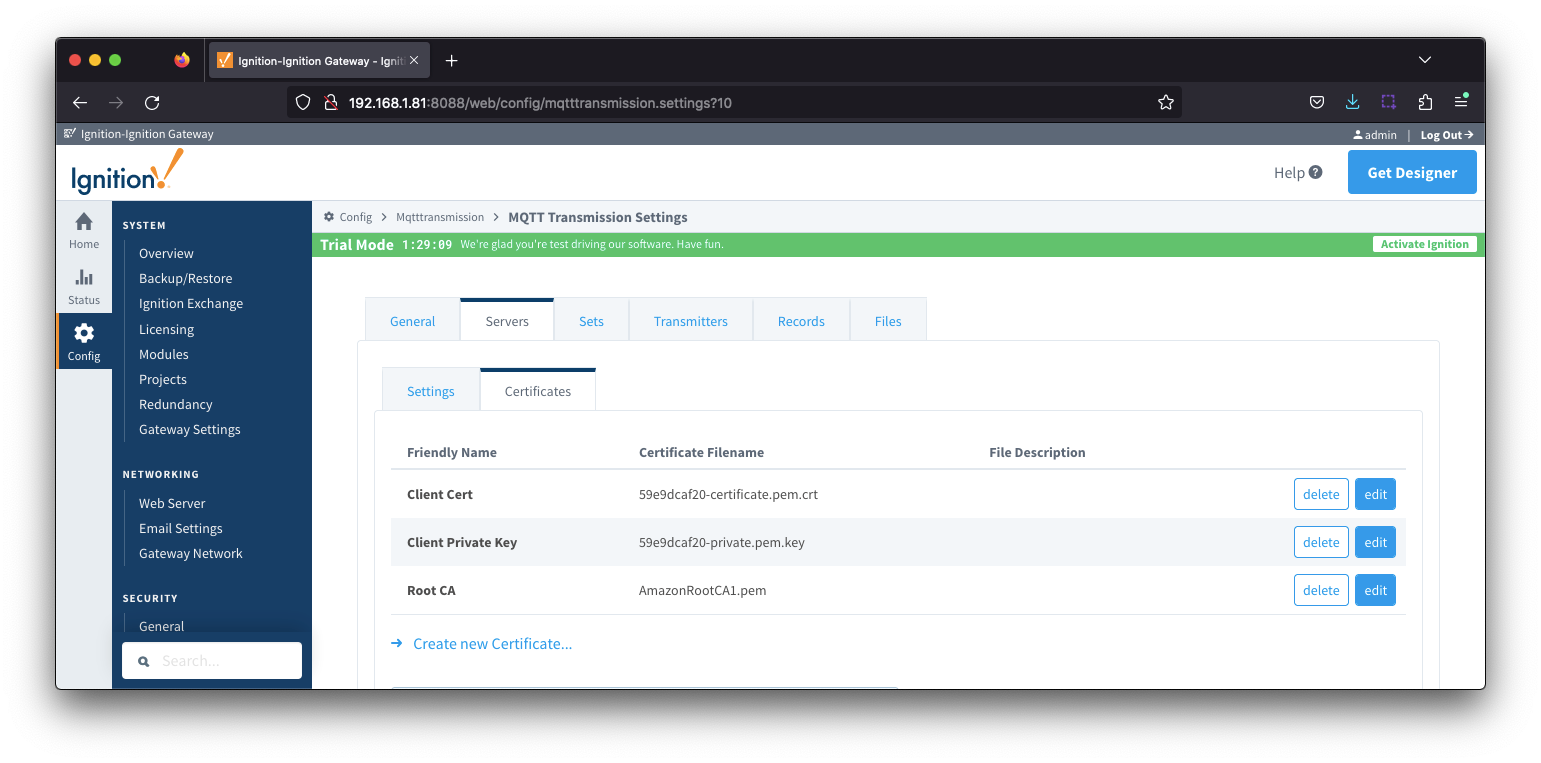
Using the Ignition Gateway Web UI, browse to the Ignition 'Config > MQTT Transmission Settings > Servers' page. Now click the 'Certificates' tab as shown below:

Now click the 'Create new Certificate' link. Then upload one of the three files previously downloaded when creating the IoT Core 'Thing'. Once completed, your Certificates page should look similar to the following with all three files.
Now, click the 'Servers' tab as shown below.
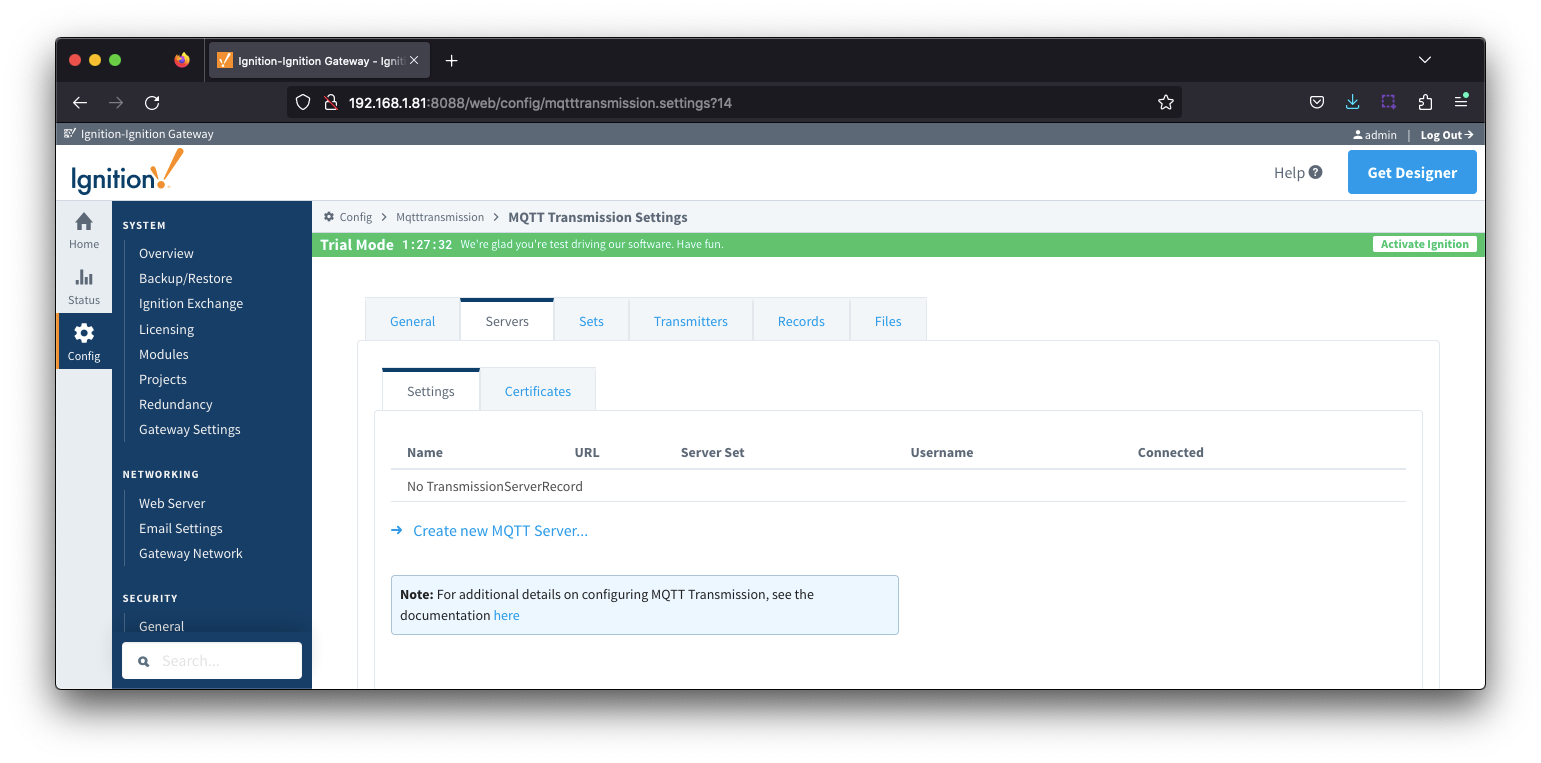
Select 'Create a new MQTT Server' link which will bring up the following page.
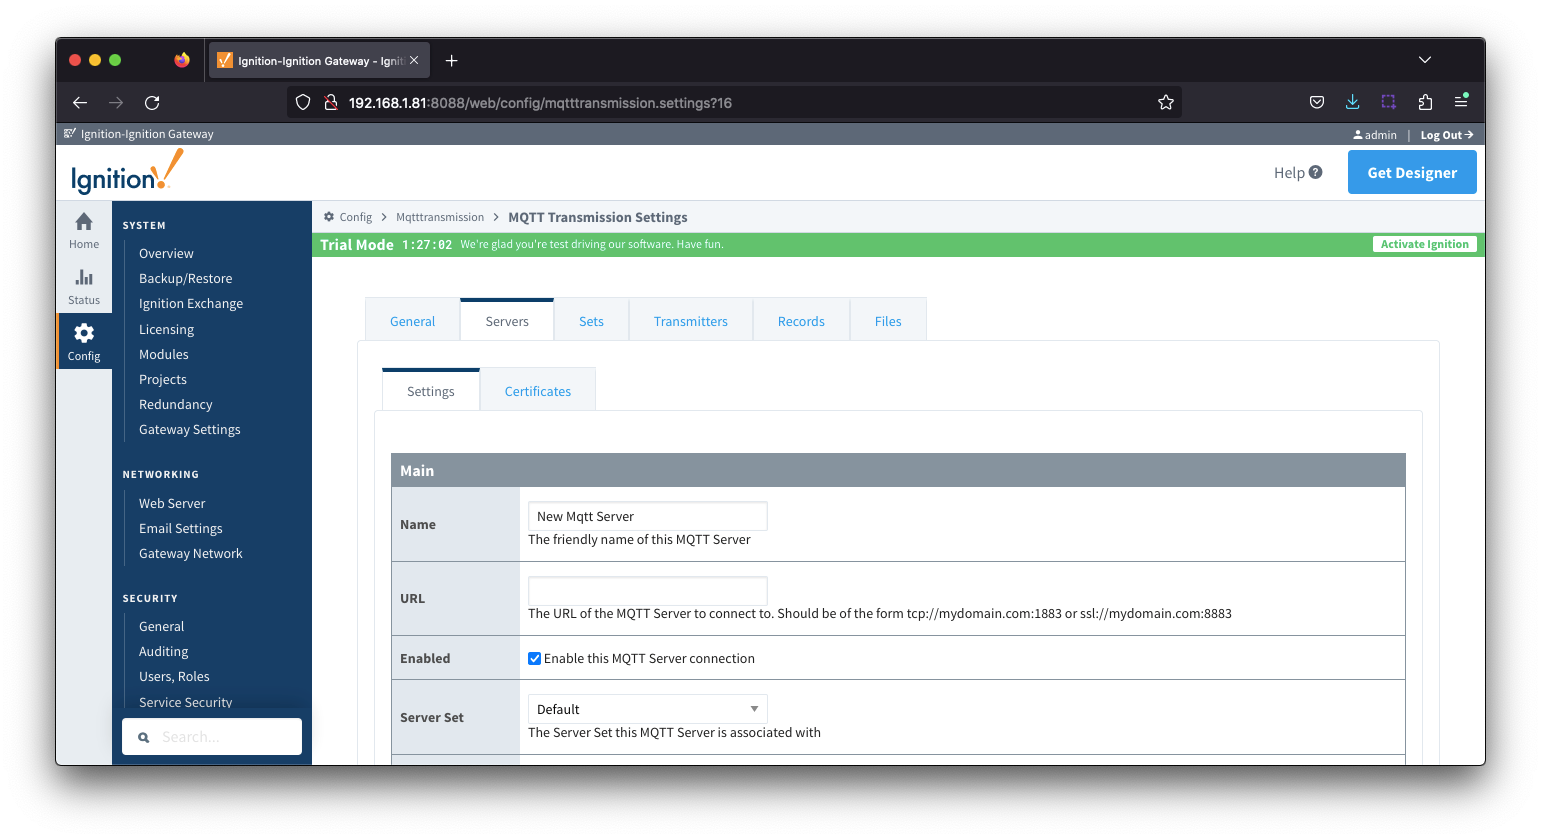
Set the following.
- Name
- URL
- Server Set
- Username
- Password
- Blank
- Note if a password was previously set, make sure to click the 'Change Password' checkbox and ensure the password fields are empty
- CA Certificate File
- The 'Root CA' that was downloaded from AWS IoT Core
- Client Certificate File
- The 'Client Cert' that was downloaded from AWS IoT Core
- Client Private Key File
- The 'Client Private Key' that was downloaded from AWS IoT Core.
Leave all other fields blank and submit the configuration.
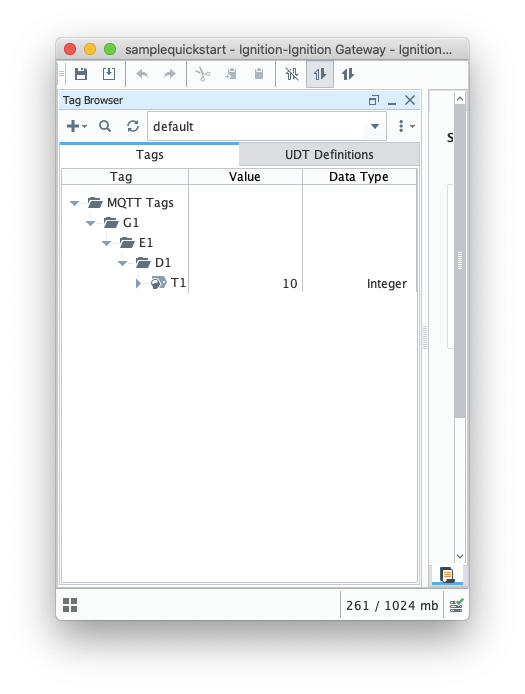
Configure an Transmitter as shown below and use Ignition Designer to created an appropriate tag tree in the default provider.
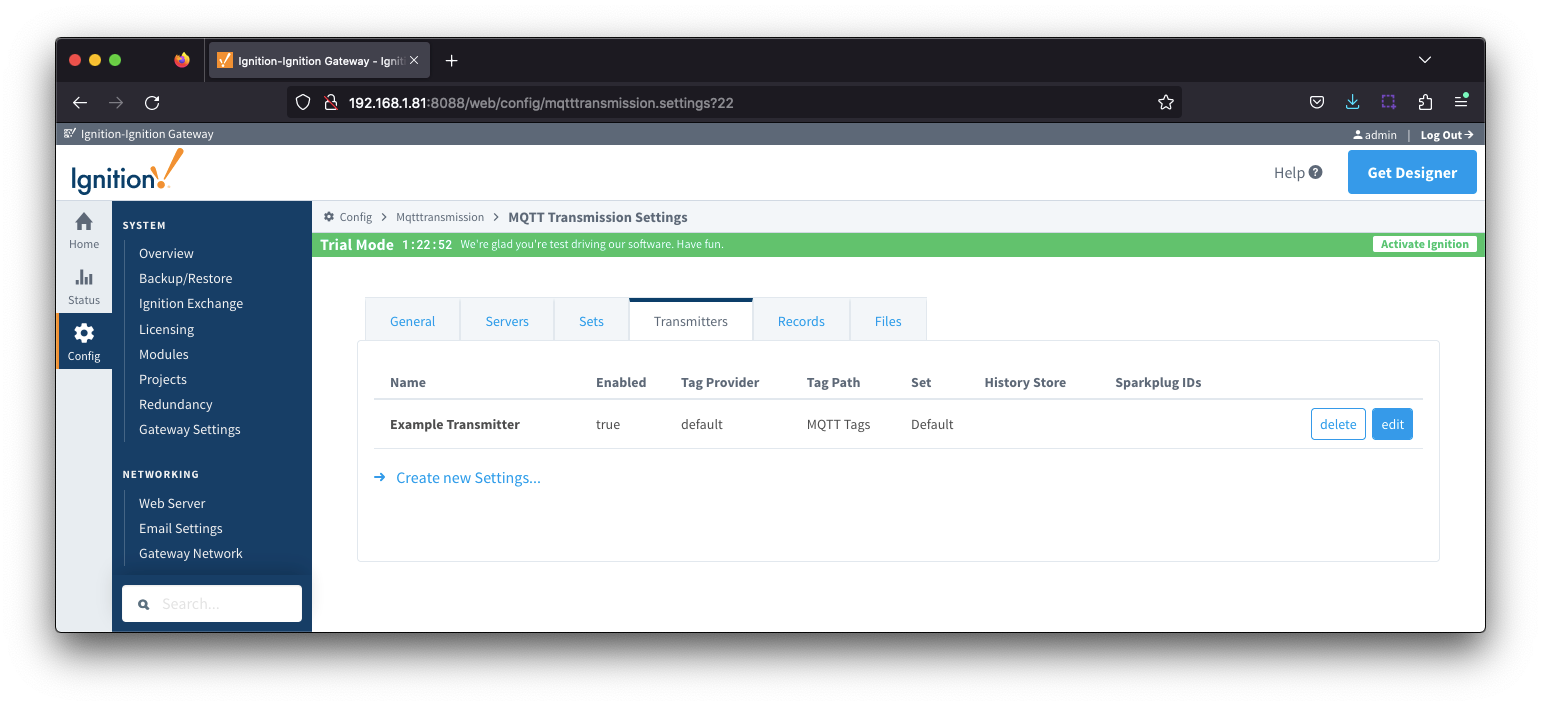
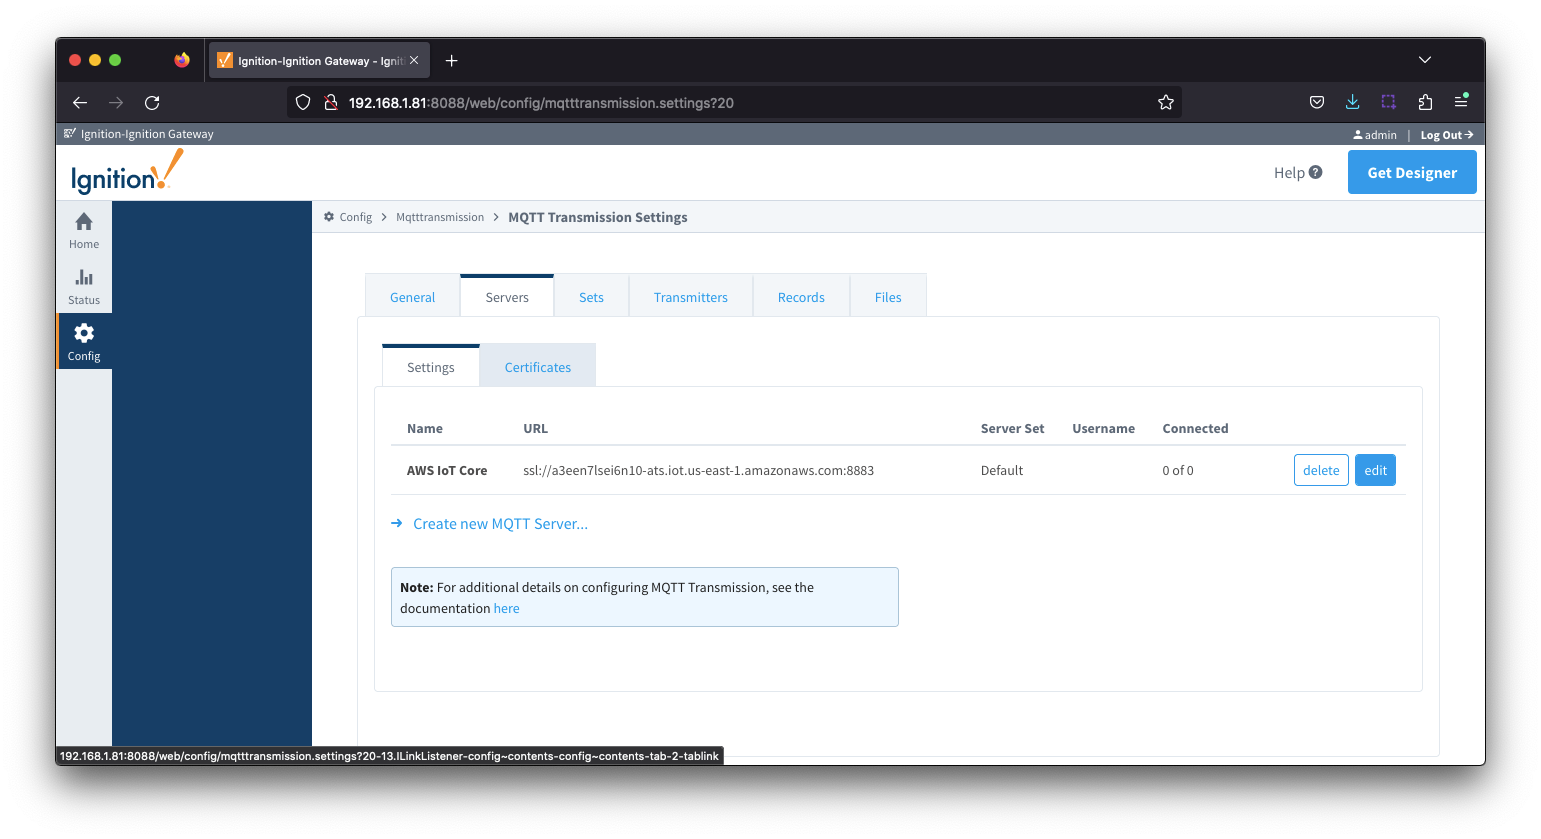
The server connection will now show the connected client as '1 of 1'

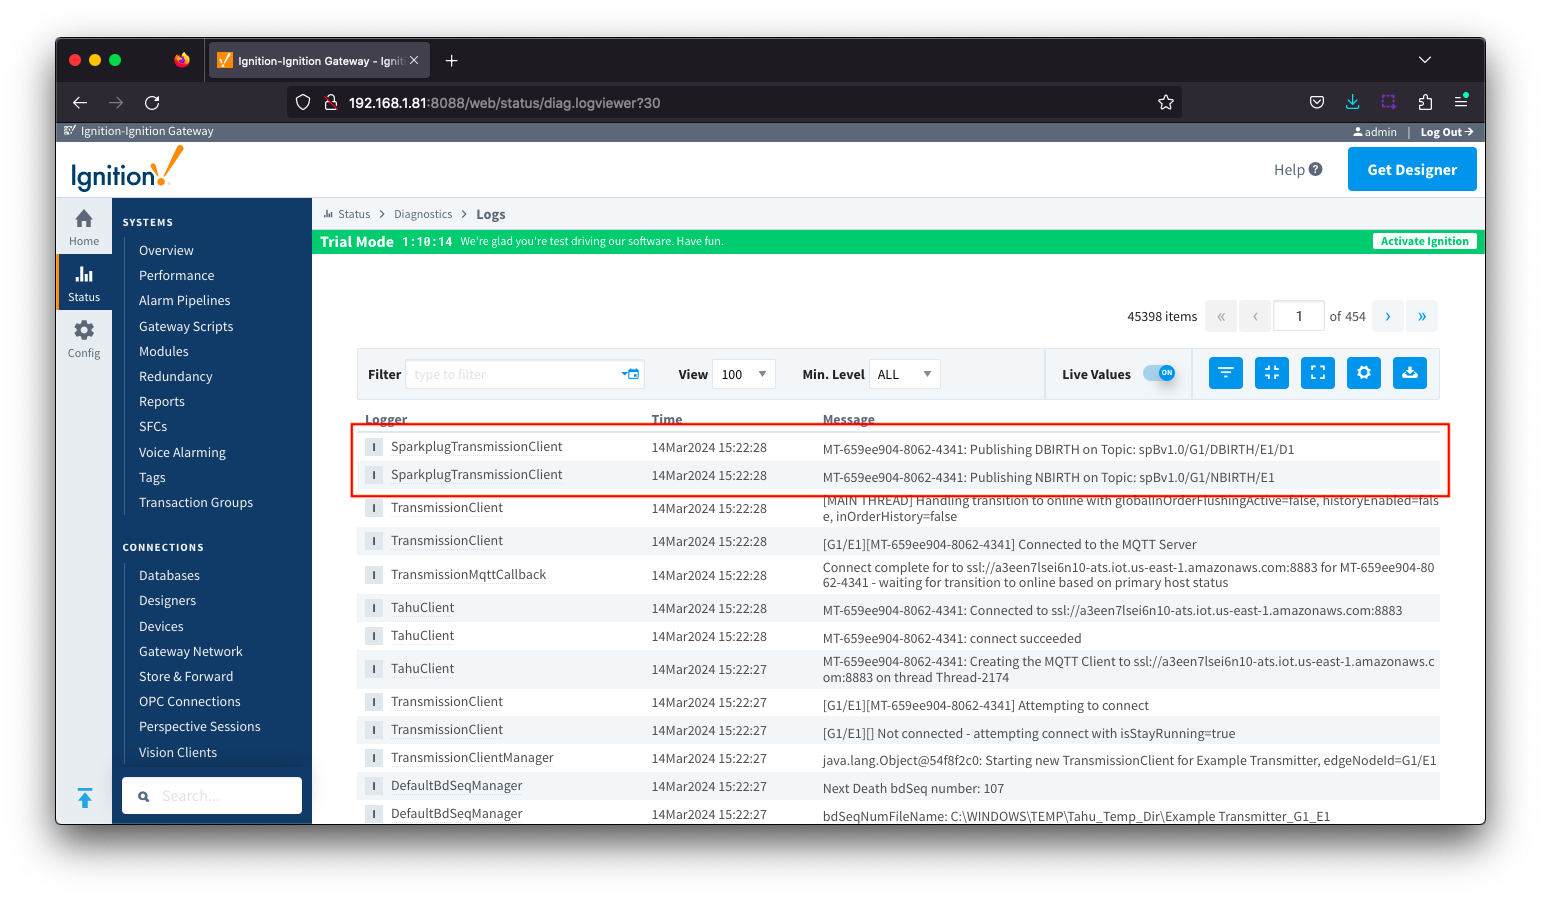
To confirm messages are published from Transmission, navigate to the Ignition logs and Refresh Transmission. This will cause the client to disconnect, reconnect and publish its BIRTH messages.
The SparkplugTransmissionClient logger will show the NBIRTH and DBIRTH messages pushed.
To confirm messages are received as AWS IoT Core. On your AWS account, navigate to AWS IoT > Test > MQTT test client.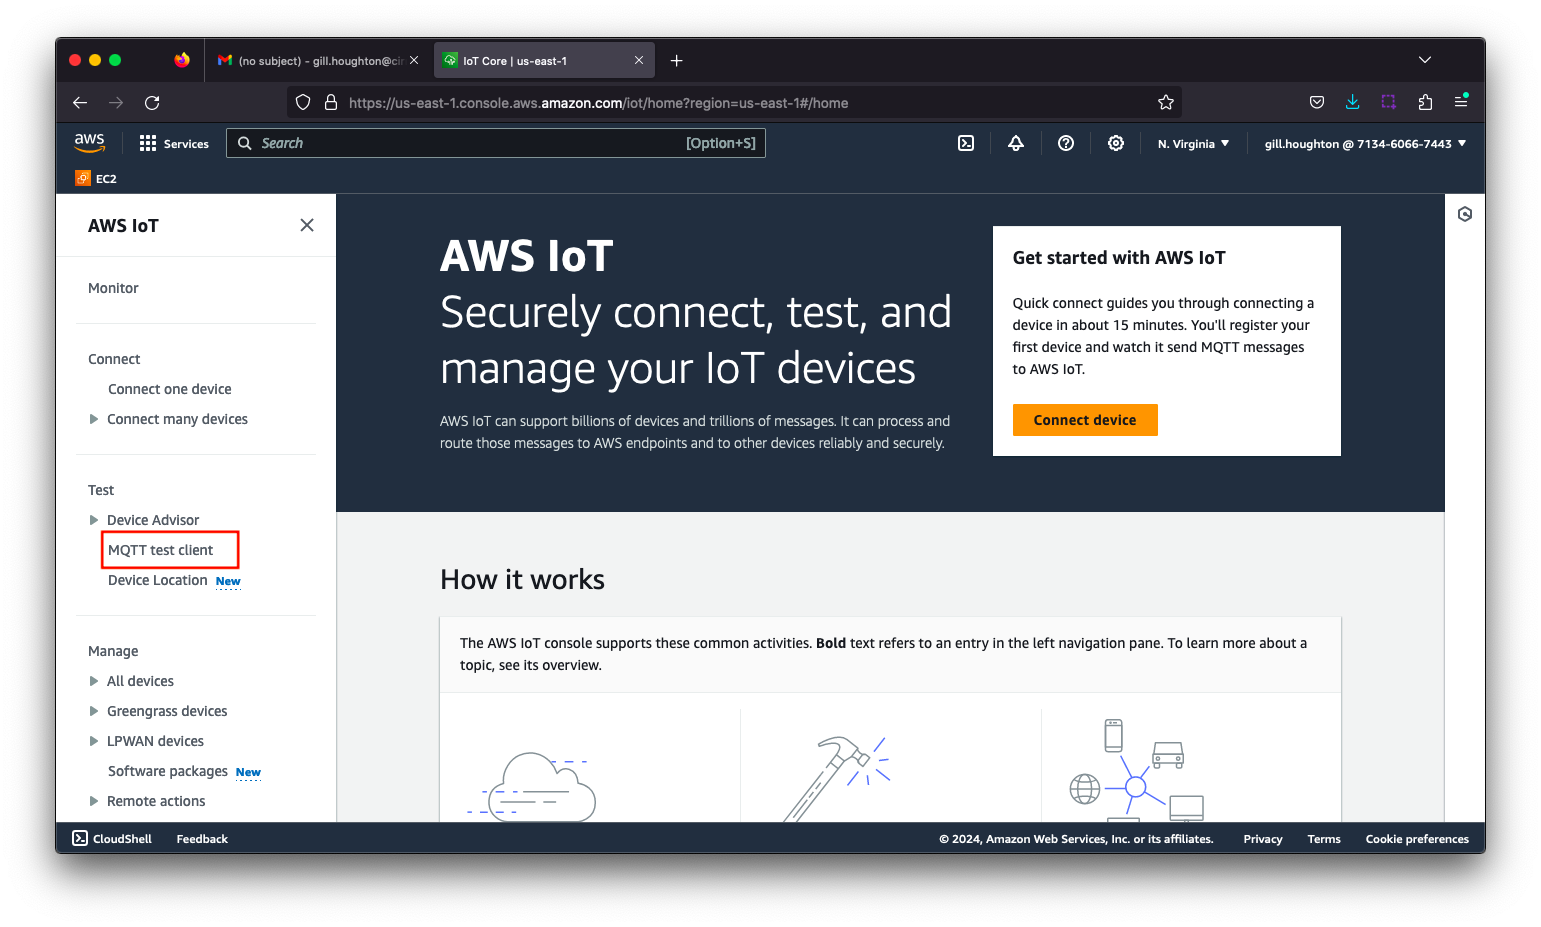
Select and subscribe on # to receive all published messages

On a Transmission Refresh you will see all DEATH messages published on the disconnect along with the new BIRTH messages on the reconnect. 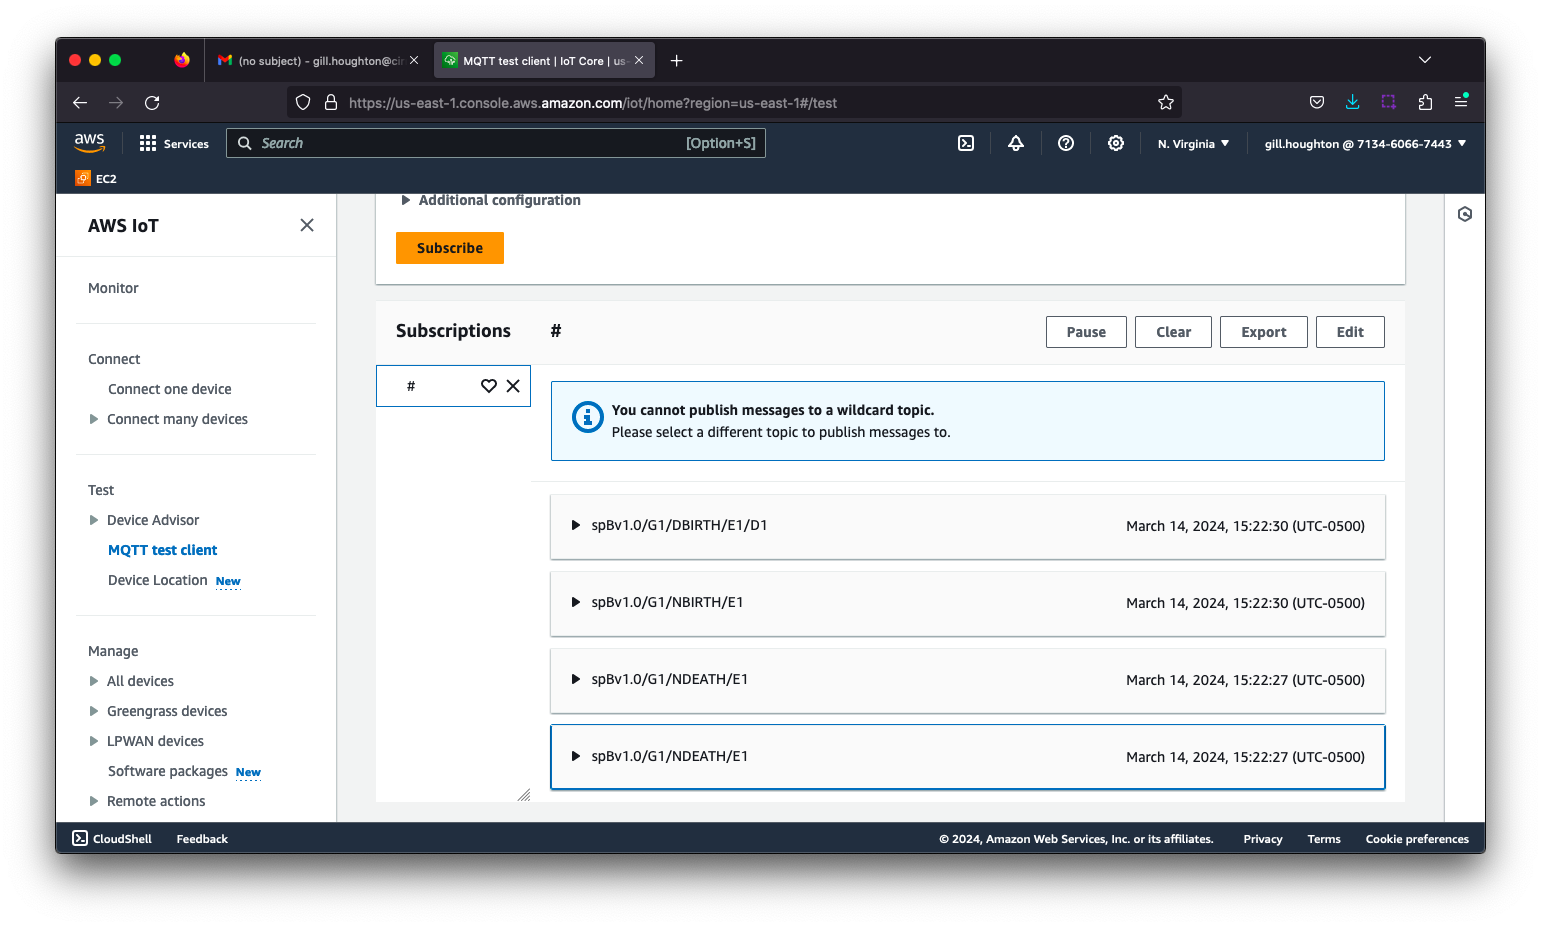
Additional Resources
- Inductive Automation's Ignition download with free trial
- Cirrus Link Solutions Modules for Ignition
- Support questions
- Sales questions
- About Cirrus Link